• Studio Work
  • Salmon Bend
  • Site Specific Work
  • Store
  • Bio
  • Contact
  • Blog
Menu

Gabe Babcock

Fine Art
  • Studio Work
  • Salmon Bend
  • Site Specific Work
  • Store
  • Bio
  • Contact
  • Blog

-

These Blogs are for sharing the design and fabrication processes of projects.

Proposal Sketch
Proposal Sketch

Knowing where to find this Rail Rd. Rail I was able to design the concept with it in mind.

In Contrast with Sketch

Project Installed at Oregon City Development Center

Rock Hoisted off Trailer

Structure build to hold the Rock to maneuver/rotate/flip to work on all sides

Process time lapse series
Process Timelapse Series
Hot Saw
Hot Saw
Adjusting clamps for Rotation
Concrete Drill
Concrete Drill

Drilling a hole for new anchor to rotate Sphere.

Using Hot Saw
Using Hot Saw

I used a hot saw to cut striated lines and to then chisel out pieces at a time.

Rotating Sphere
Rotating Sphere

Several times i had to get a different face upright to work on.  A fork lift would have made this process easier, but a pallet jack and man power made it happen.

Success
Success

It was nessasary to have a blocks to stop the momentum of the ball from continuing to roll.  The cable helped accomplish this but once the 4000 sphere started its roll there wasn' t much to do to stop it...

pneumatic Chisel
pneumatic Chisel

Don't let the old school photos fool you.  THERE are purist out there, i am sure, but after 2 days of hammer and chisel i was directed to a pneumatic one...then looking in the background of some of Naguchi's photos you can see the Compressor and Chisels in the back ground. 

Chiseling
Chiseling

Pneumatic was much faster...but 7 days strait will give you tendonitis...sleep was limited during the process and what ever sleep i got was interupted with arm aches and buzzes.  

Smoothing
Smoothing

After roughing out the striated marks with a flat chisel i went over it with a pulverizing bit to make it look like a huge golf ball.

Polishing
Polishing
Loaded onto the Trailer

Concrete and Rail in the back, Polished ball in front.  It was strapped down after this.  Come-alonged the  ball up a ramp on a pallet jack....

Installed
Installed

The fallowing cracks in the rock with a chisel i was able to create valleys that i filled with achrylic based concerete.

View from Top
View from Top
Close-up of Cable
Close-up of Cable

The cable was used for the construction process but also served its prupose for the concept.

Proposal Sketch In Contrast with Sketch Rock Hoisted off Trailer Process time lapse series Process Timelapse Series Process Timelapse Series Process Timelapse Series Process Timelapse Series Process Timelapse Series Process Timelapse Series Hot Saw Adjusting clamps for Rotation Concrete Drill Using Hot Saw Rotating Sphere Success pneumatic Chisel Chiseling Smoothing Polishing Loaded onto the Trailer Installed View from Top Close-up of Cable

Tethered @ Willamette Falls

April 22, 2015

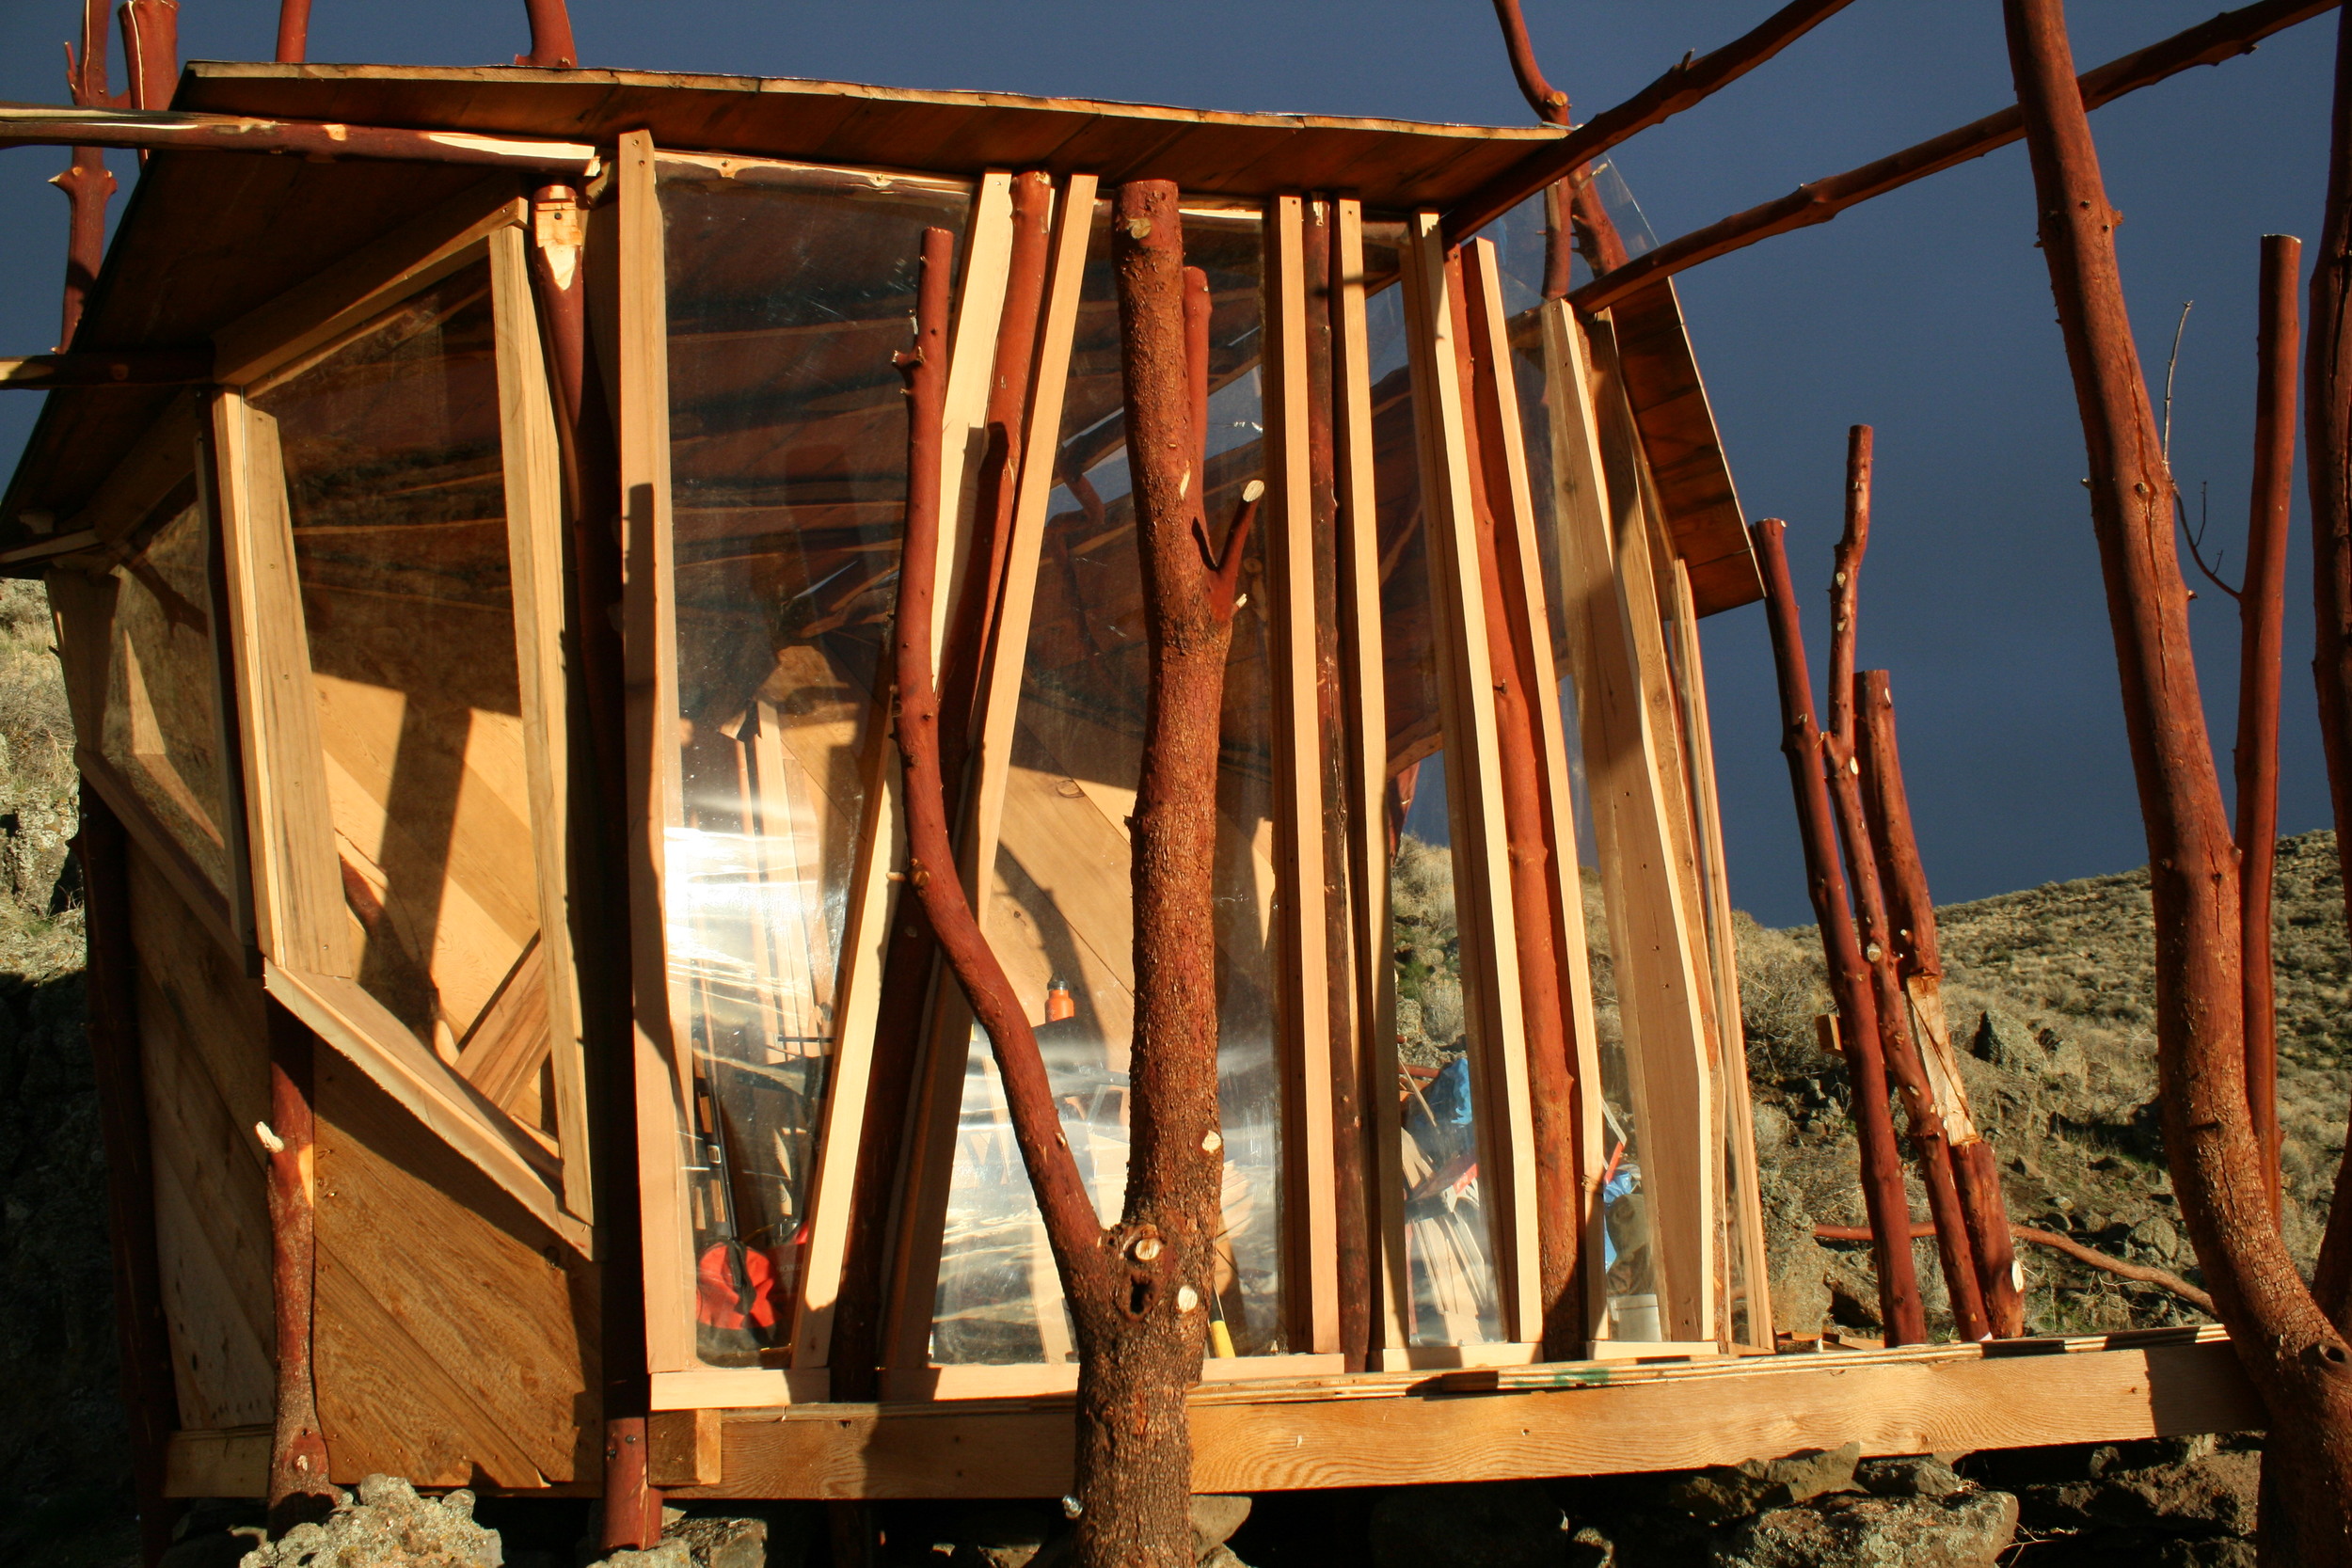
After a day exploring the Blue Heron Mill site at Willamette Falls, my focus was on intervention and control.  I saw a 6 ft concrete stem wall on the perimeter of the basalt bedrock falls, with an additional 3 ft wooden wall (seasonal) atop that. With a power plant on the opposite bank playing for maximum efficiency of flow, three large tubes inflate and deflate on command in the main spillway...The second largest waterfall in North America (by volume) had been transformed into a water fountain.  So, as with much of industry, it seems that the natural wholeness and process is tethered to our need to achieve efficiency, comfort and control...

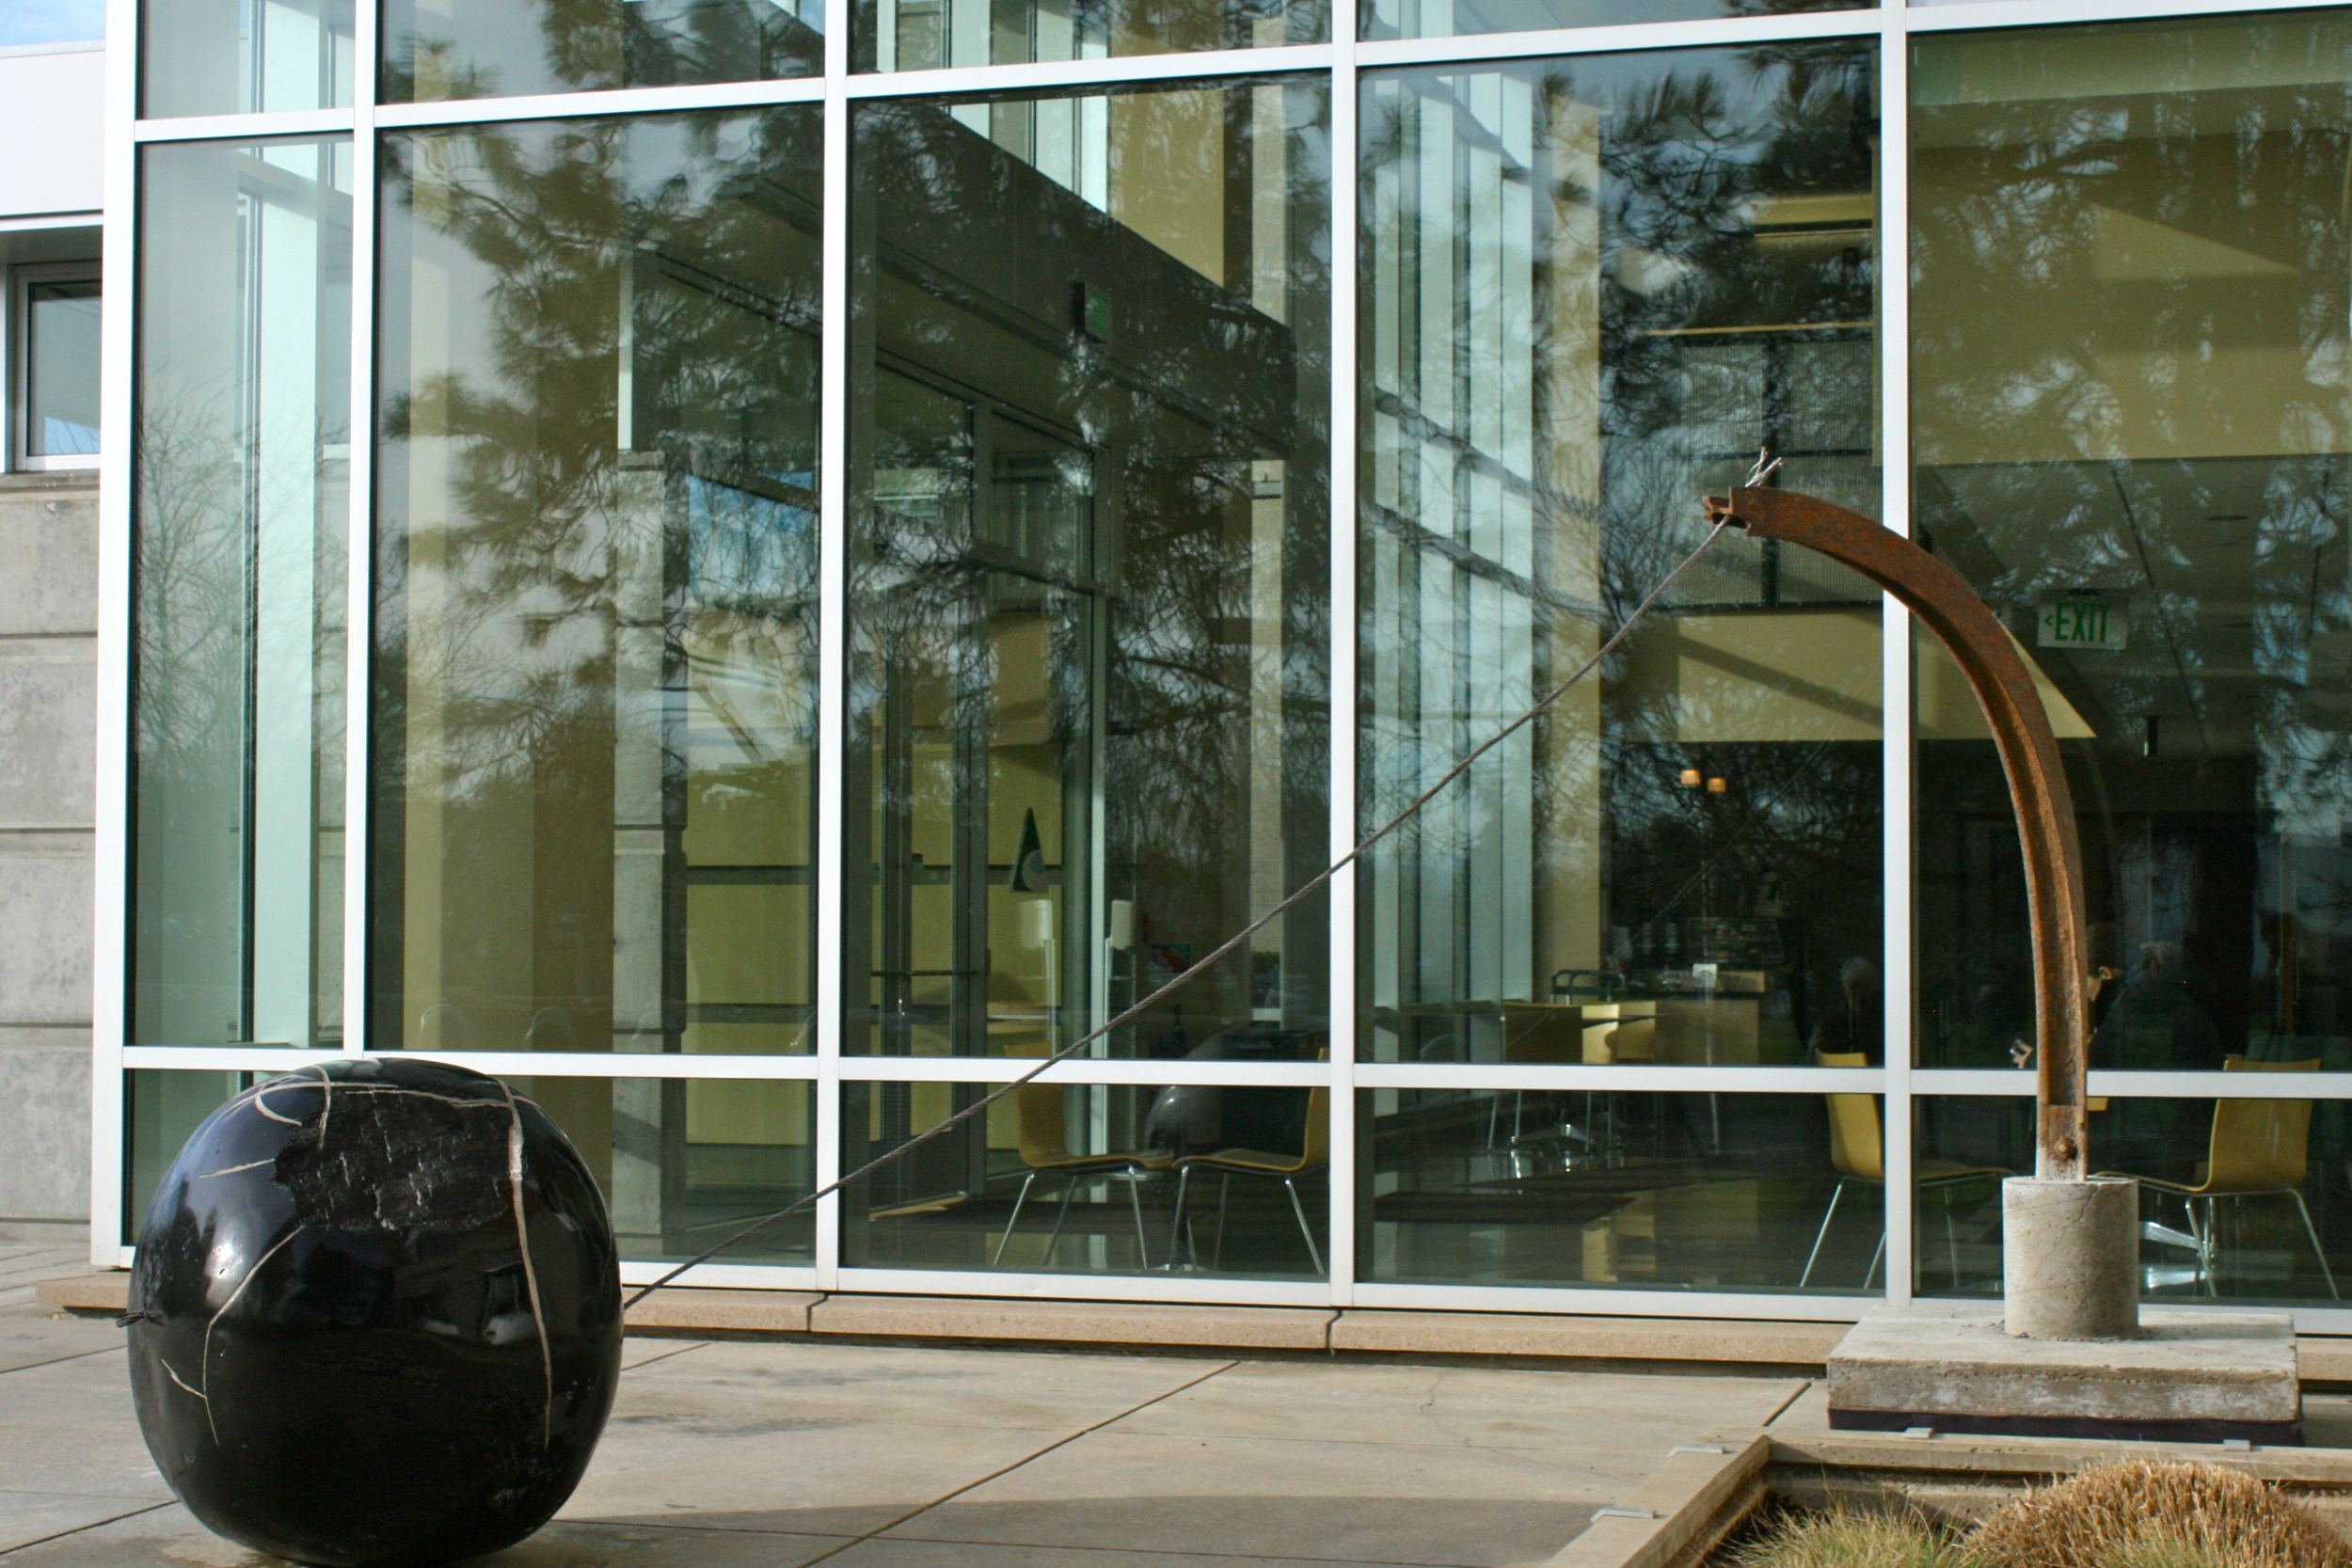
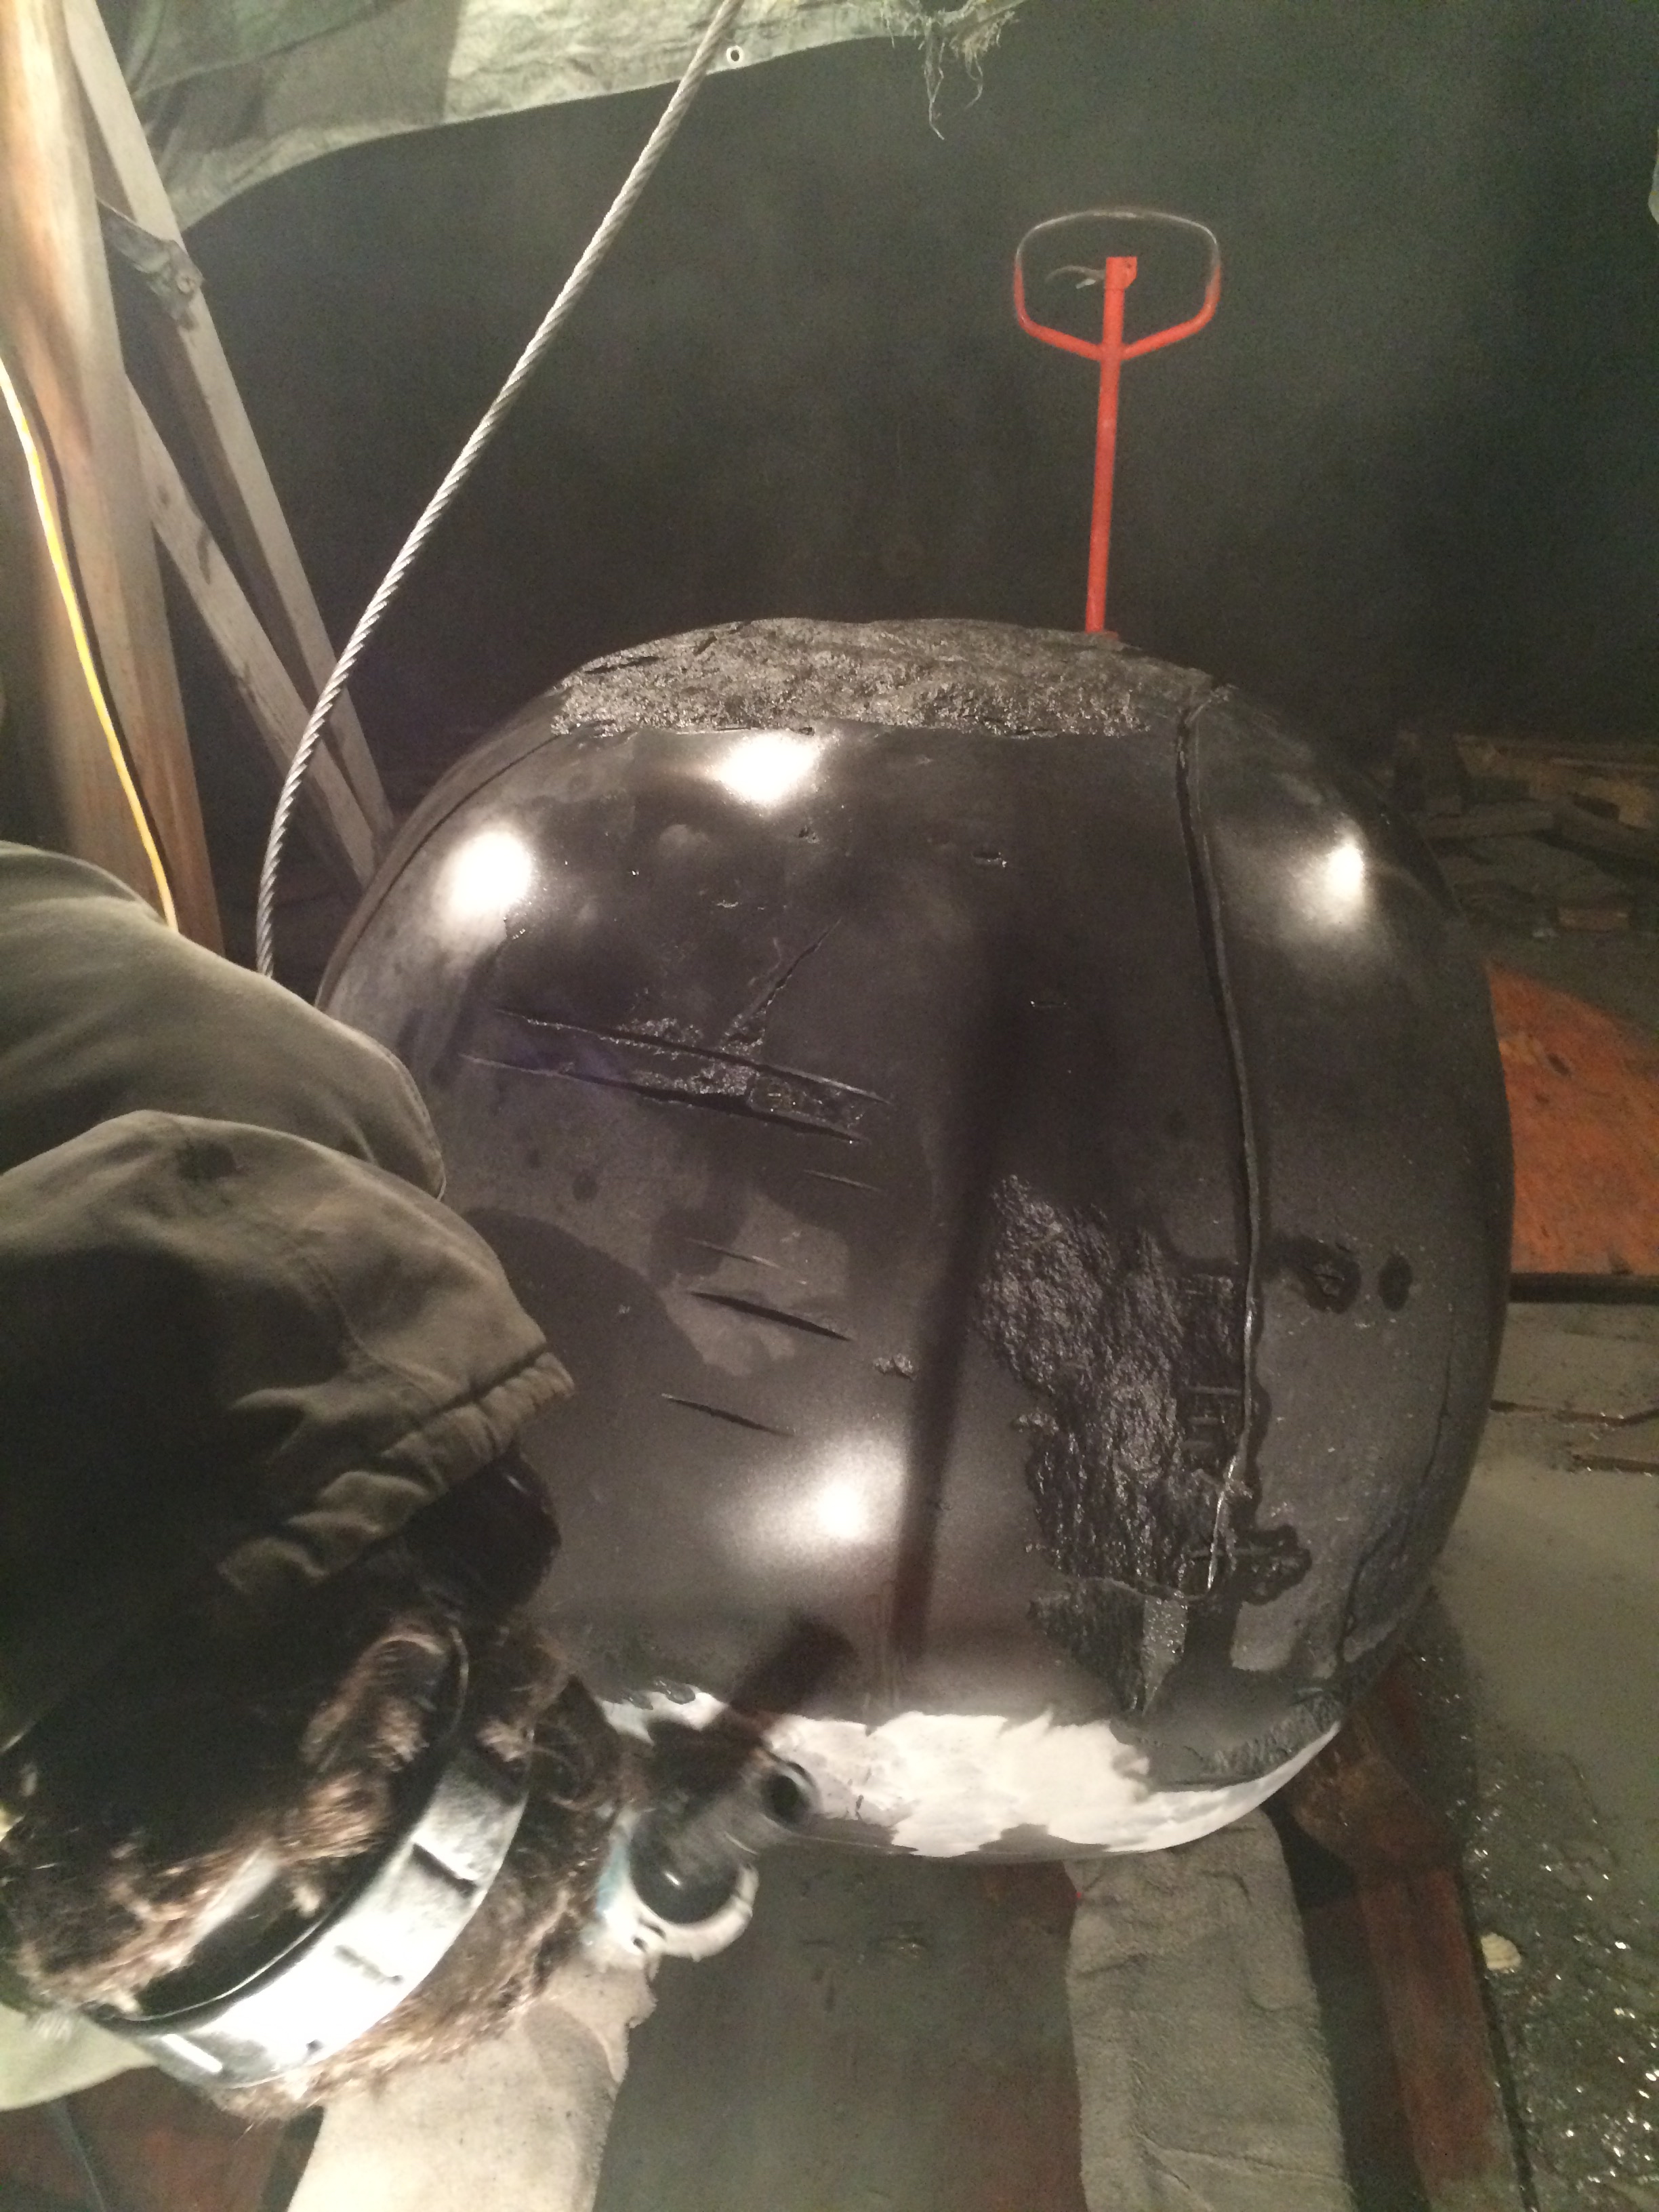
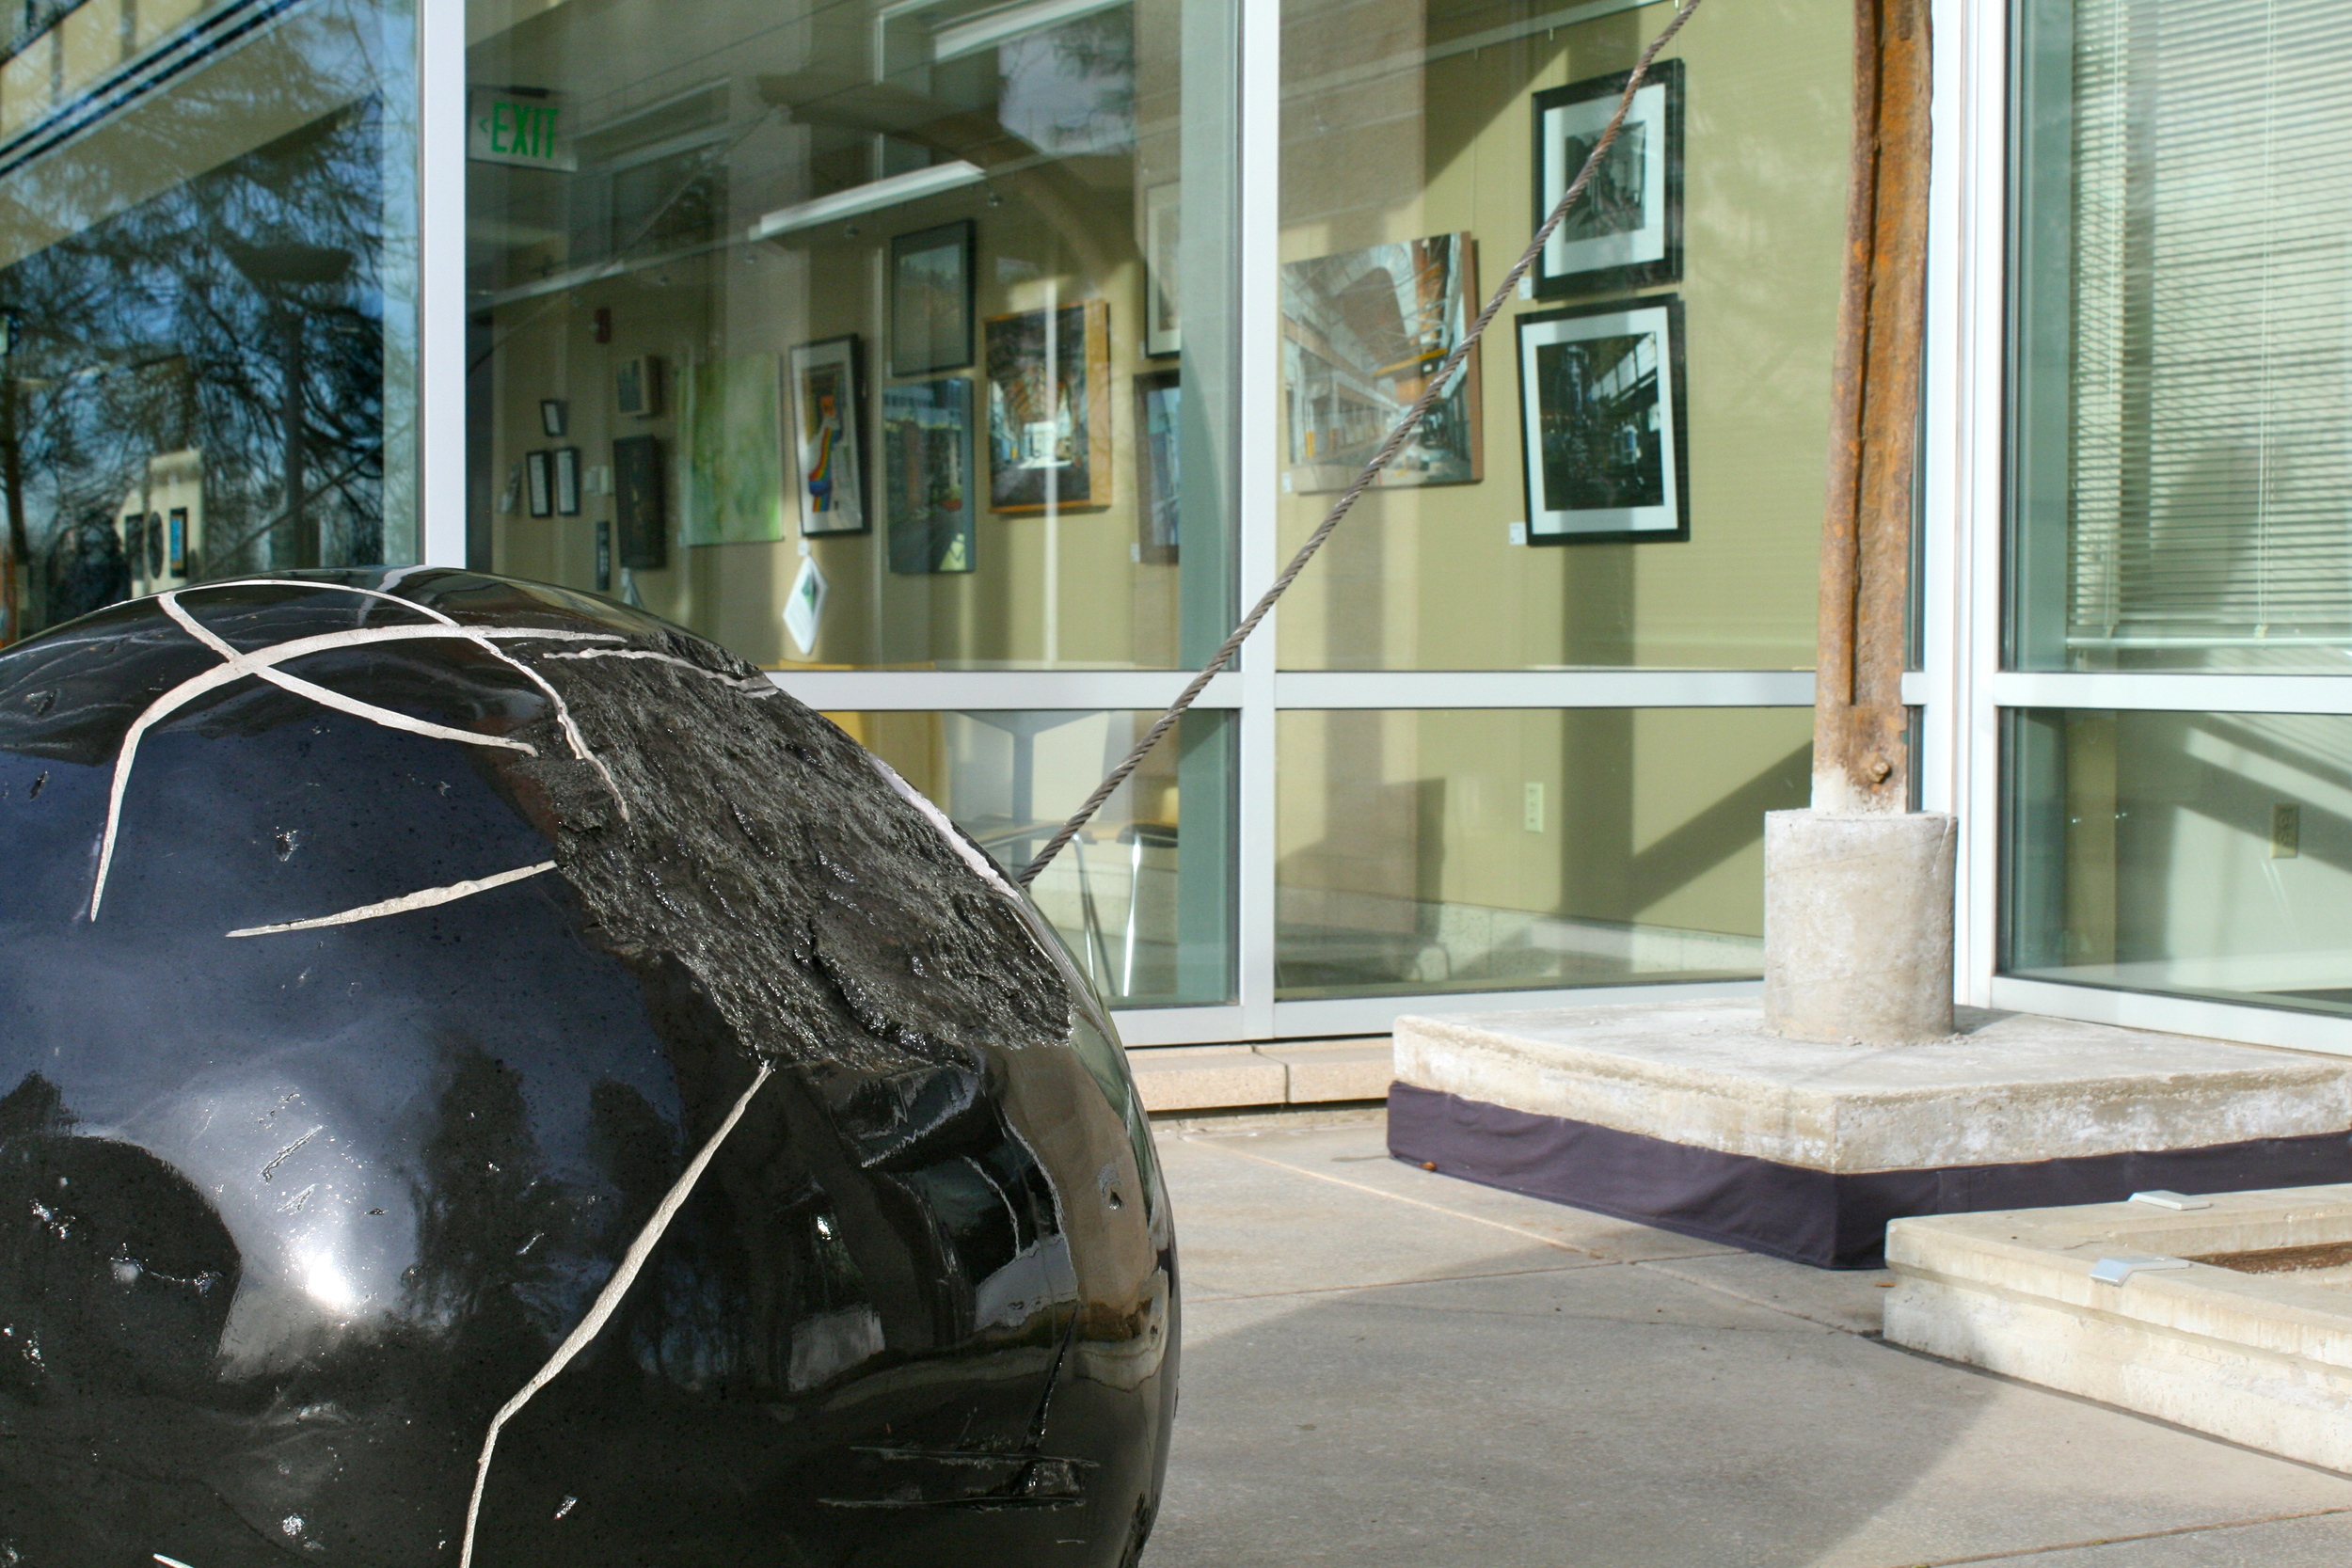
The rail and concrete represent industry, in use and strength.  The rounded basalt, being the bedrock of the falls and the Blue Heron Mill site, speaks for natural wholeness. The cracks filled with concrete show the ways we've broken this wholeness and "fix" it to fit our needs. A process that seems continuous. The bent rail was found and packed out of a Nameless coastal river where high water inconceivably bent and broke the steel....representing nature's way of struggling to remain omnipresent but, with our ways, never able to be free.

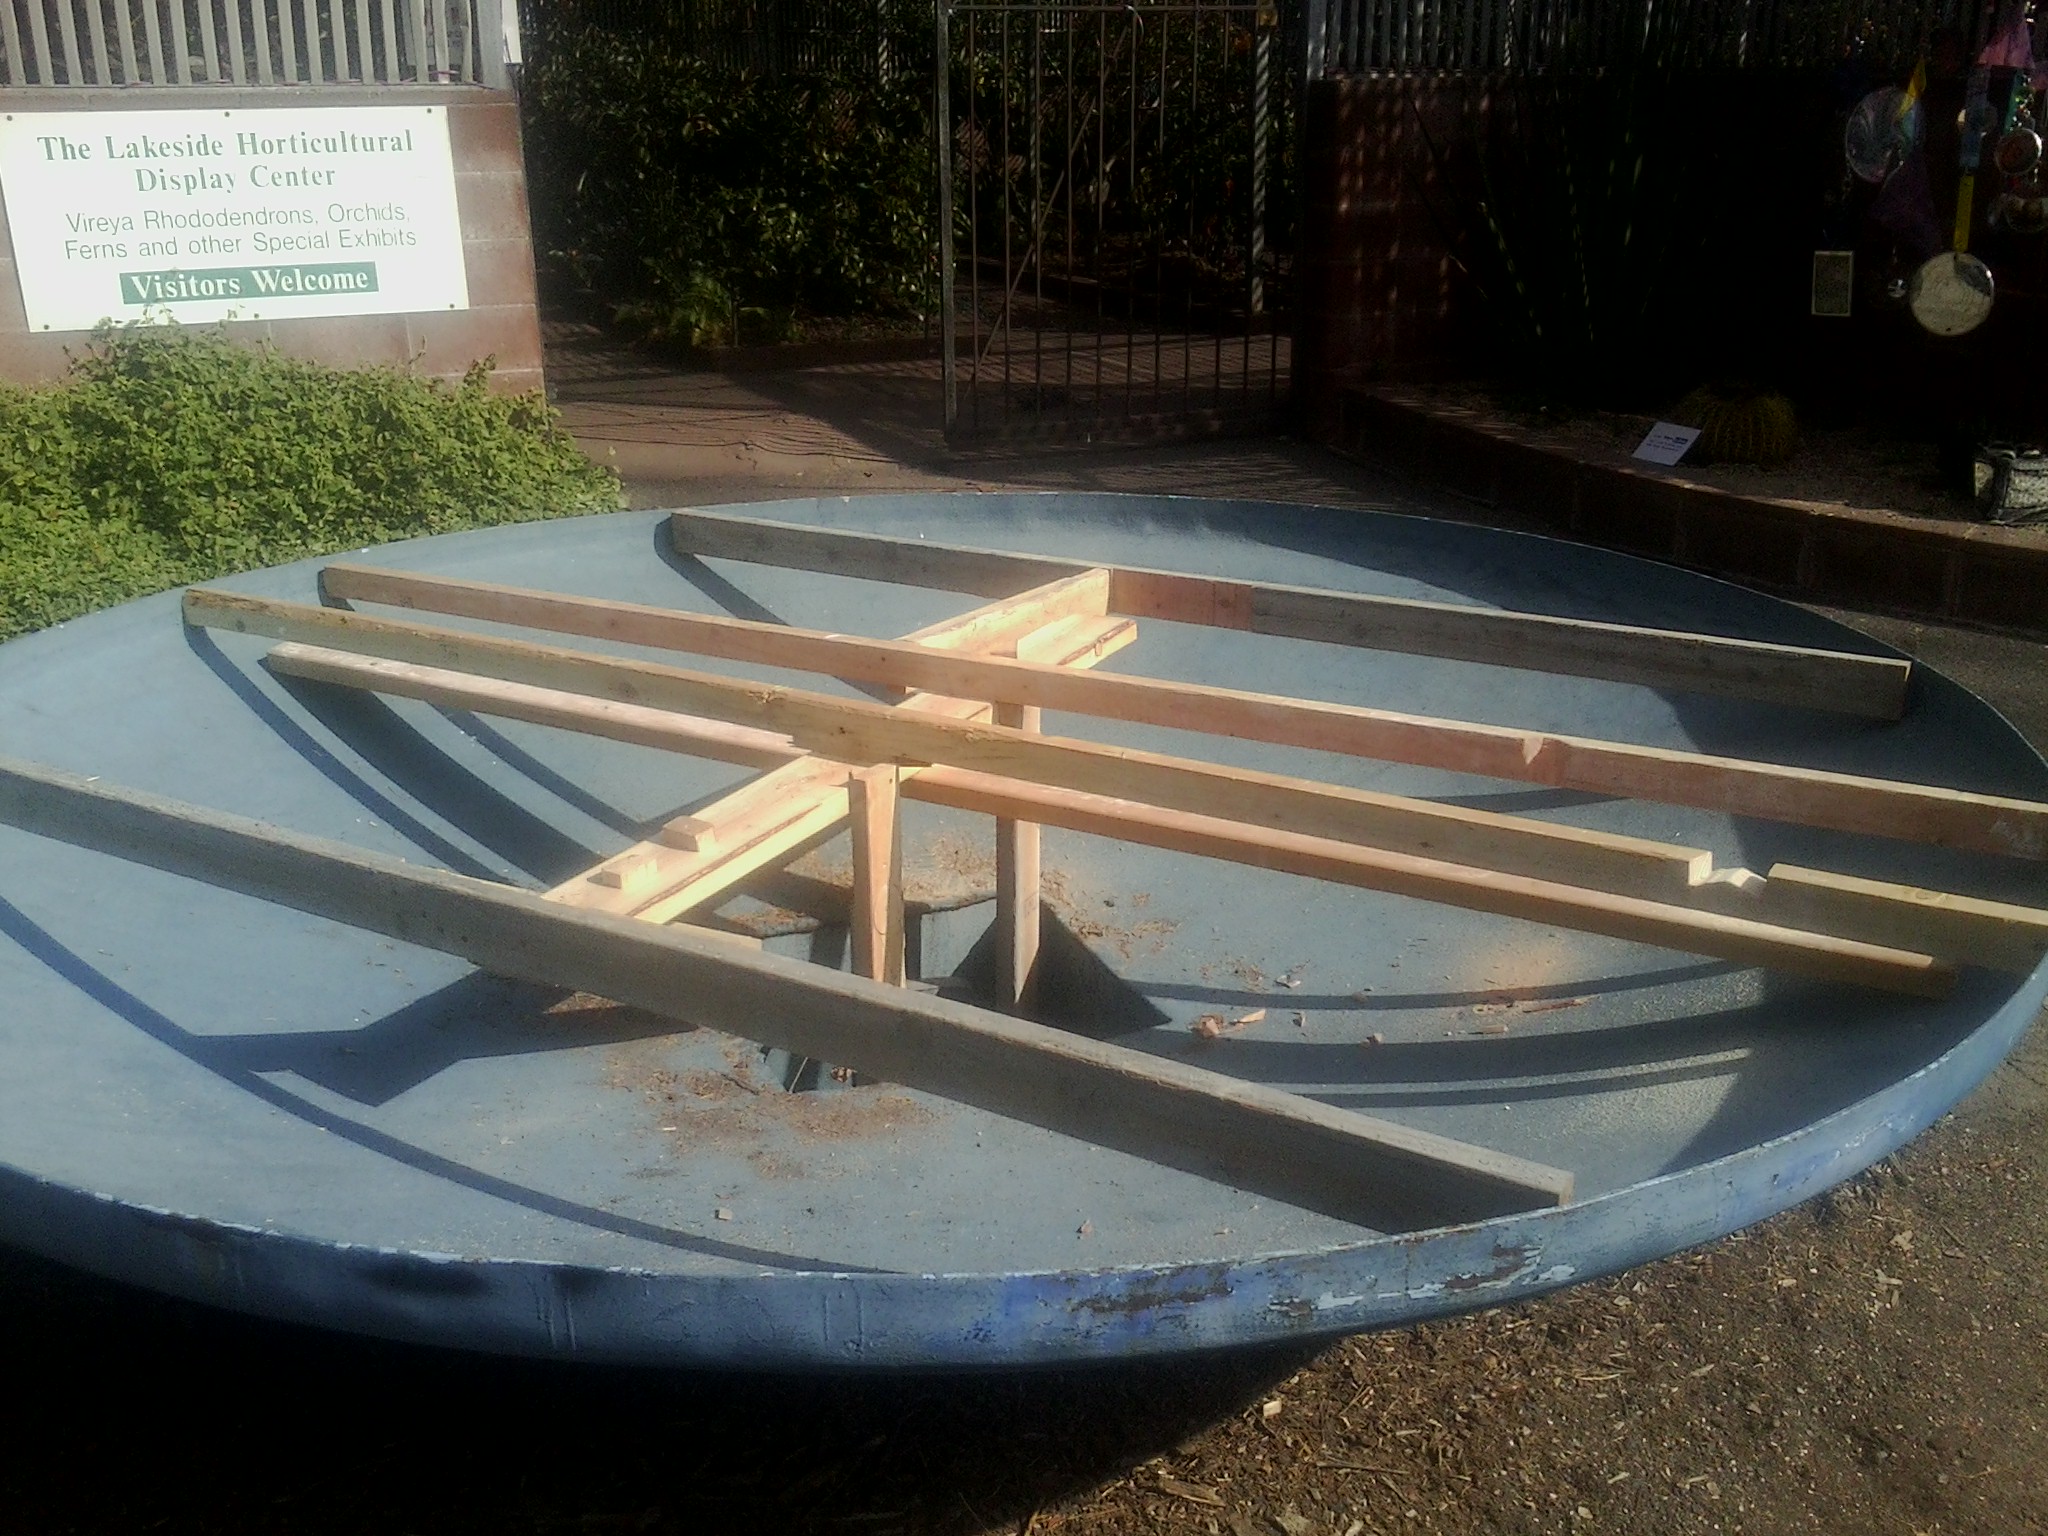
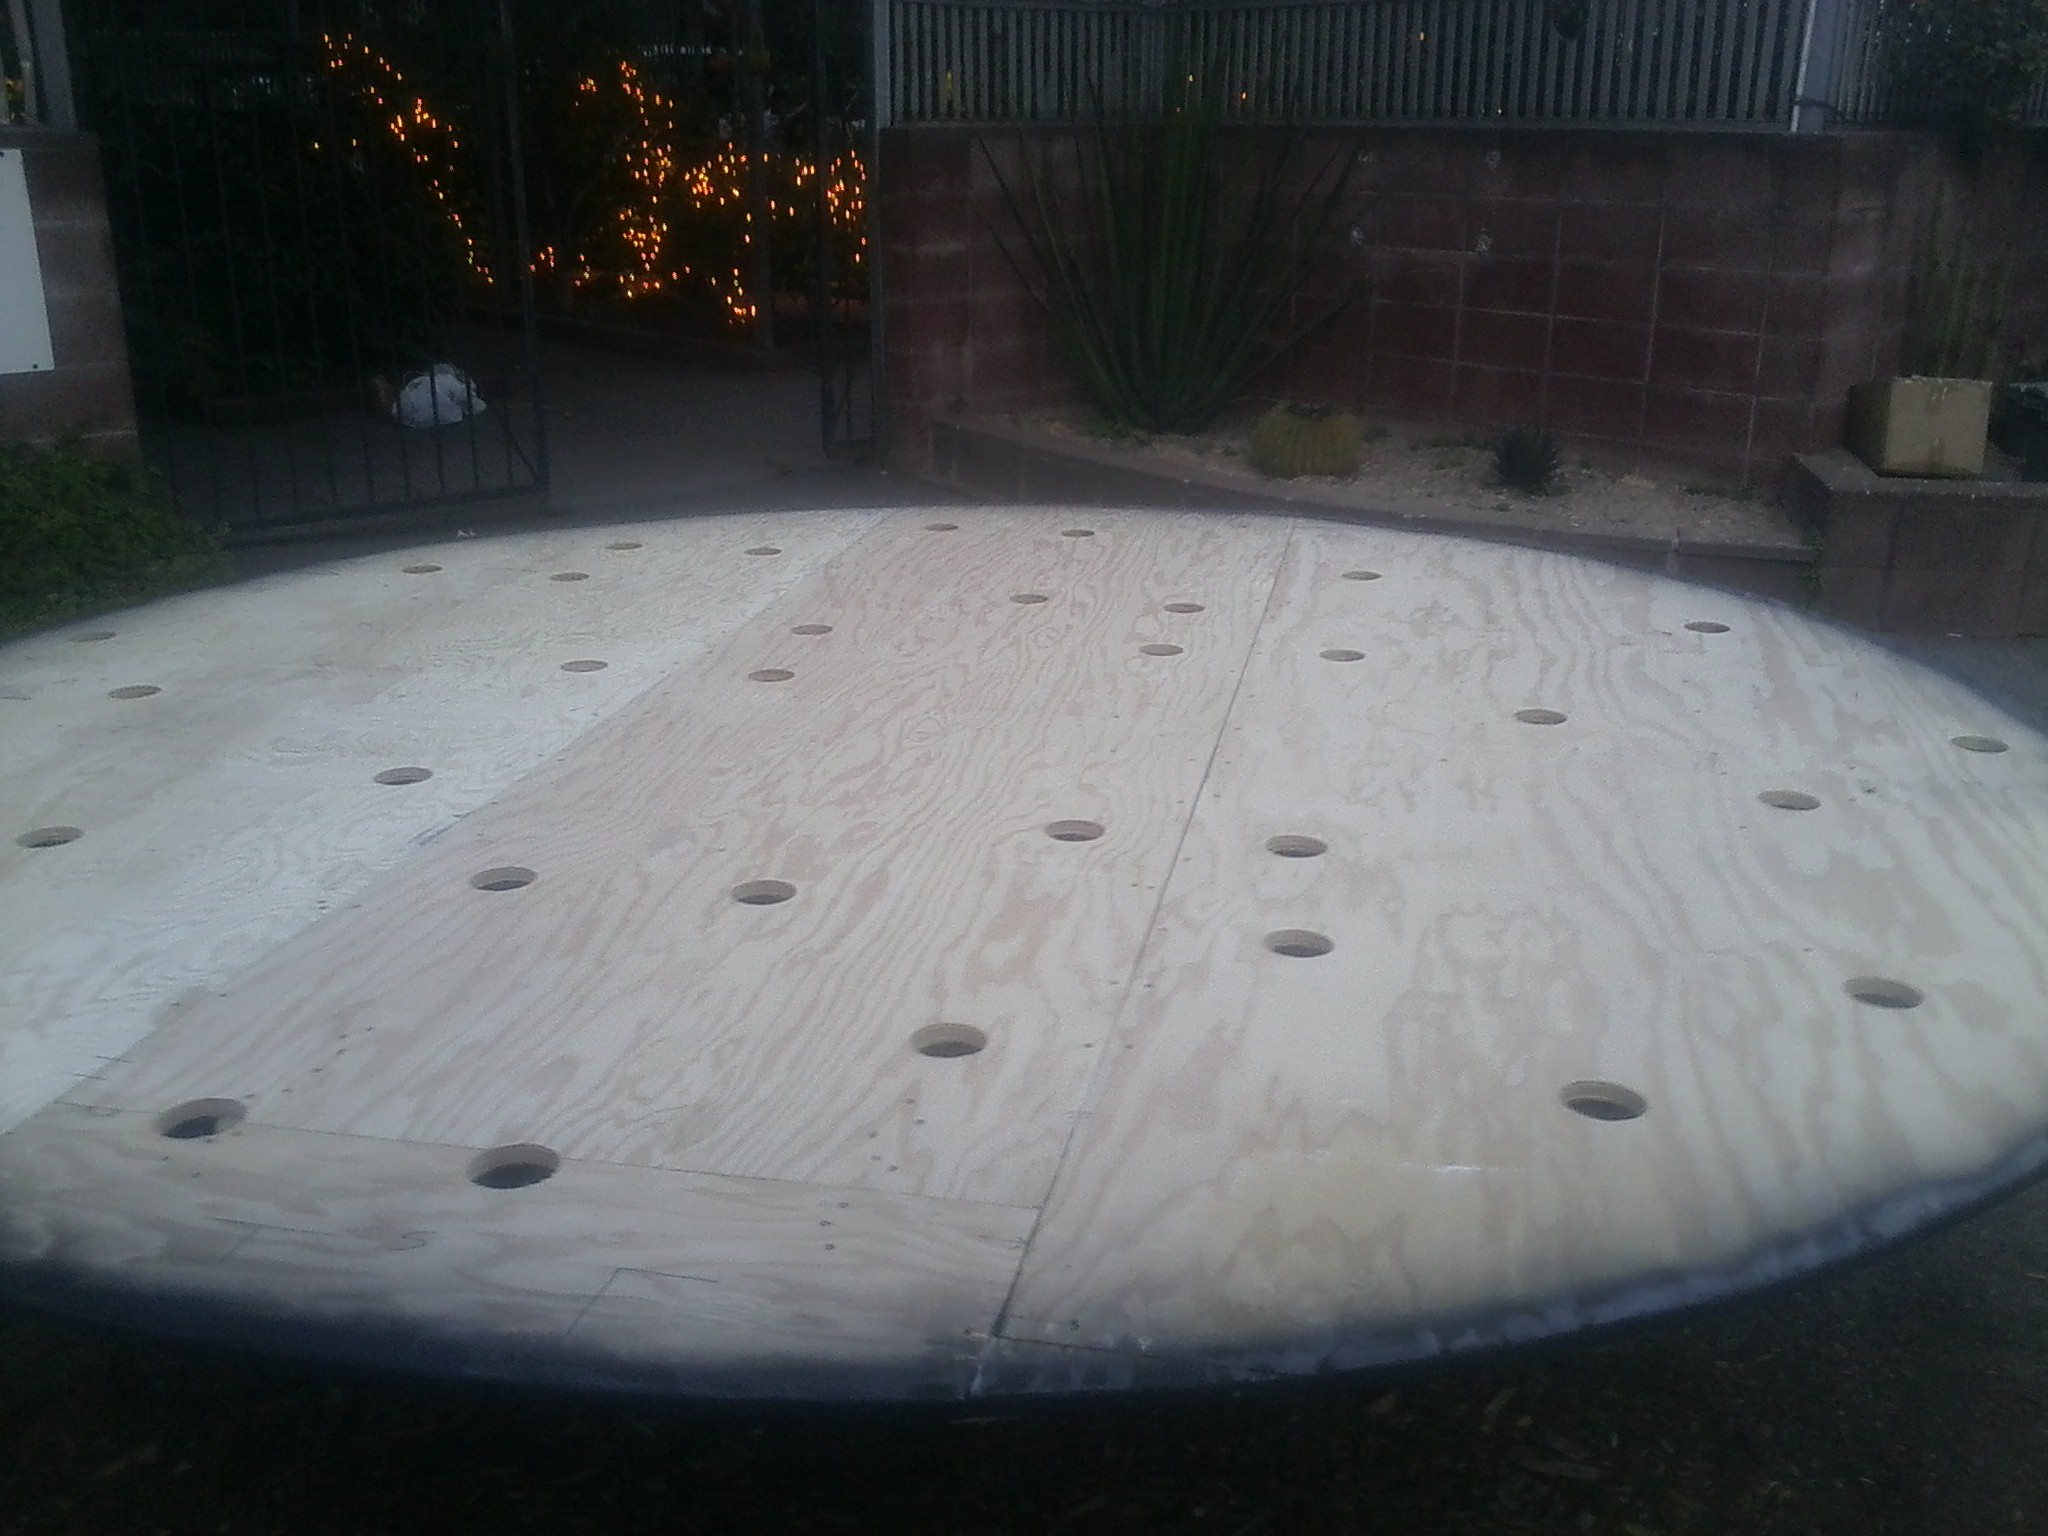
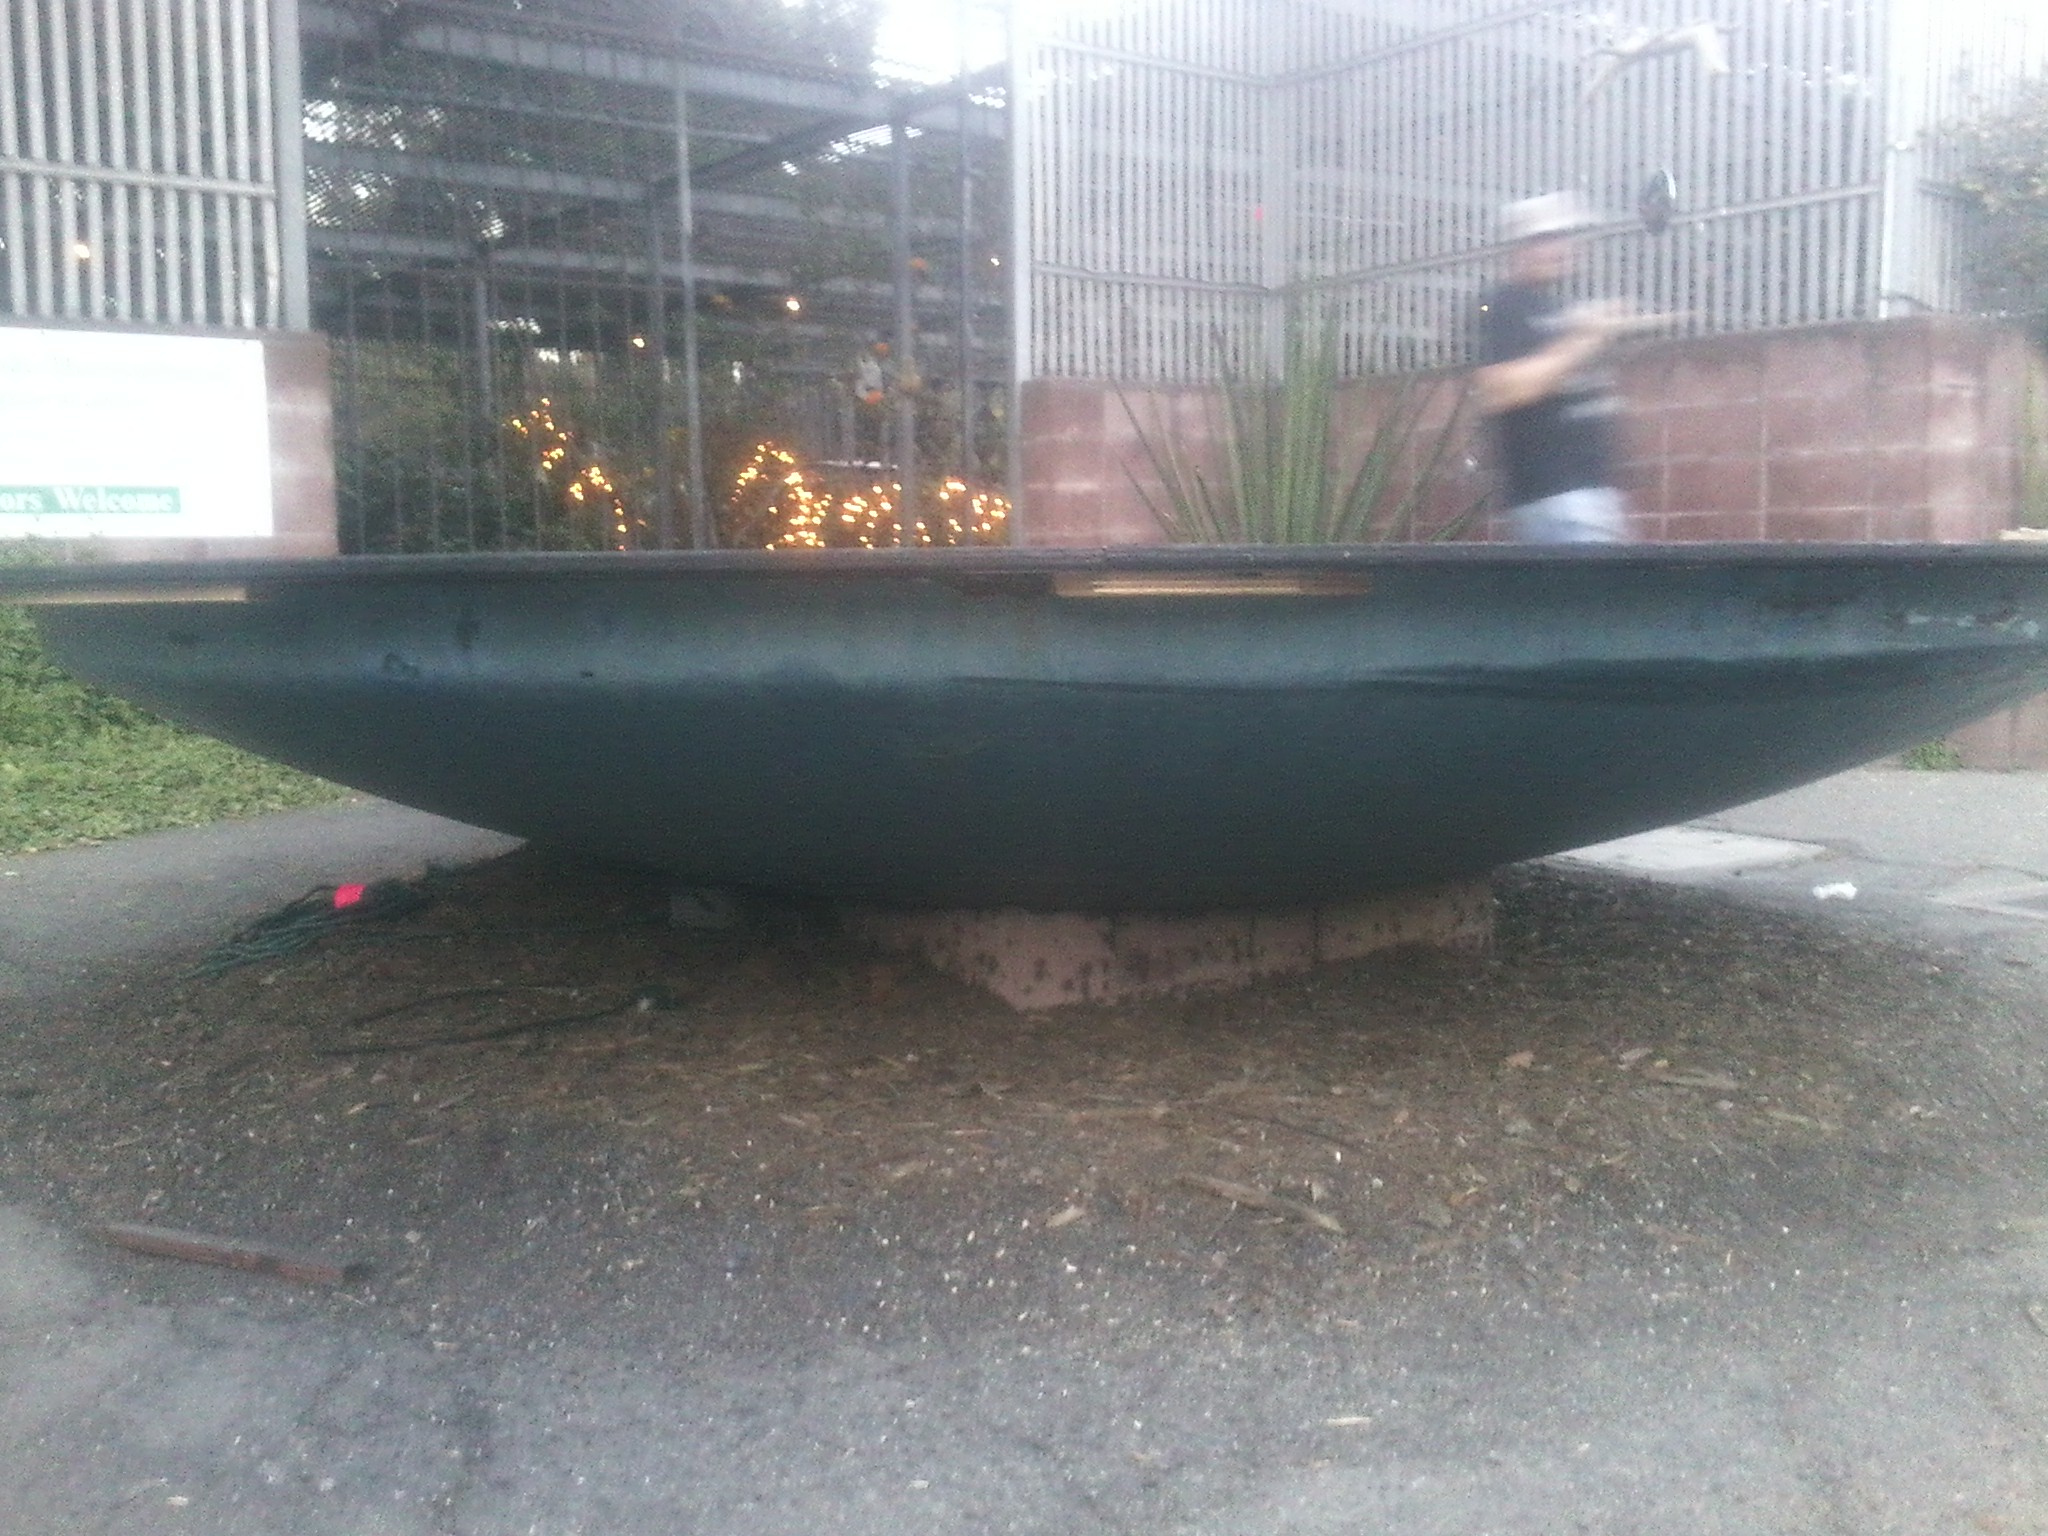
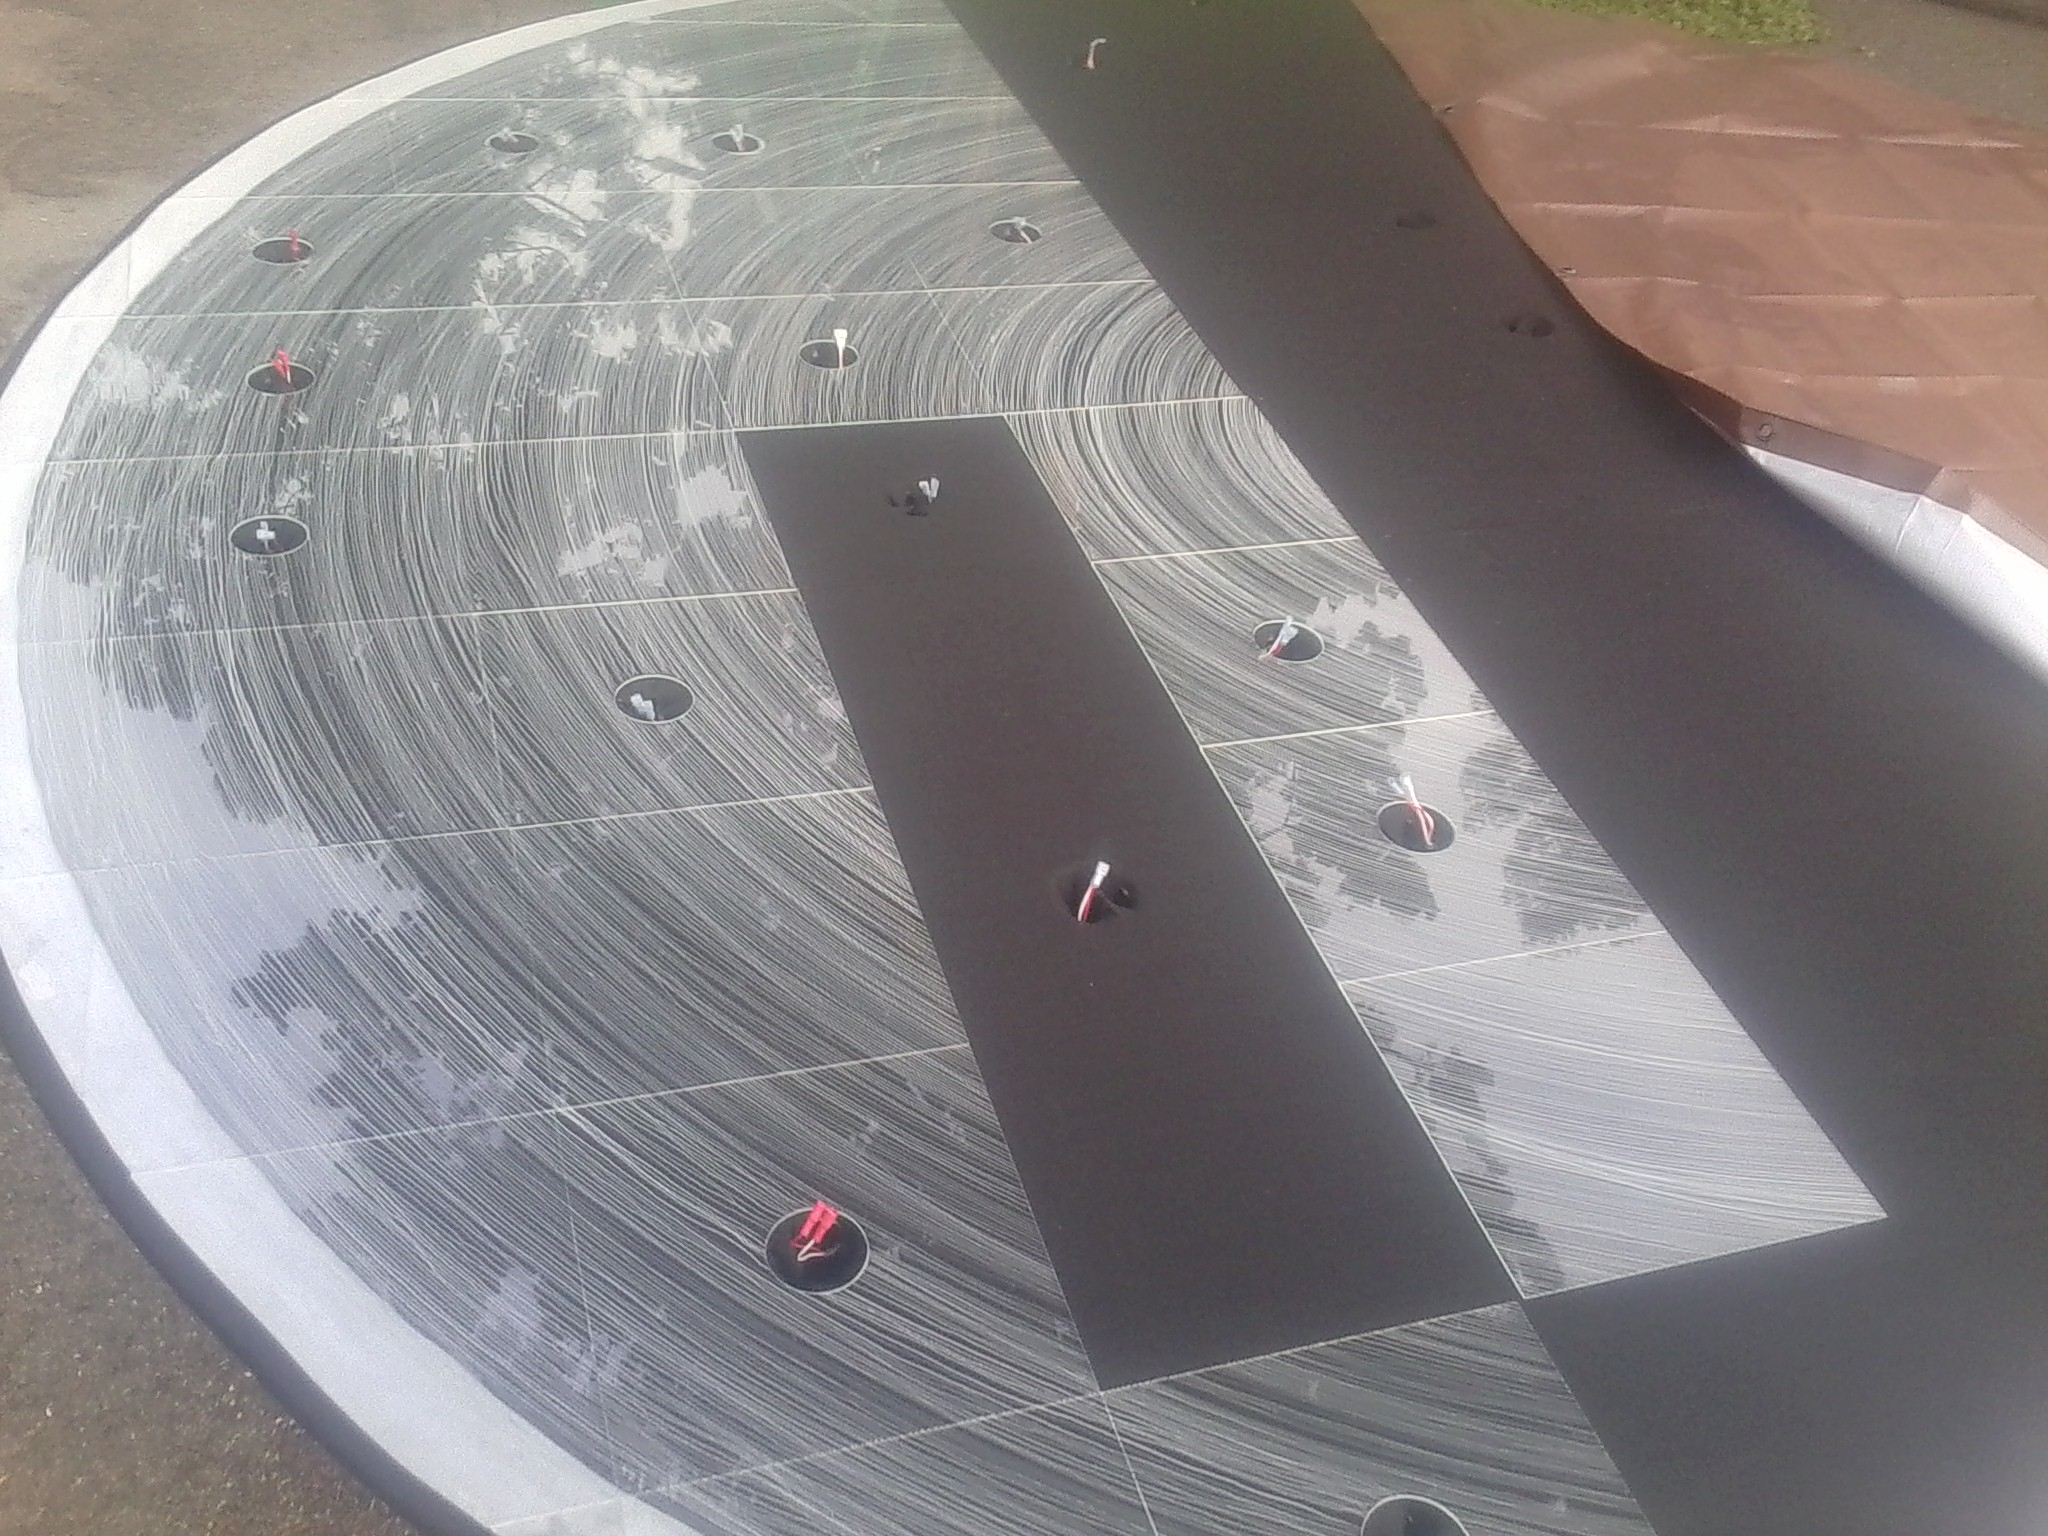
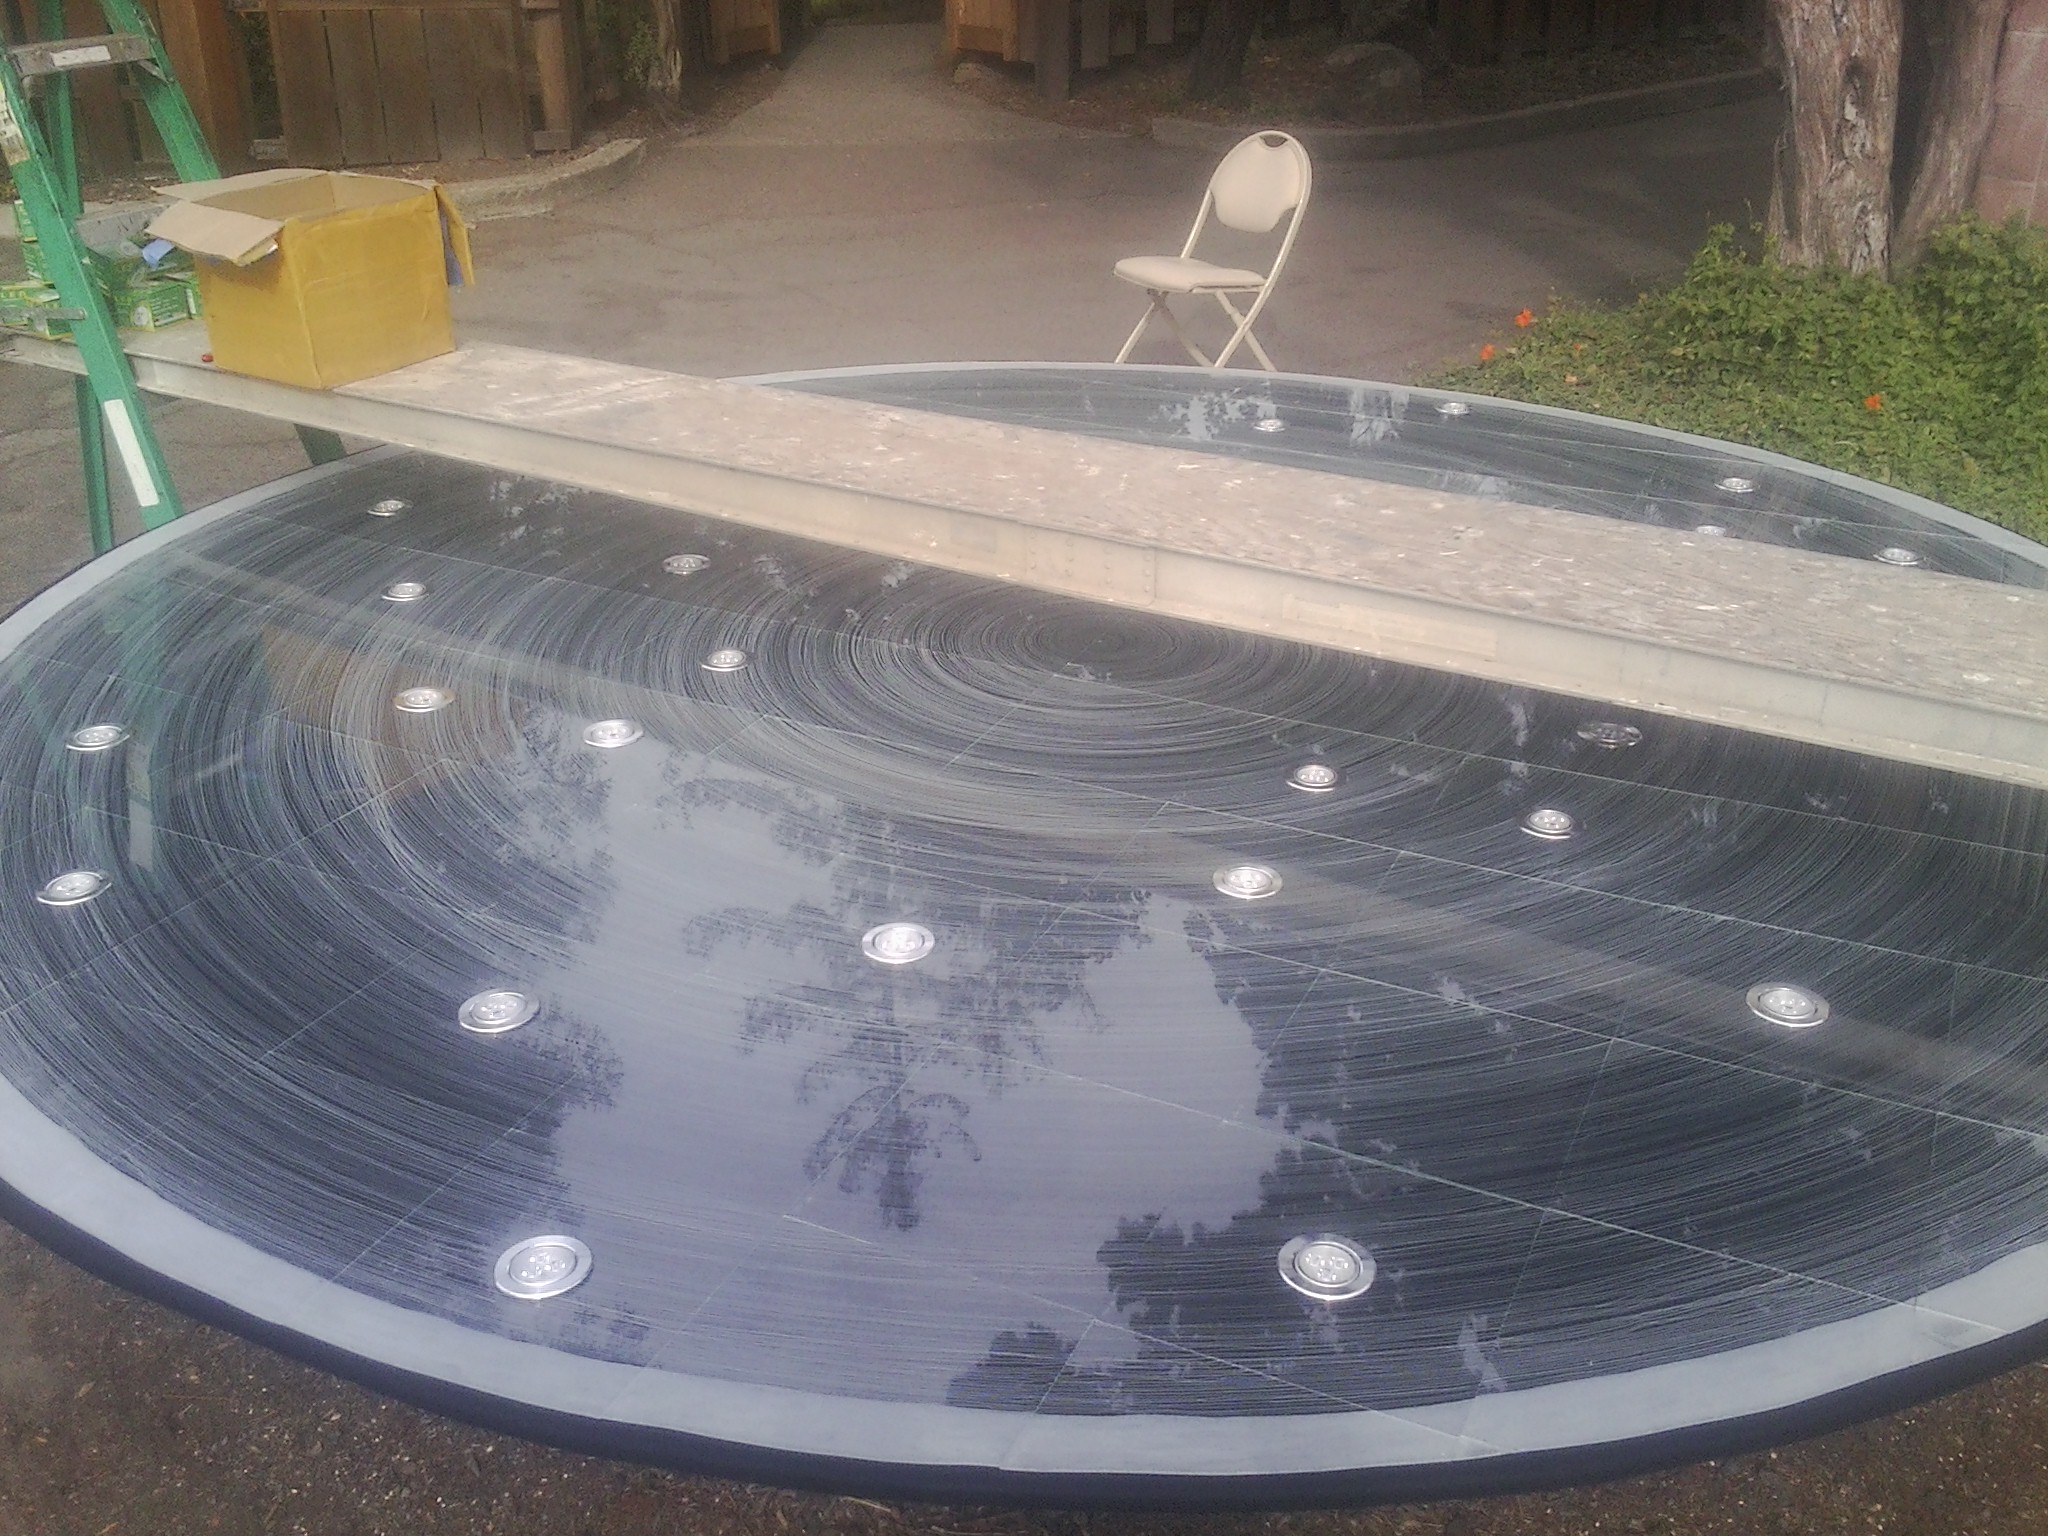
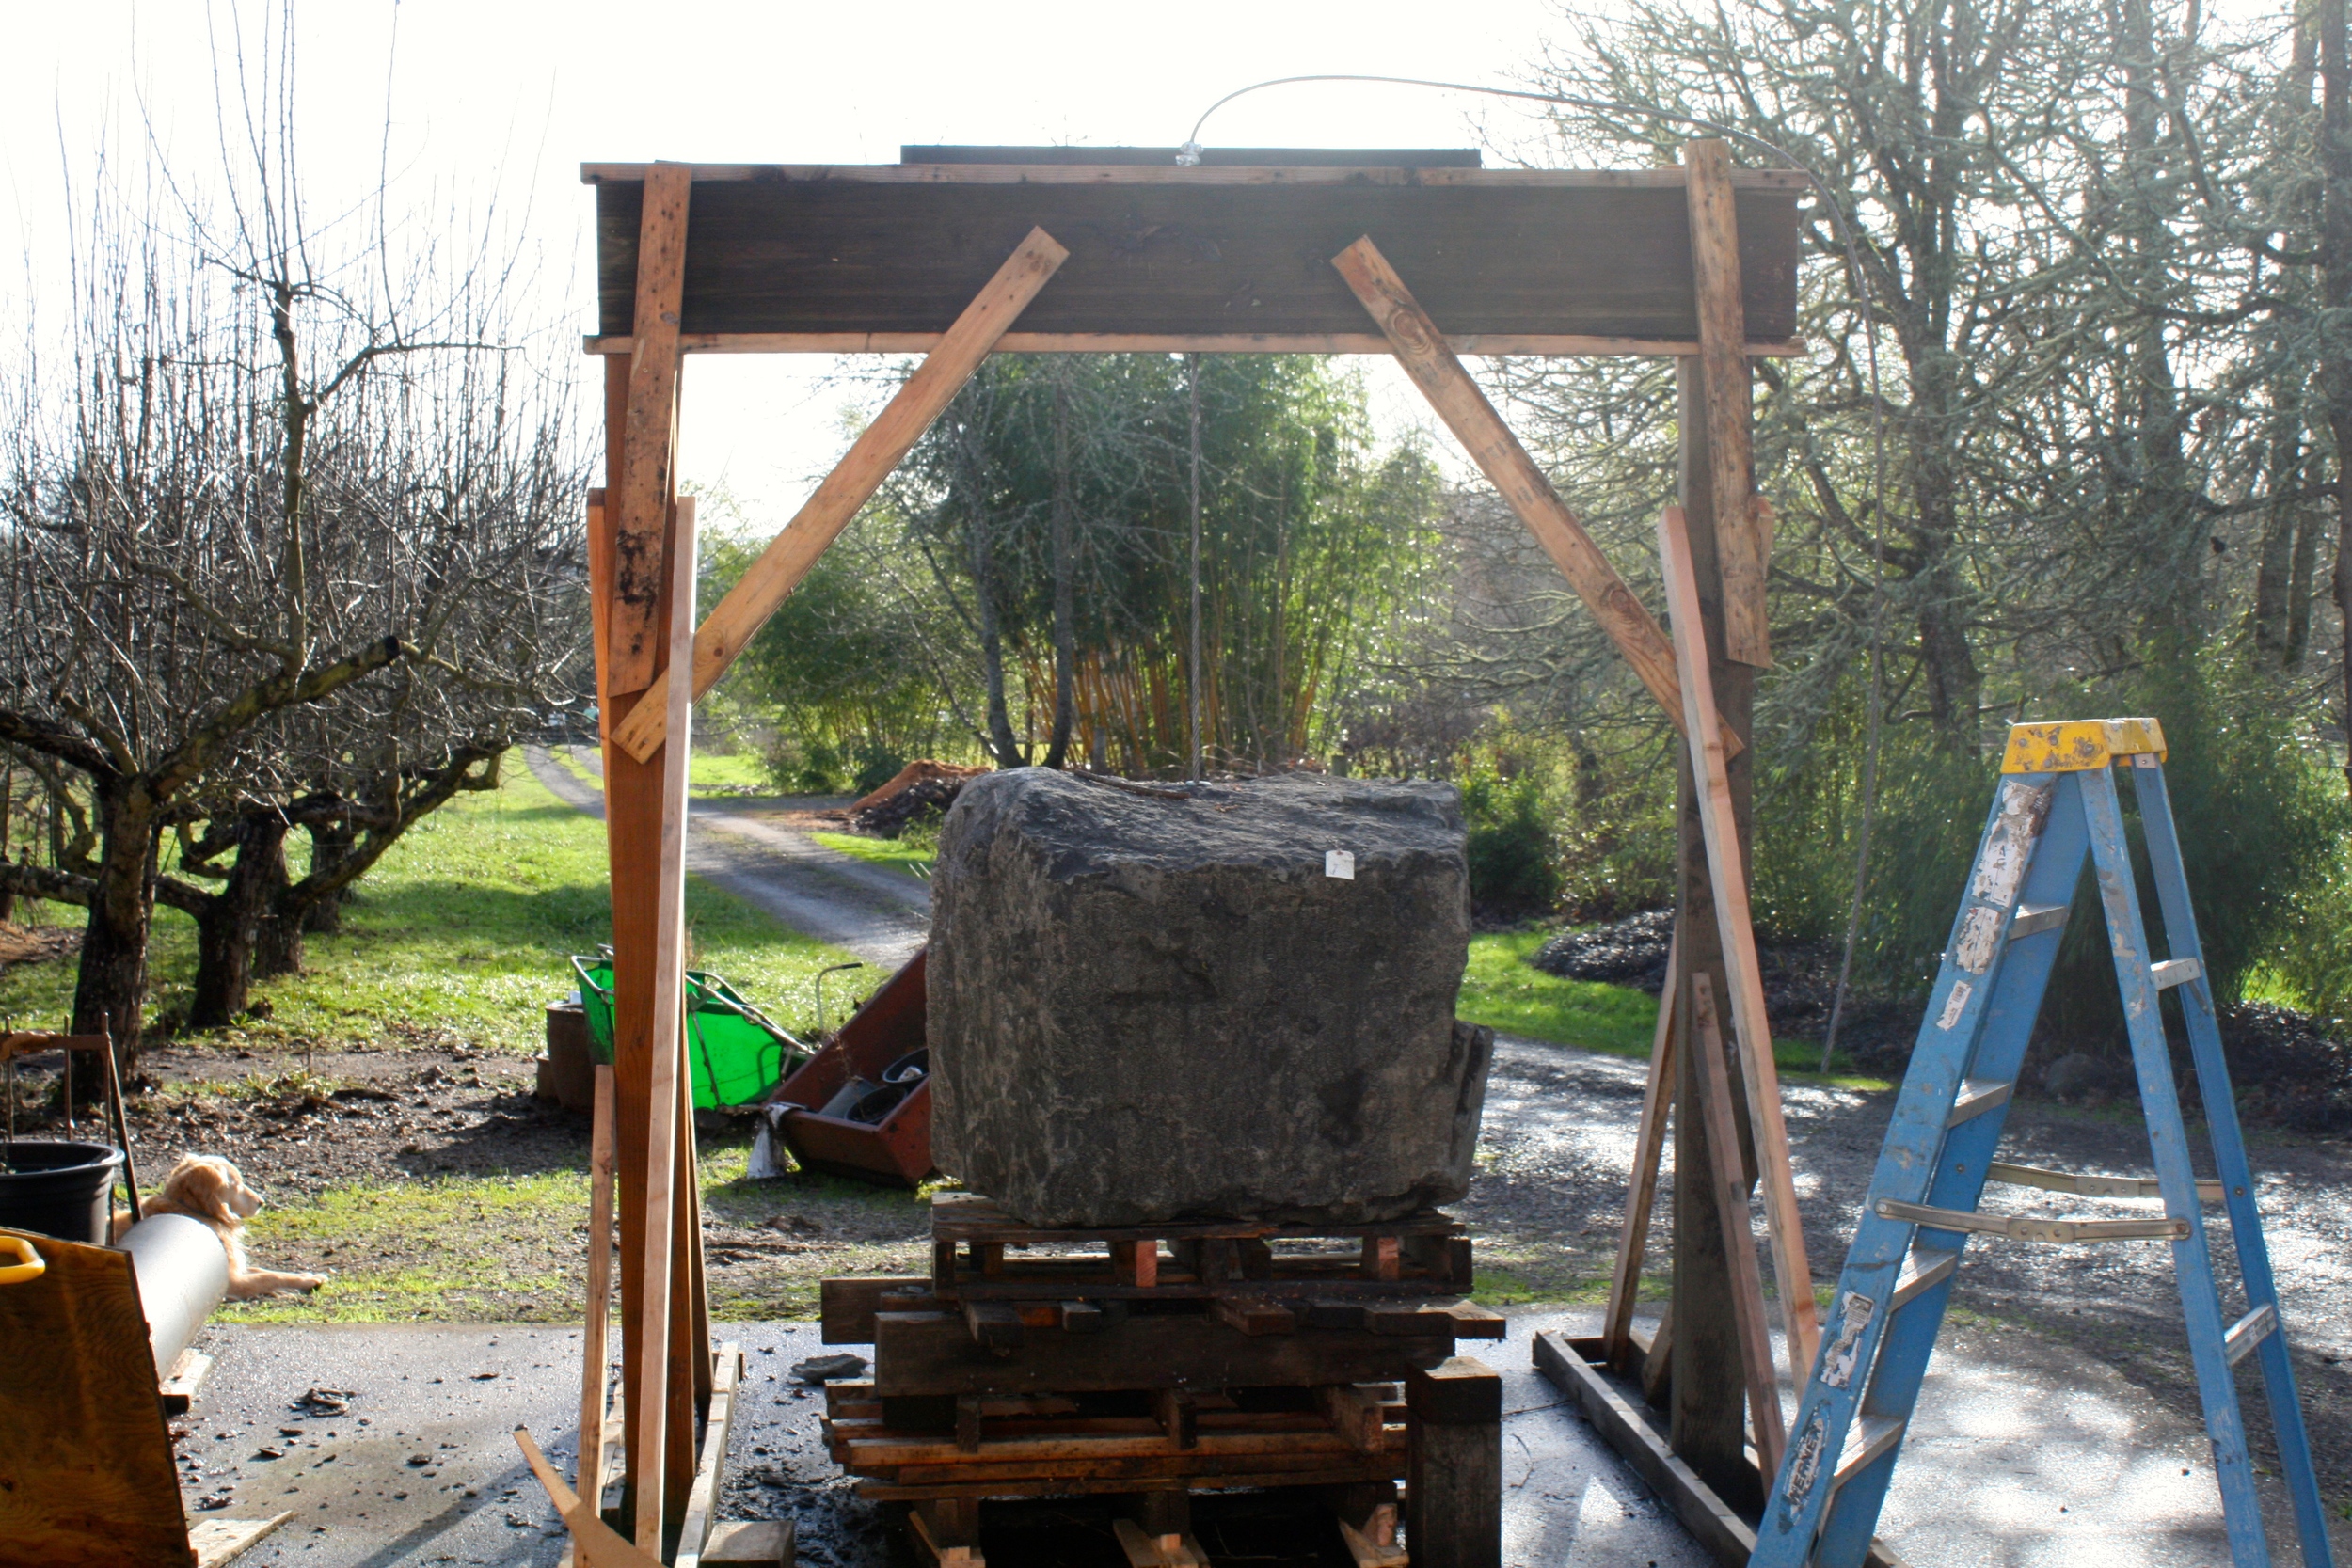
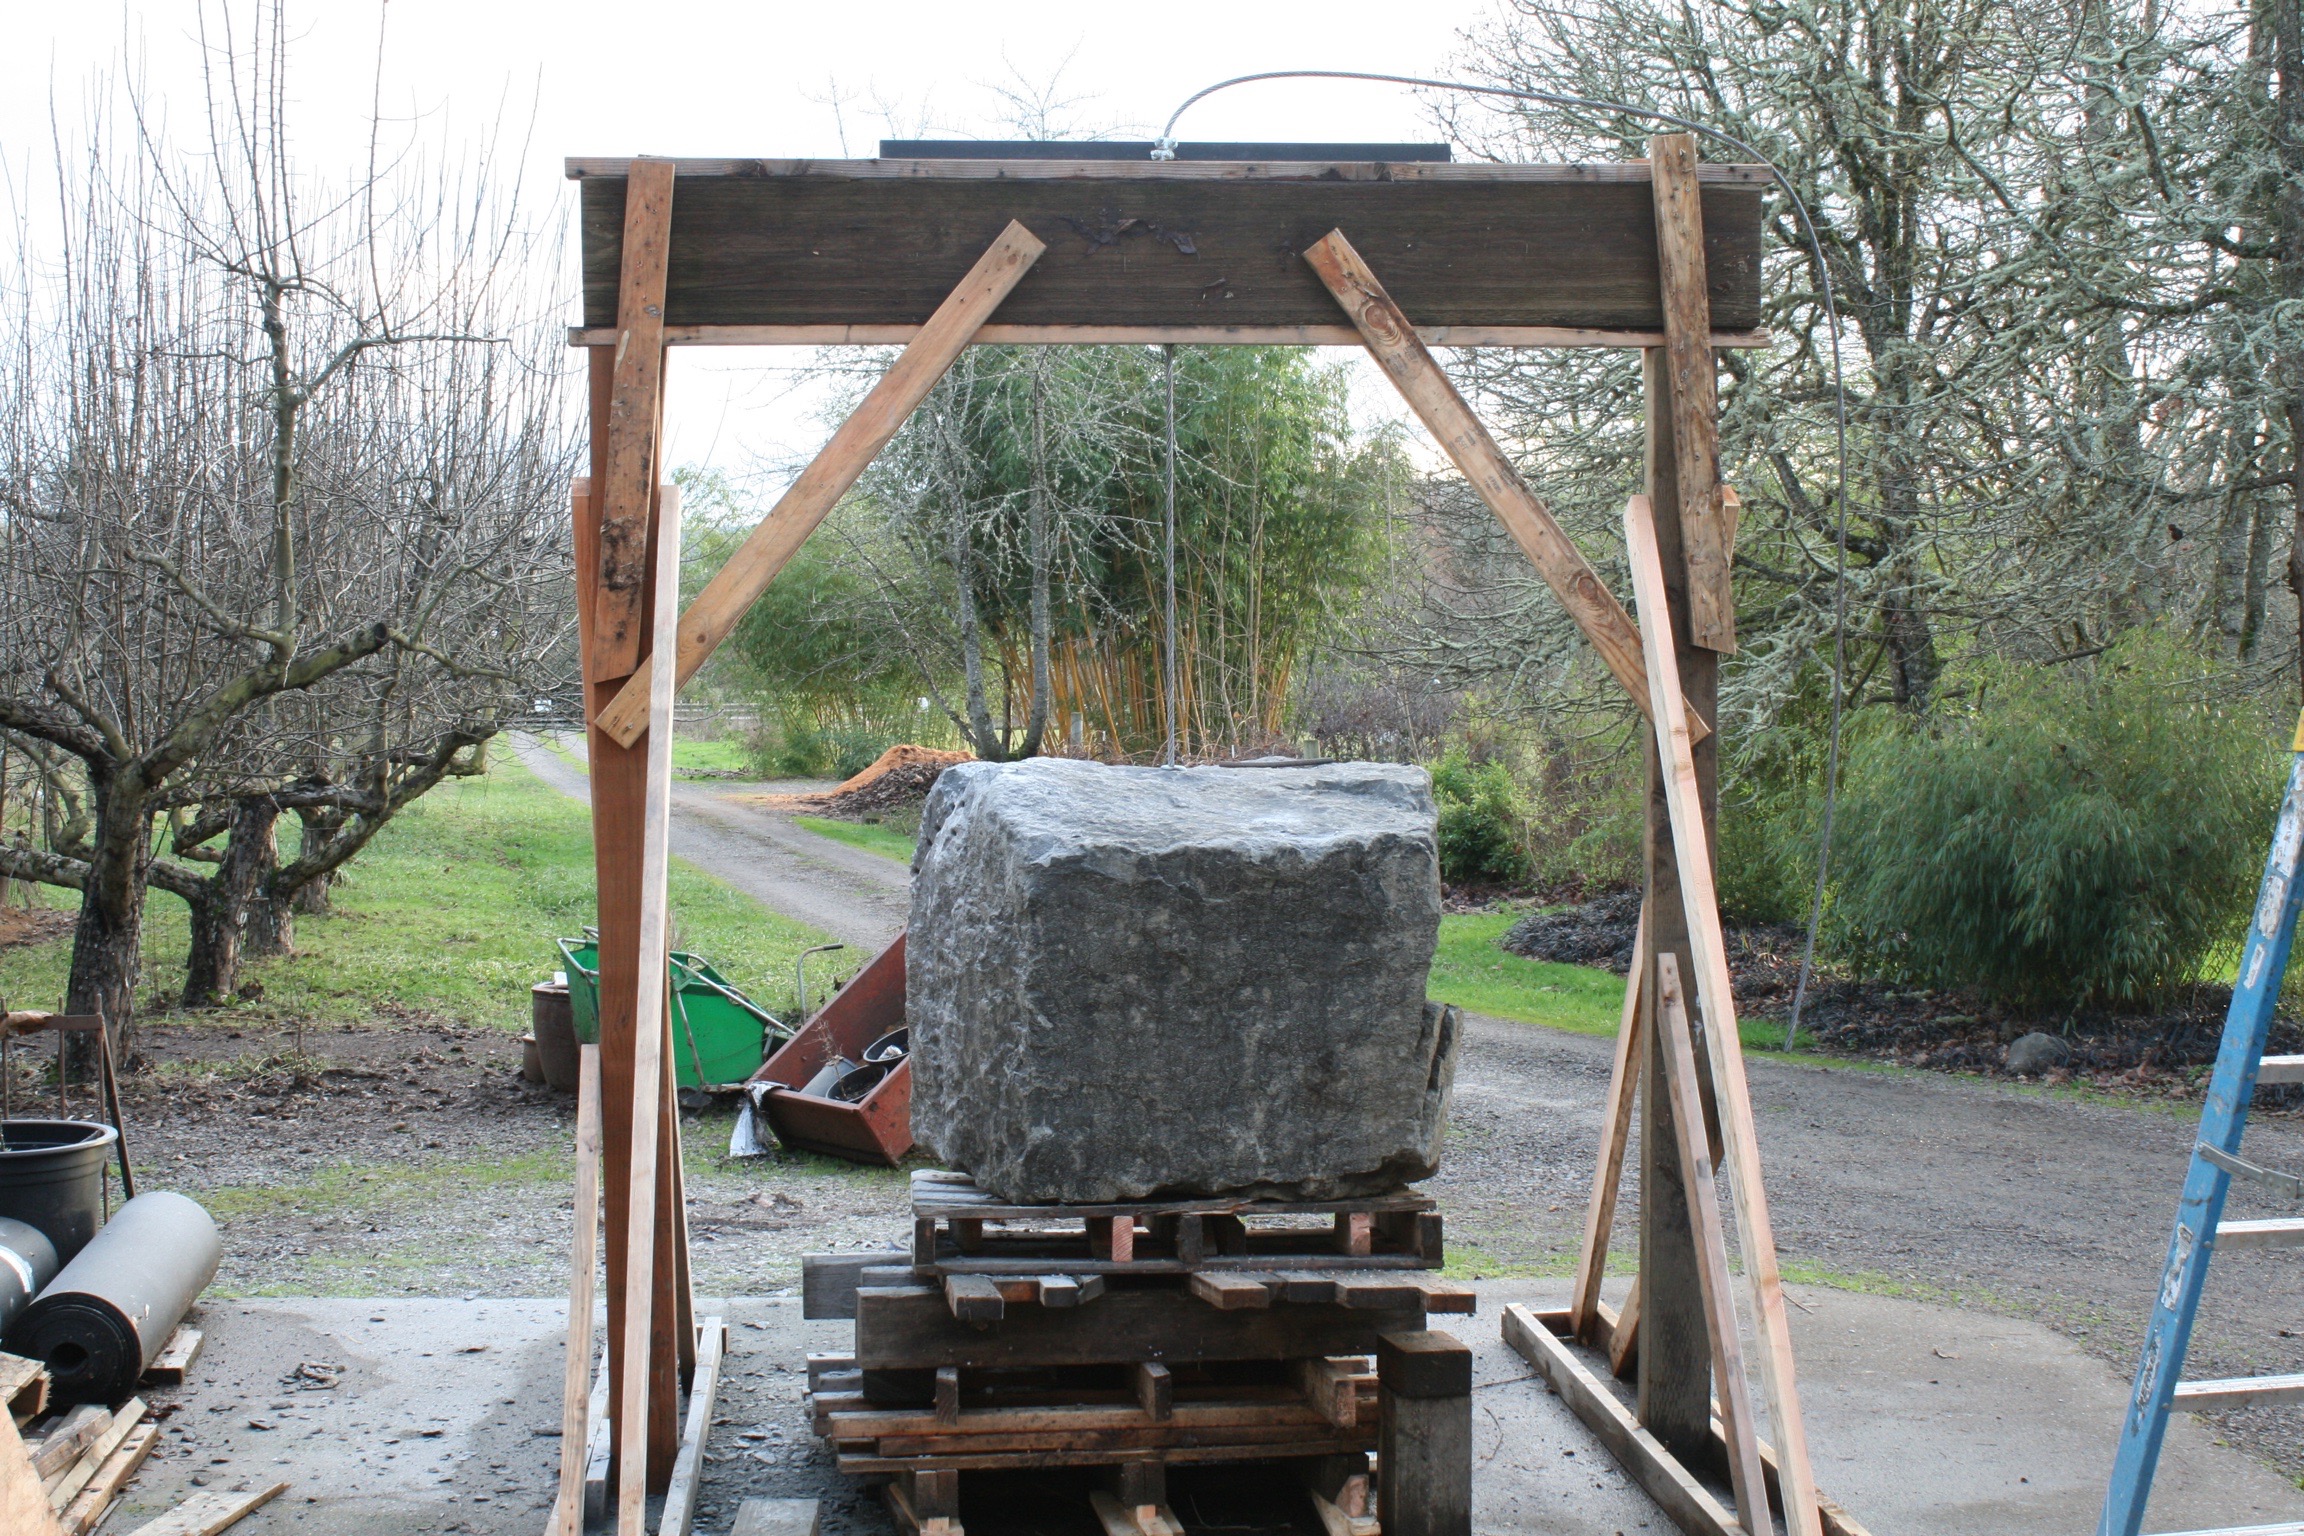
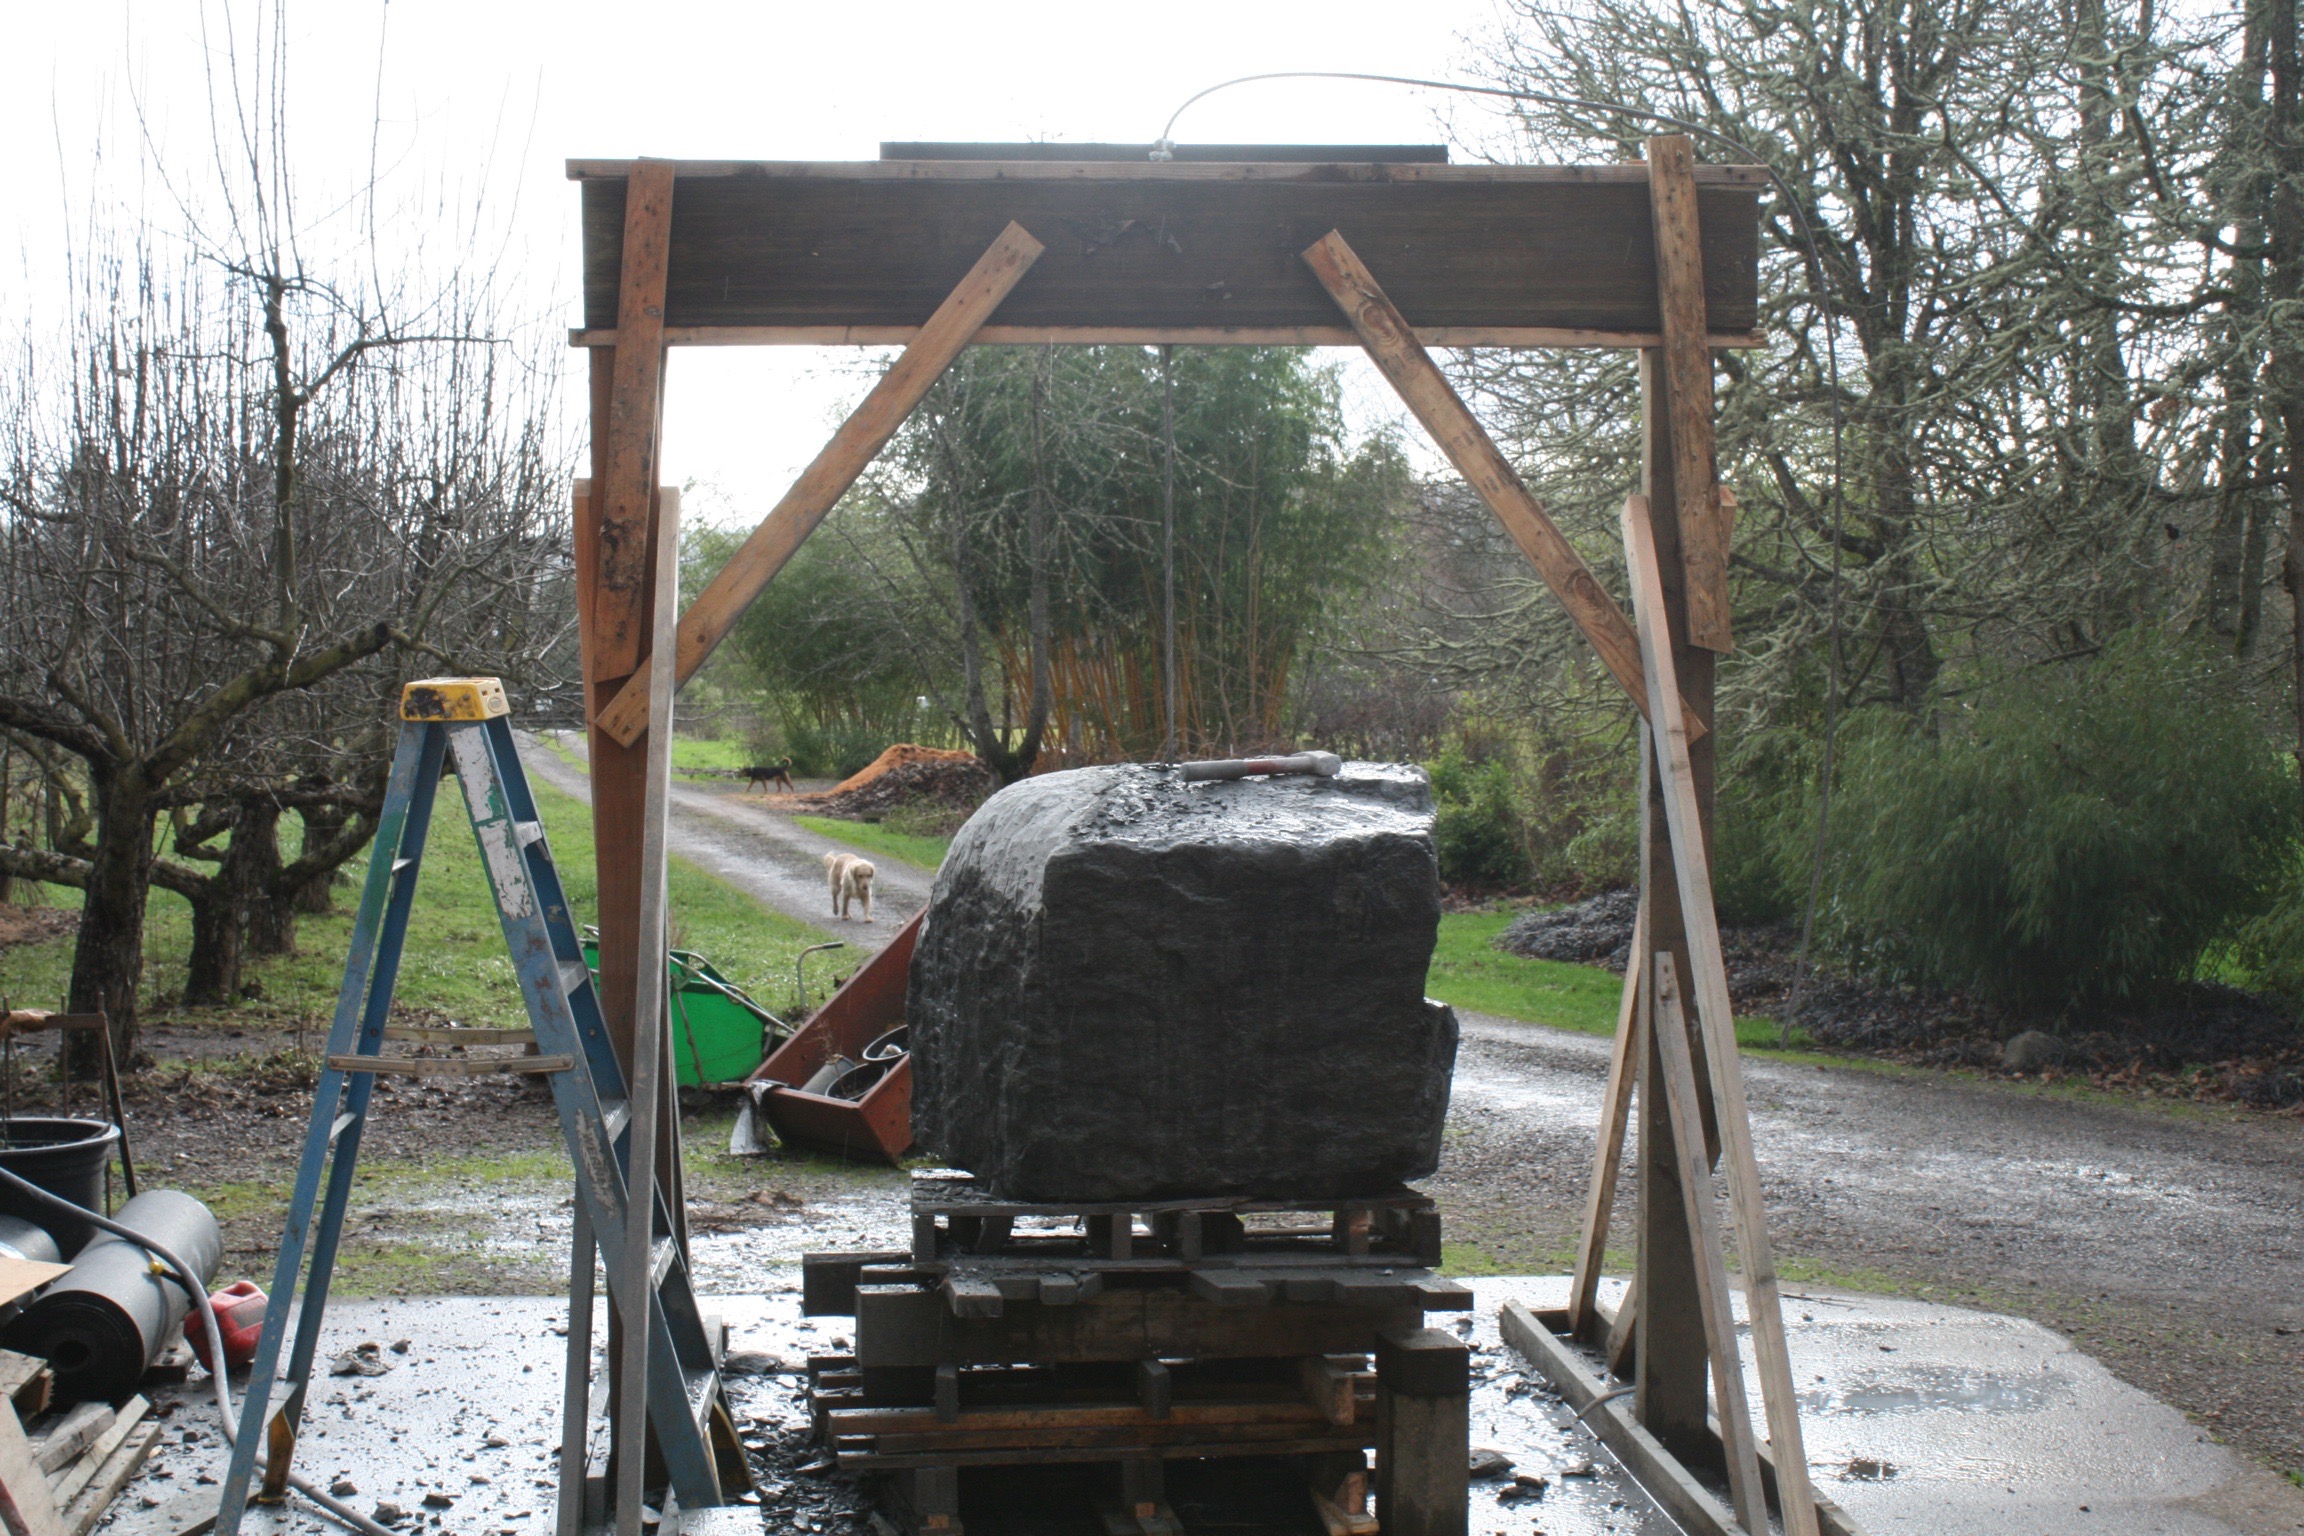
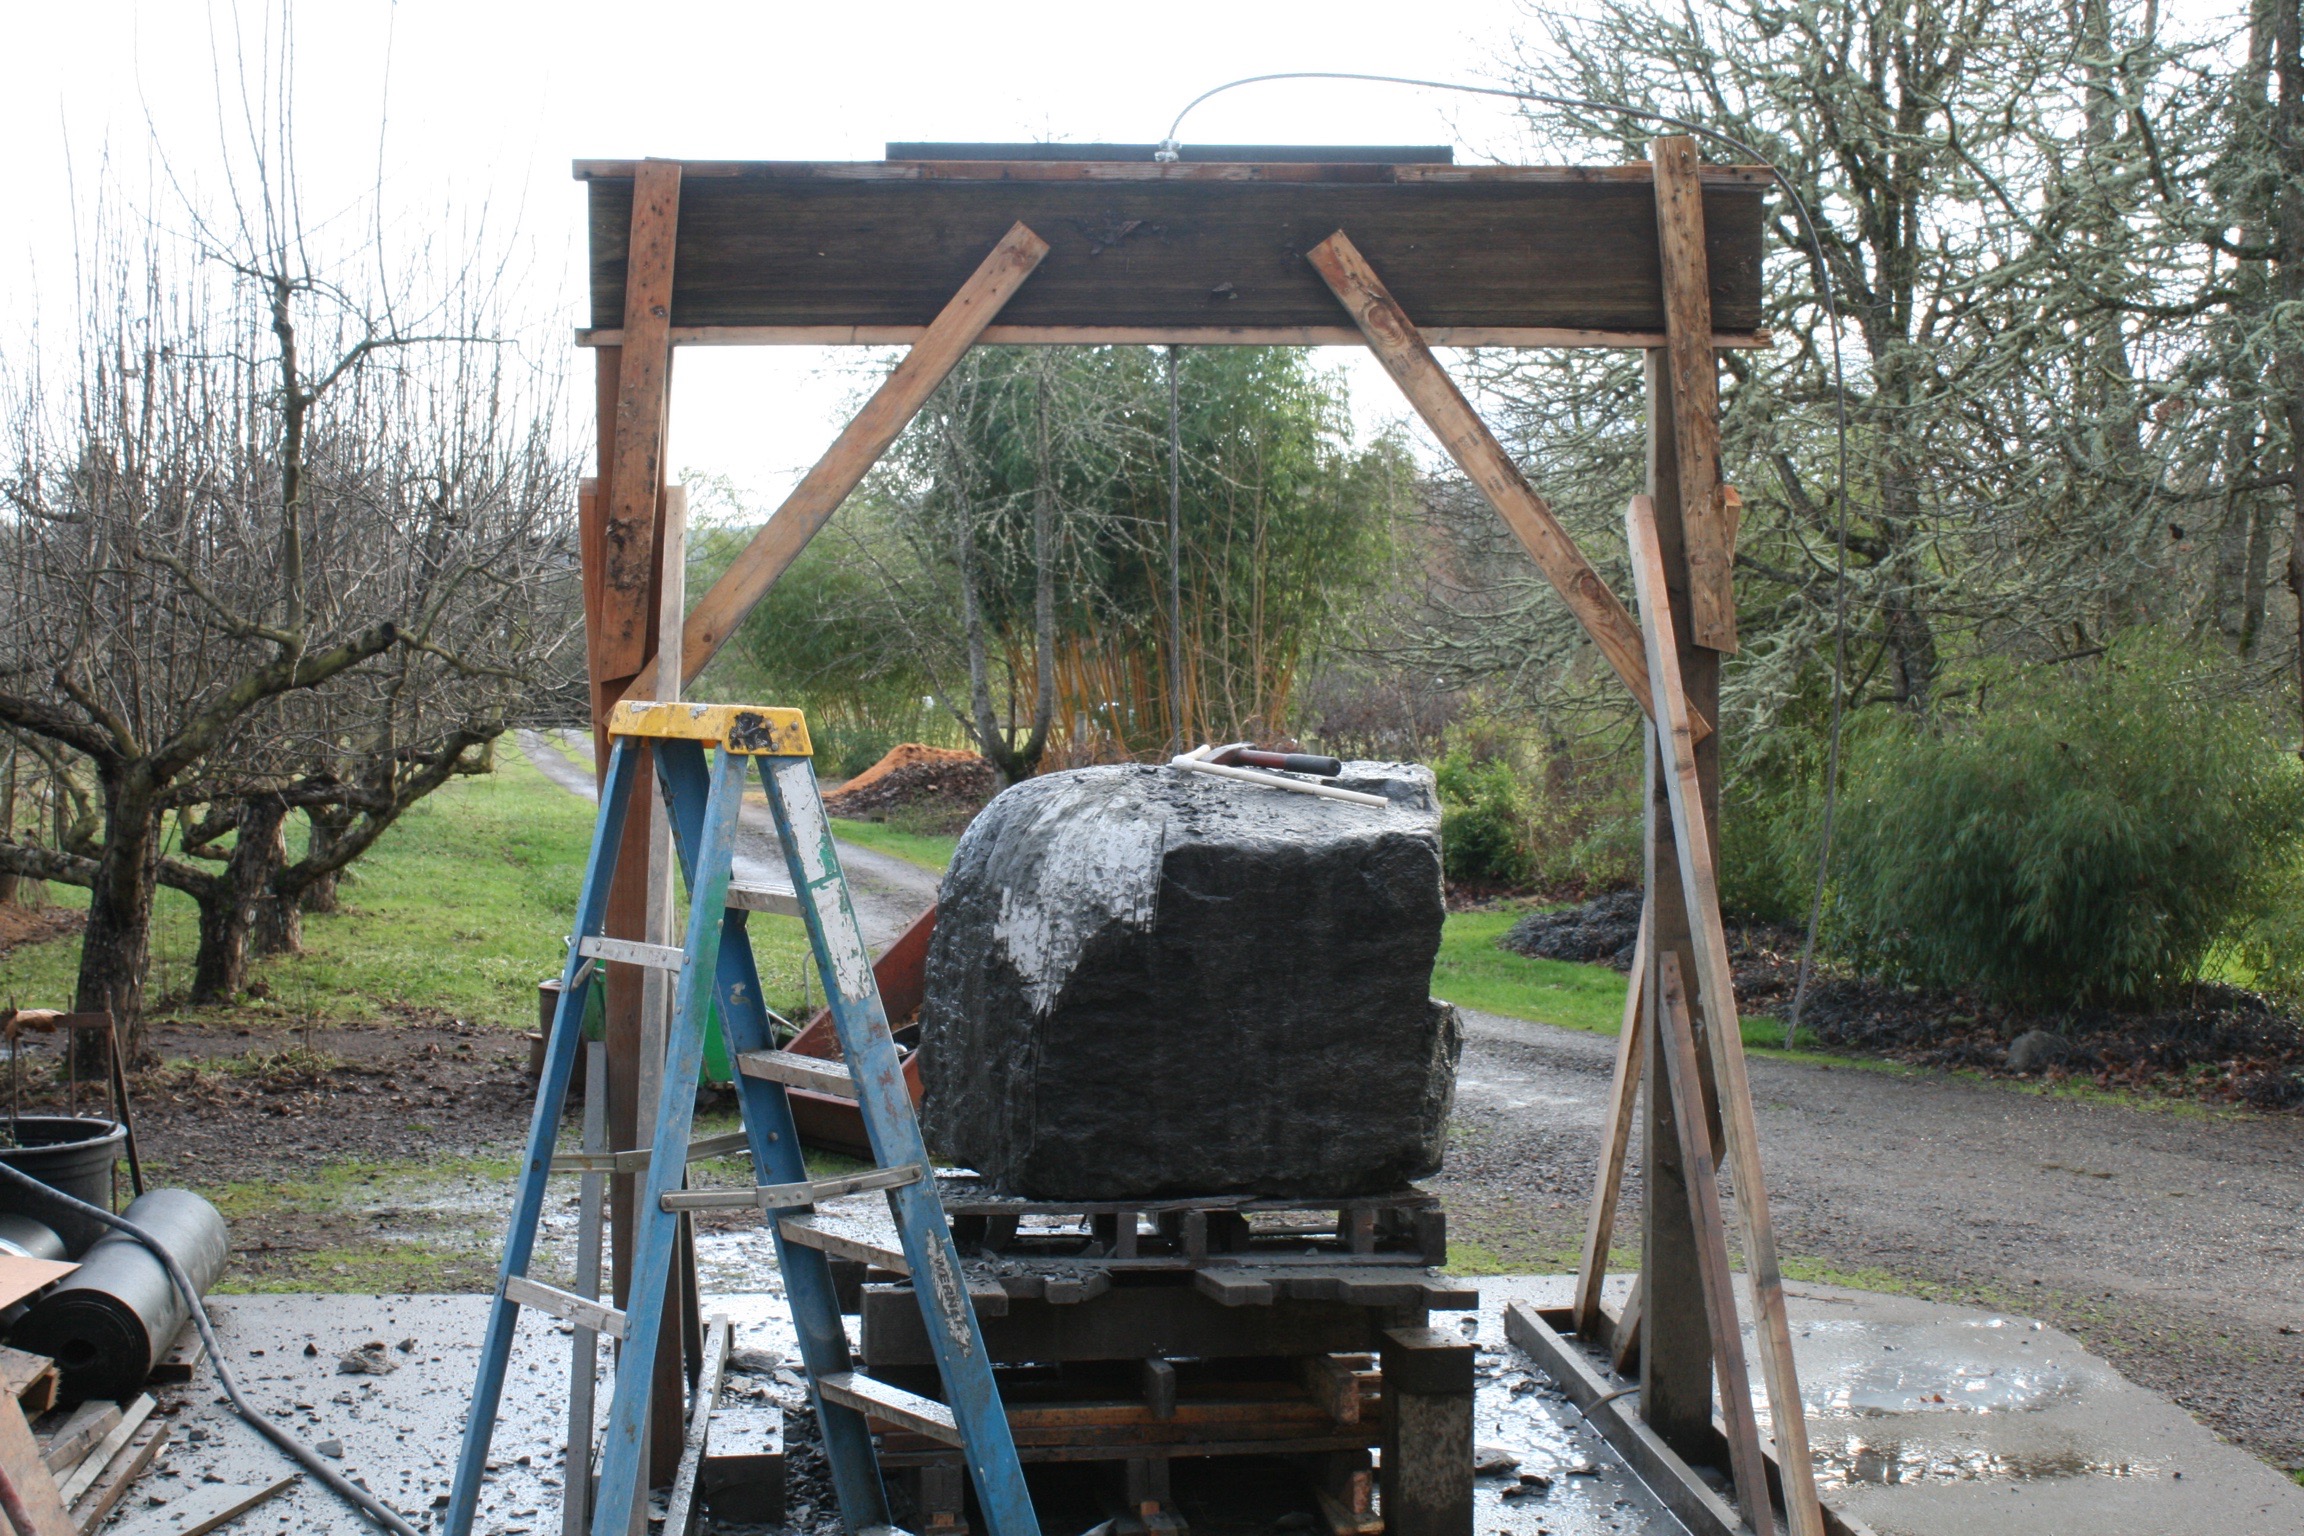
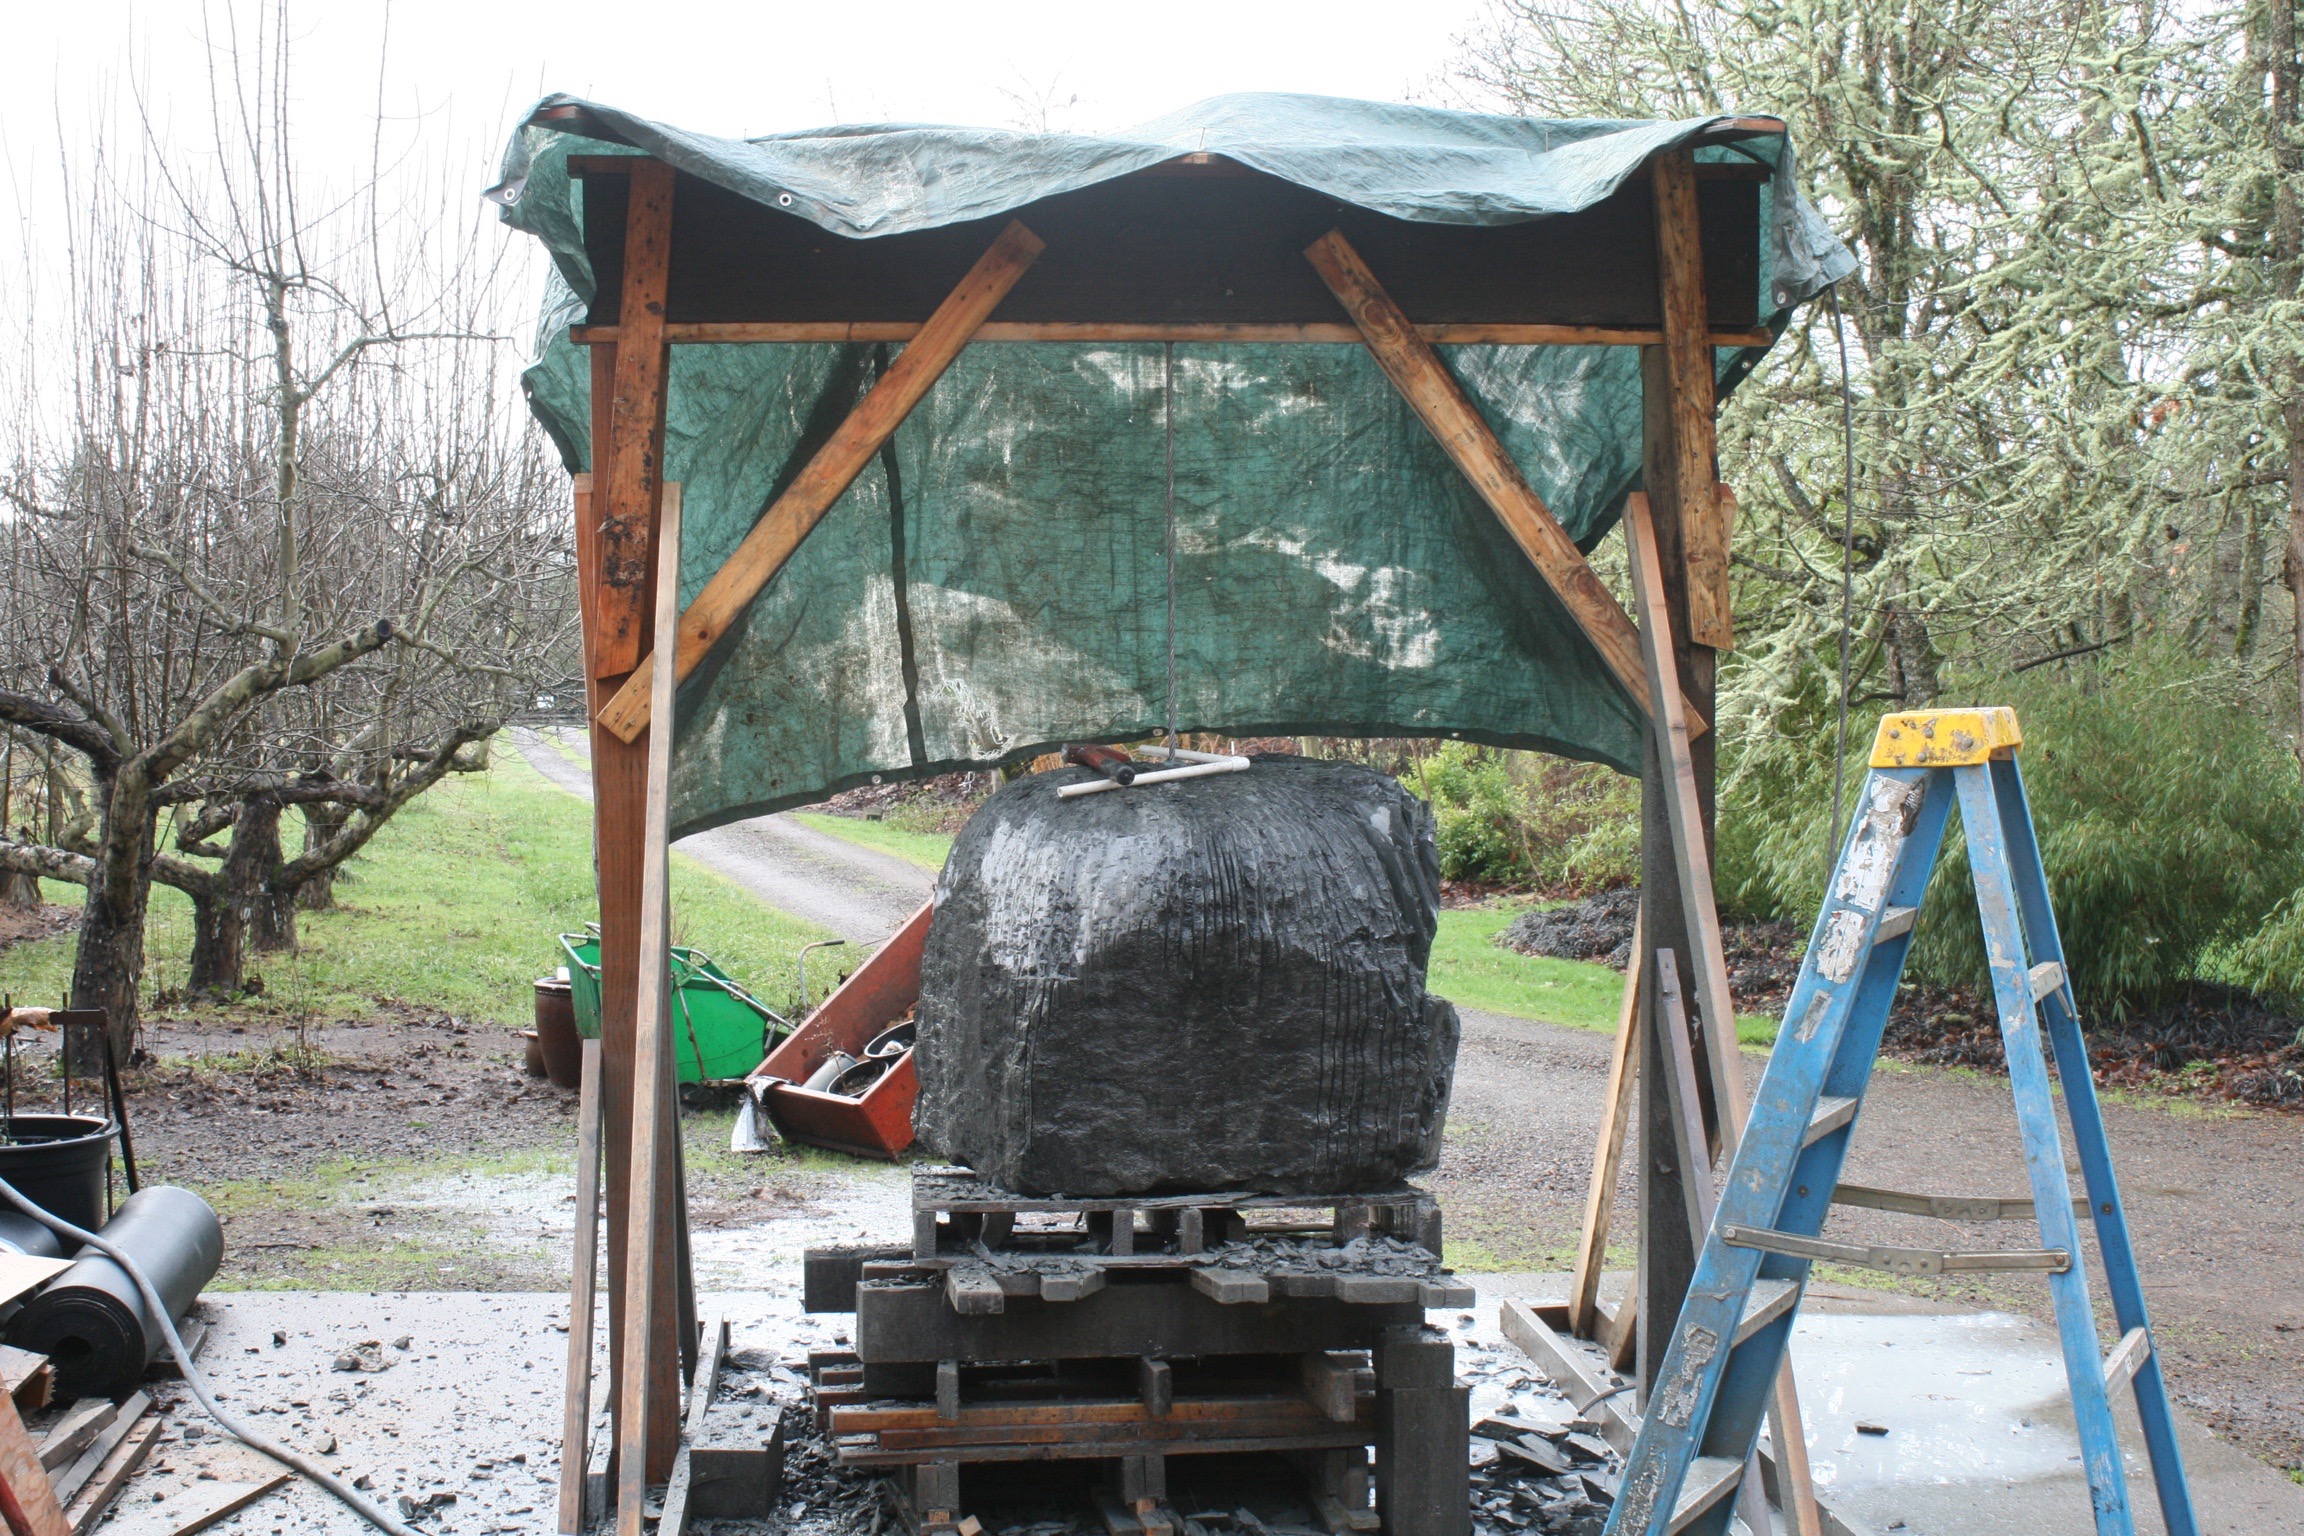
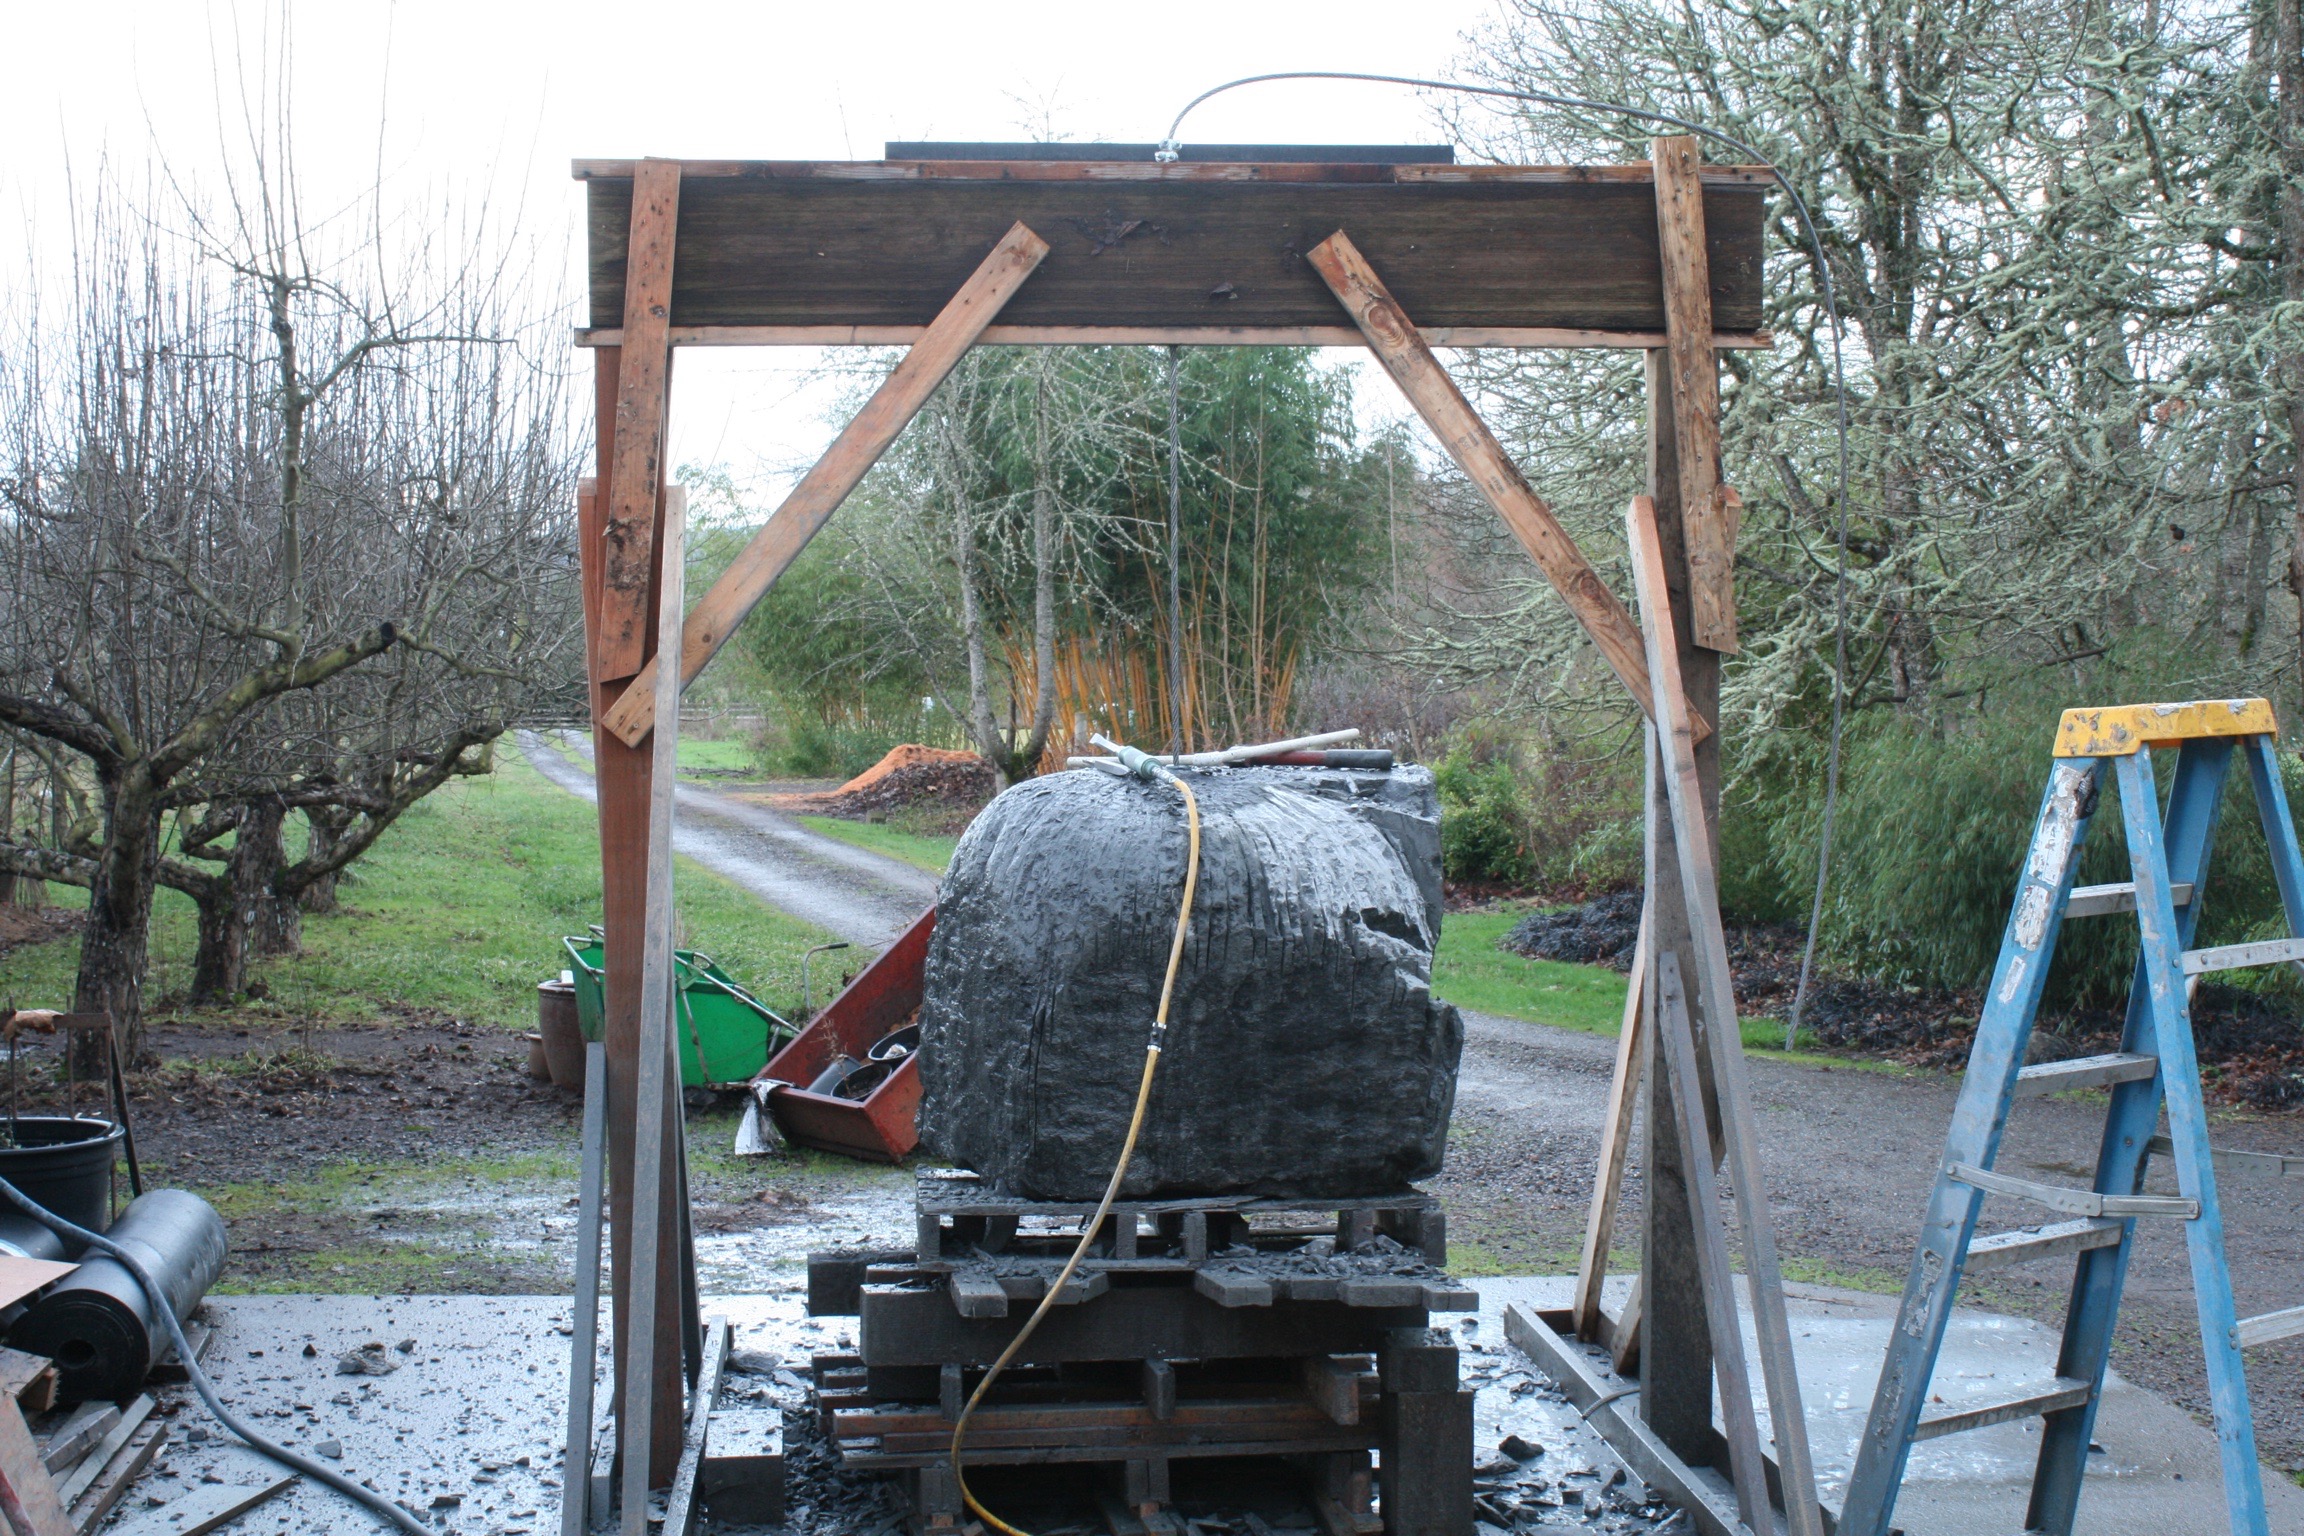
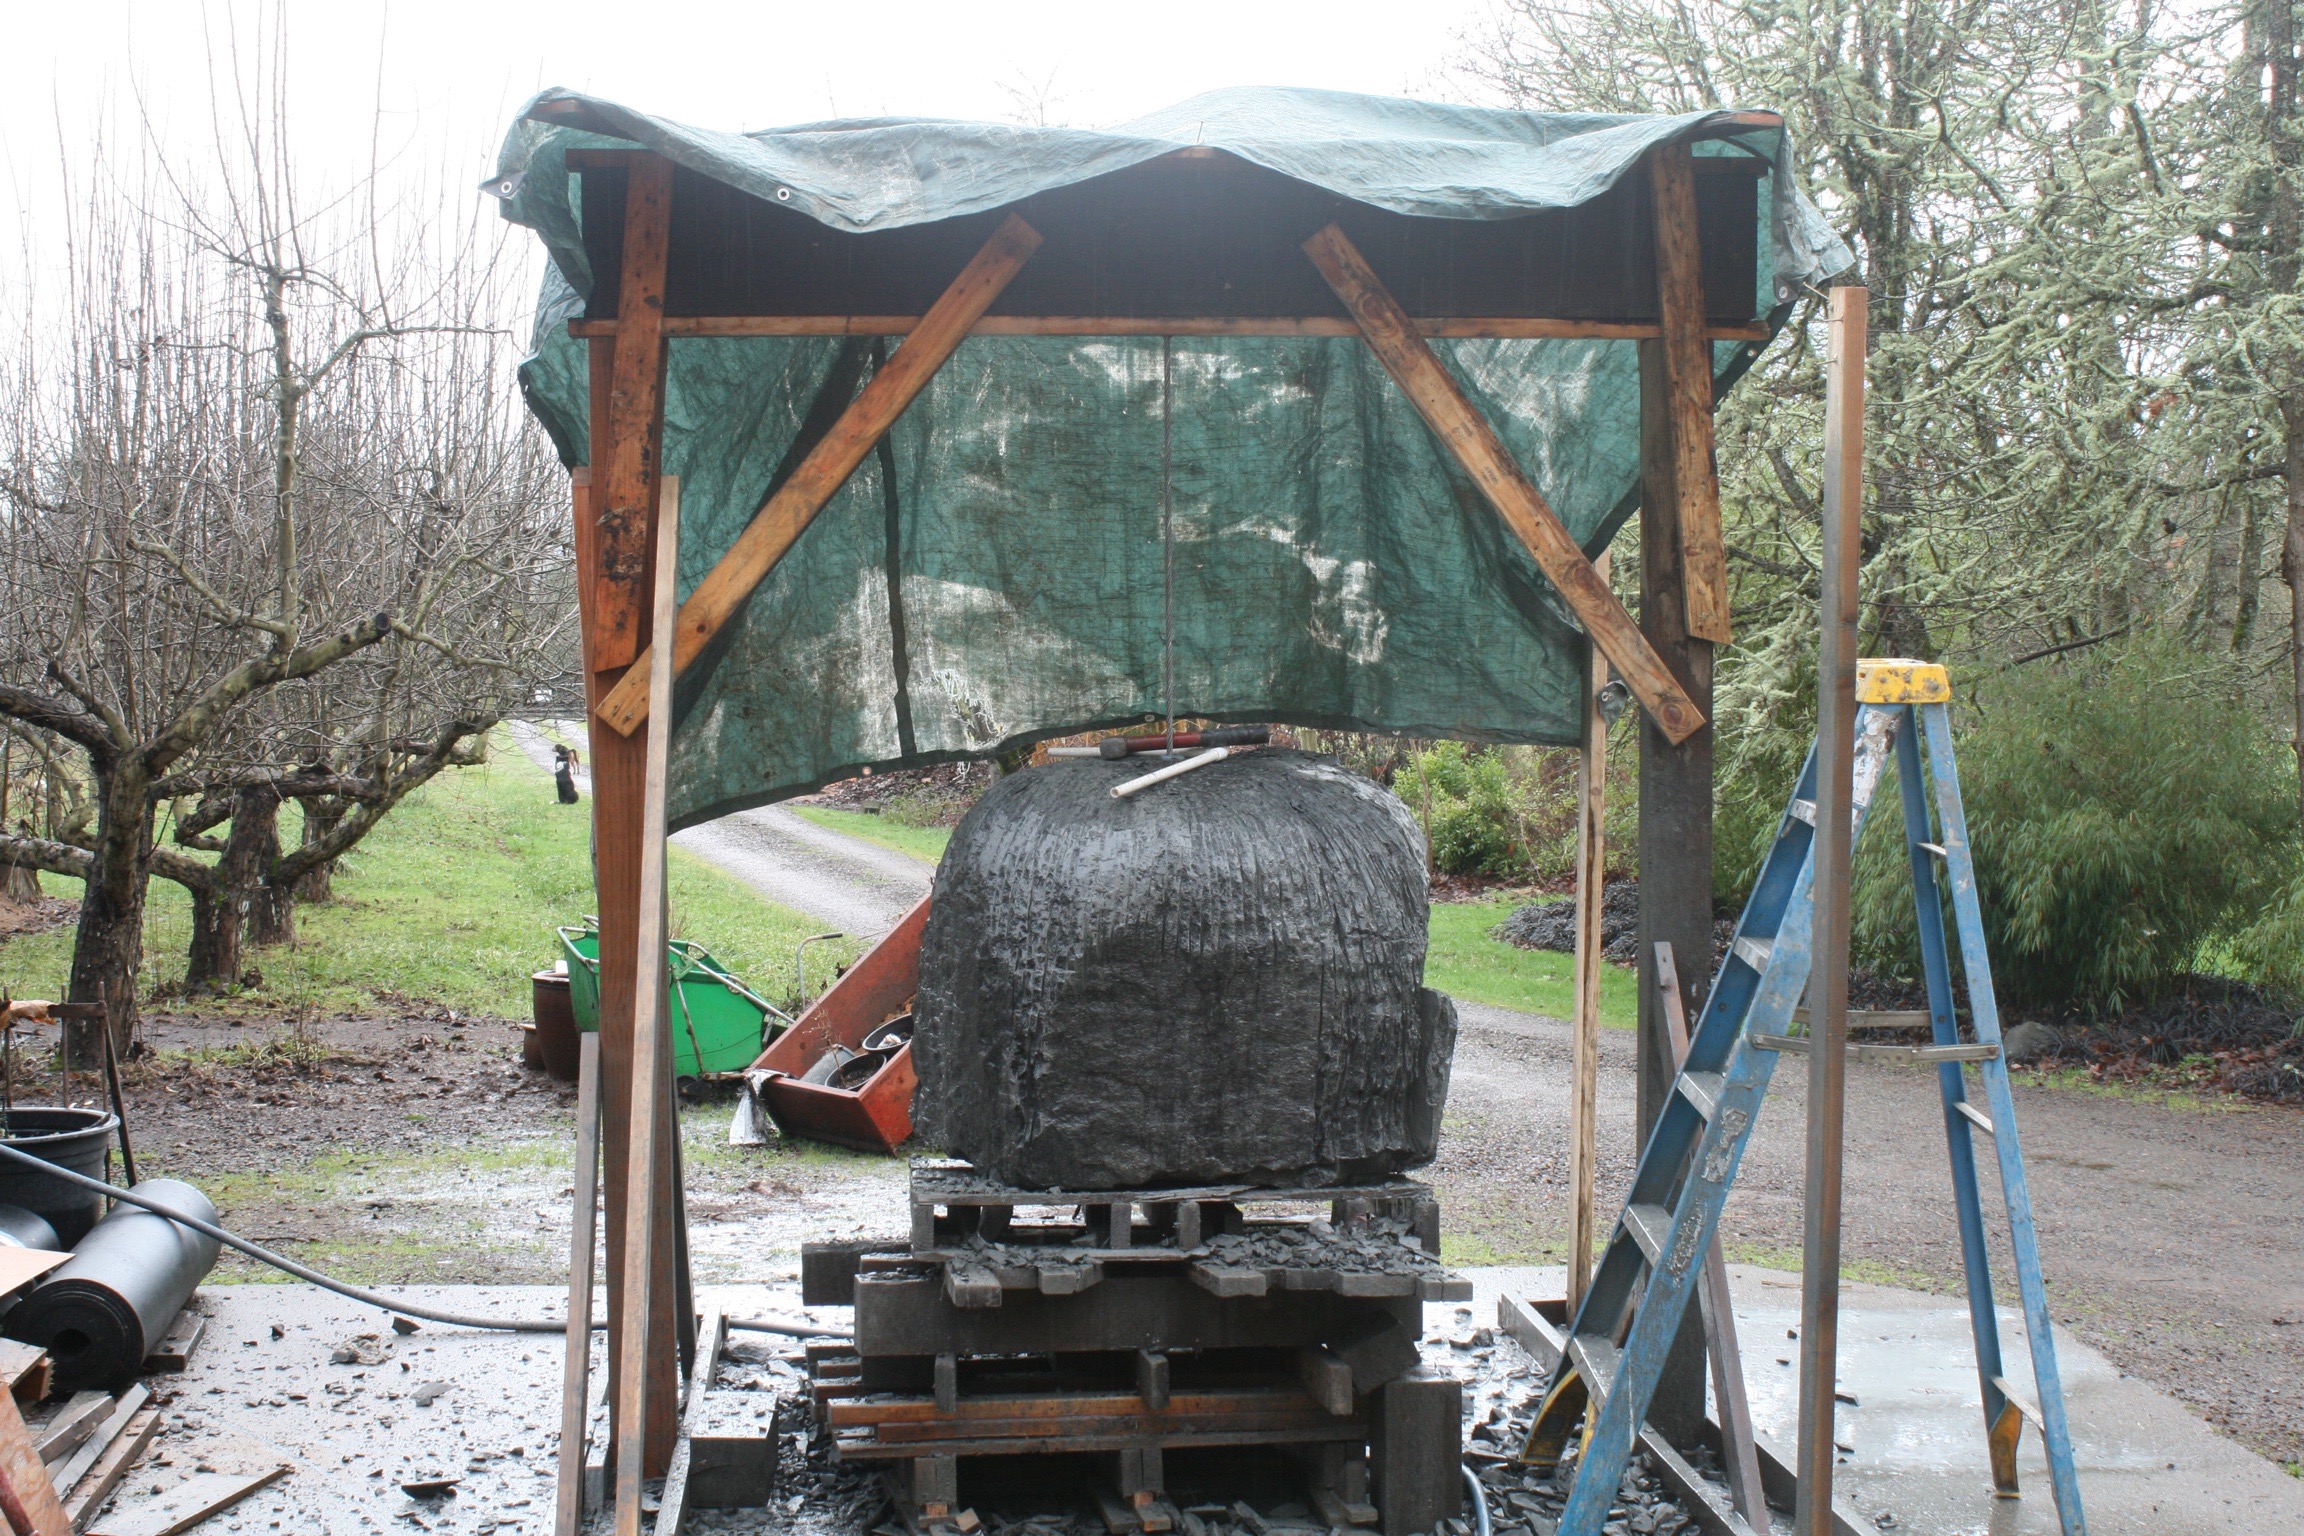
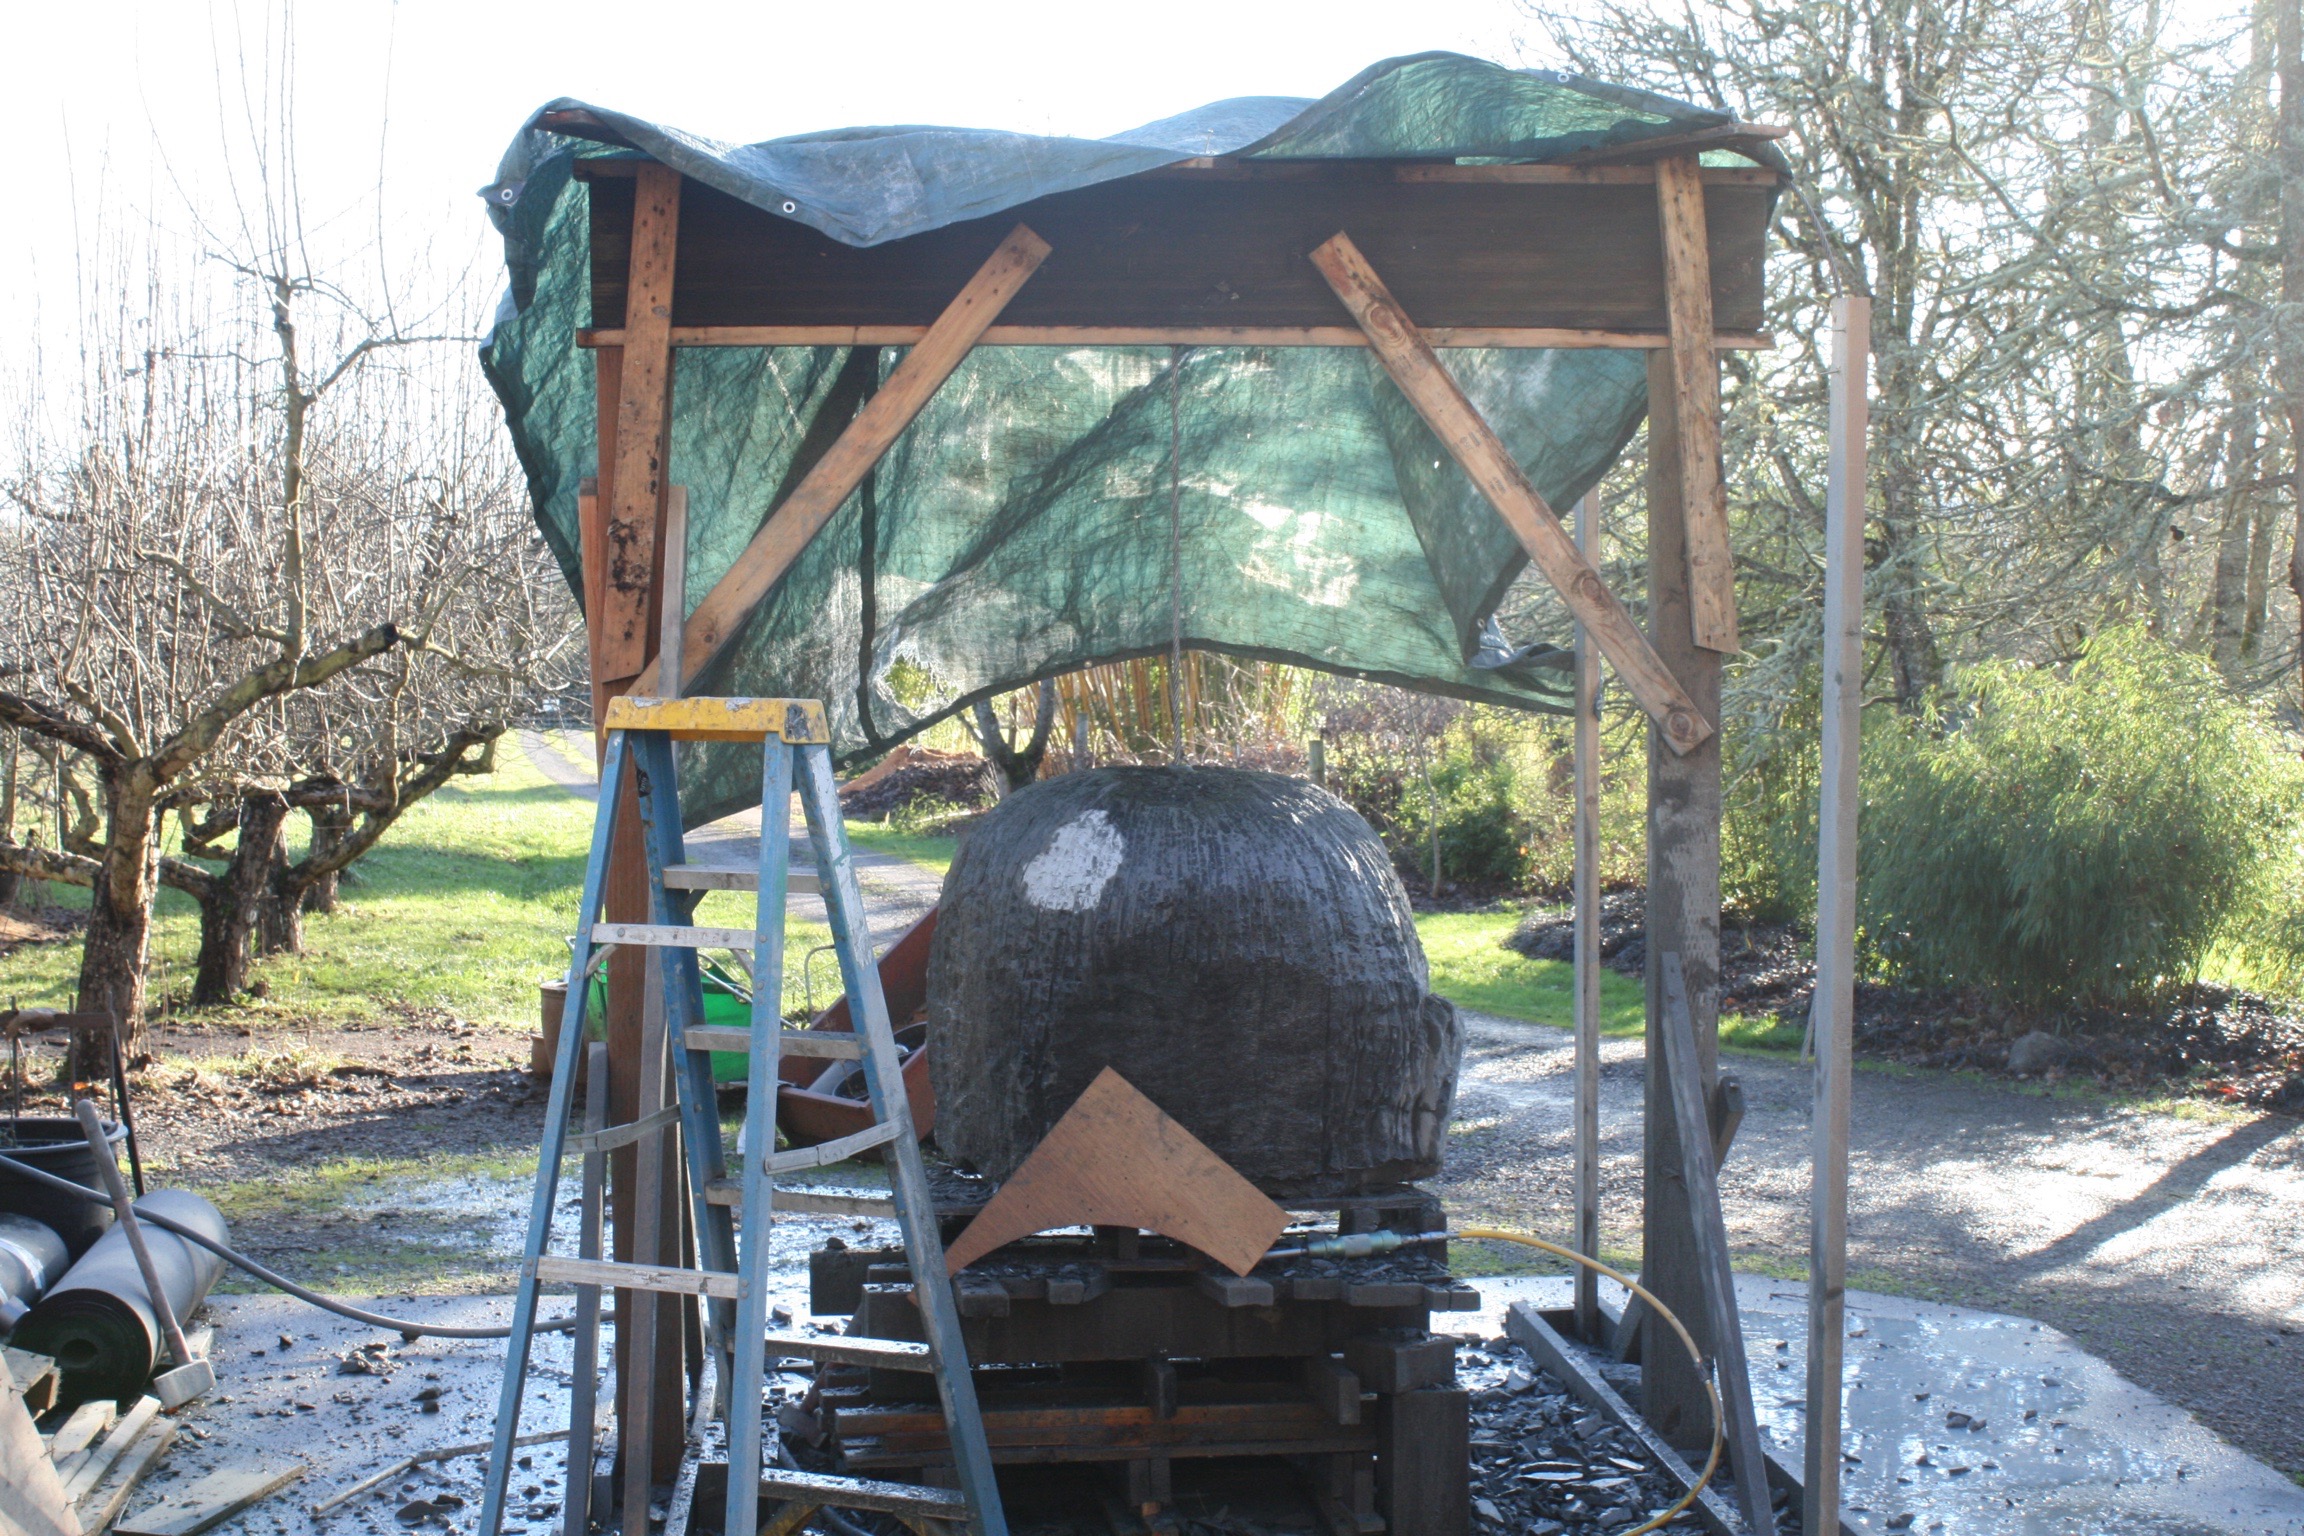
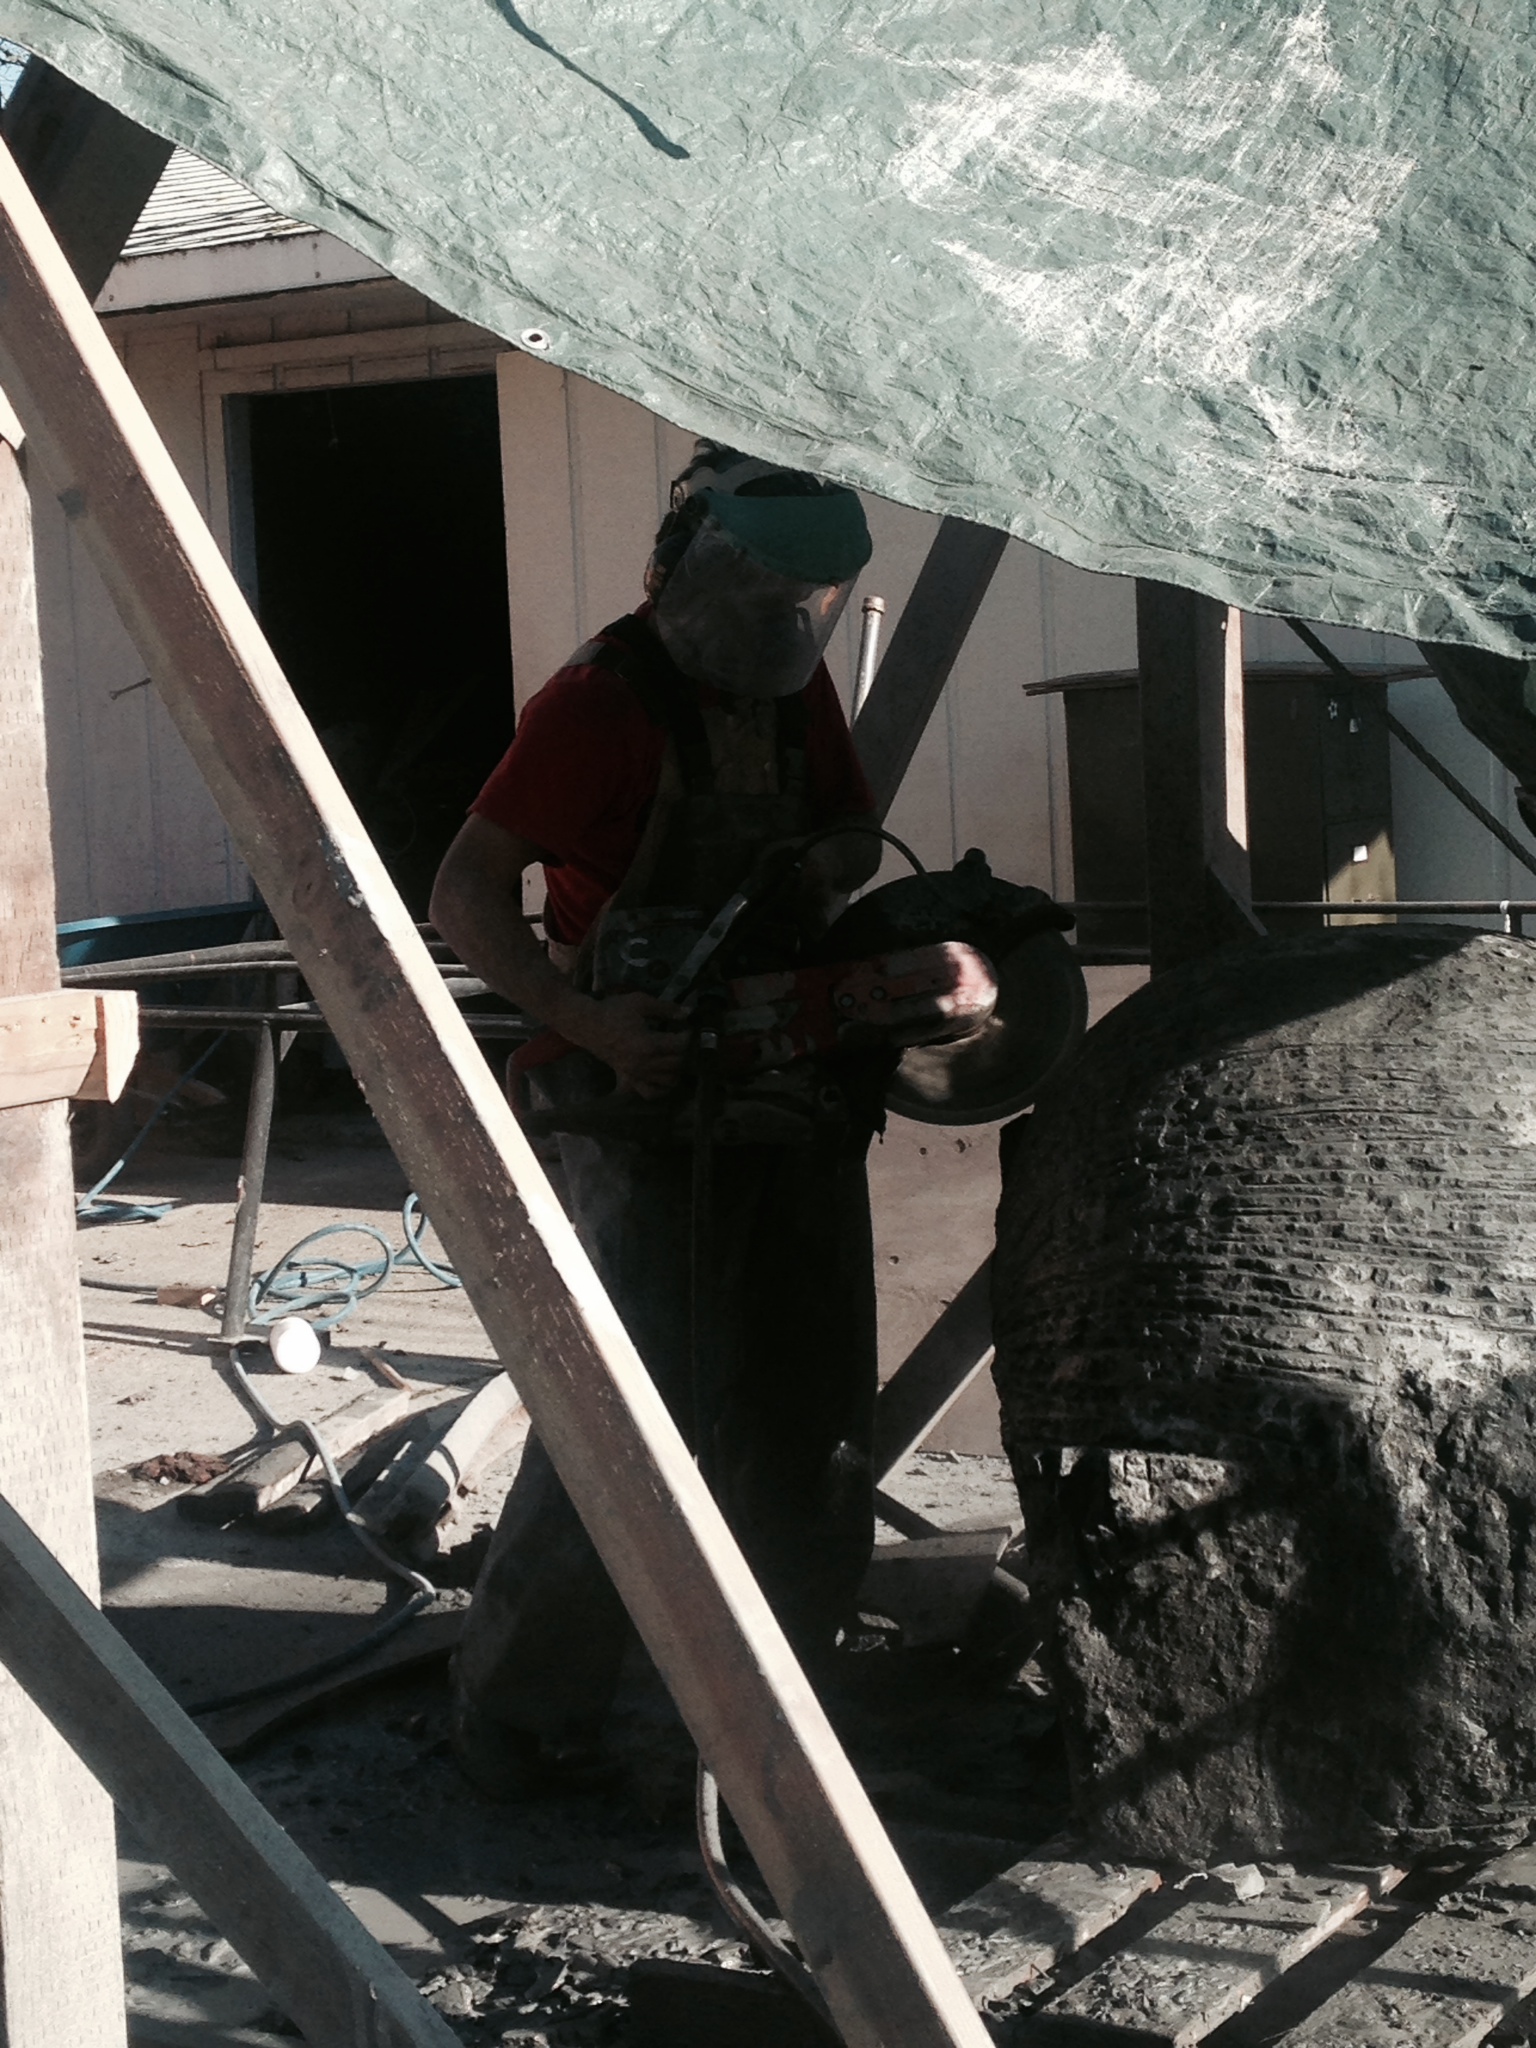
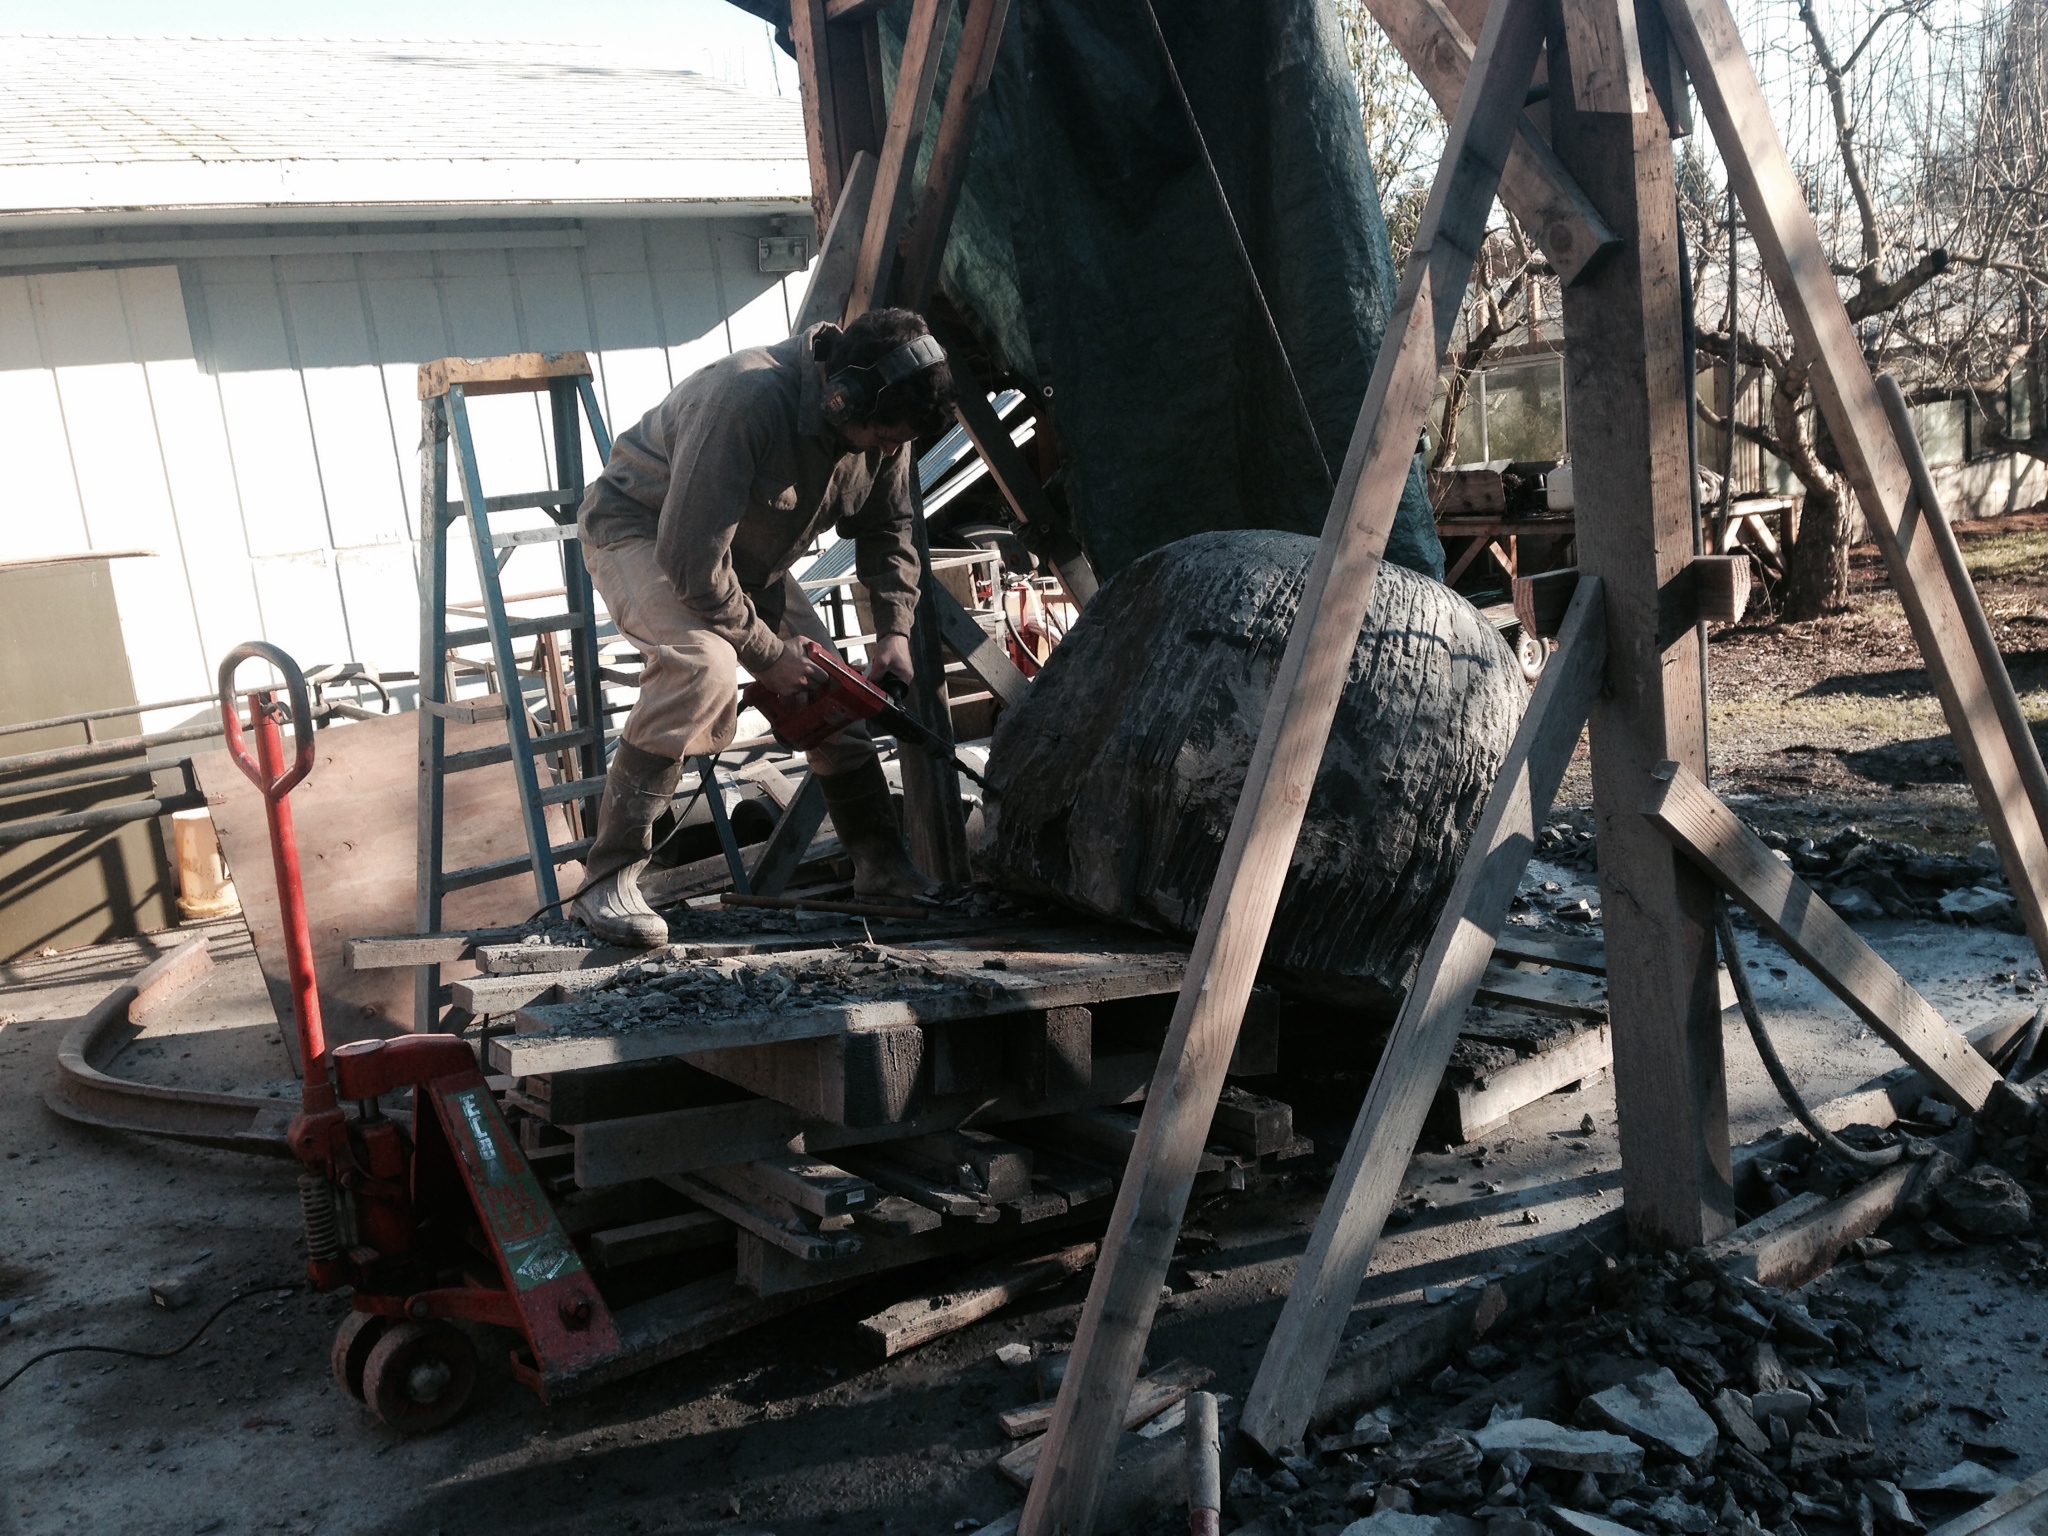
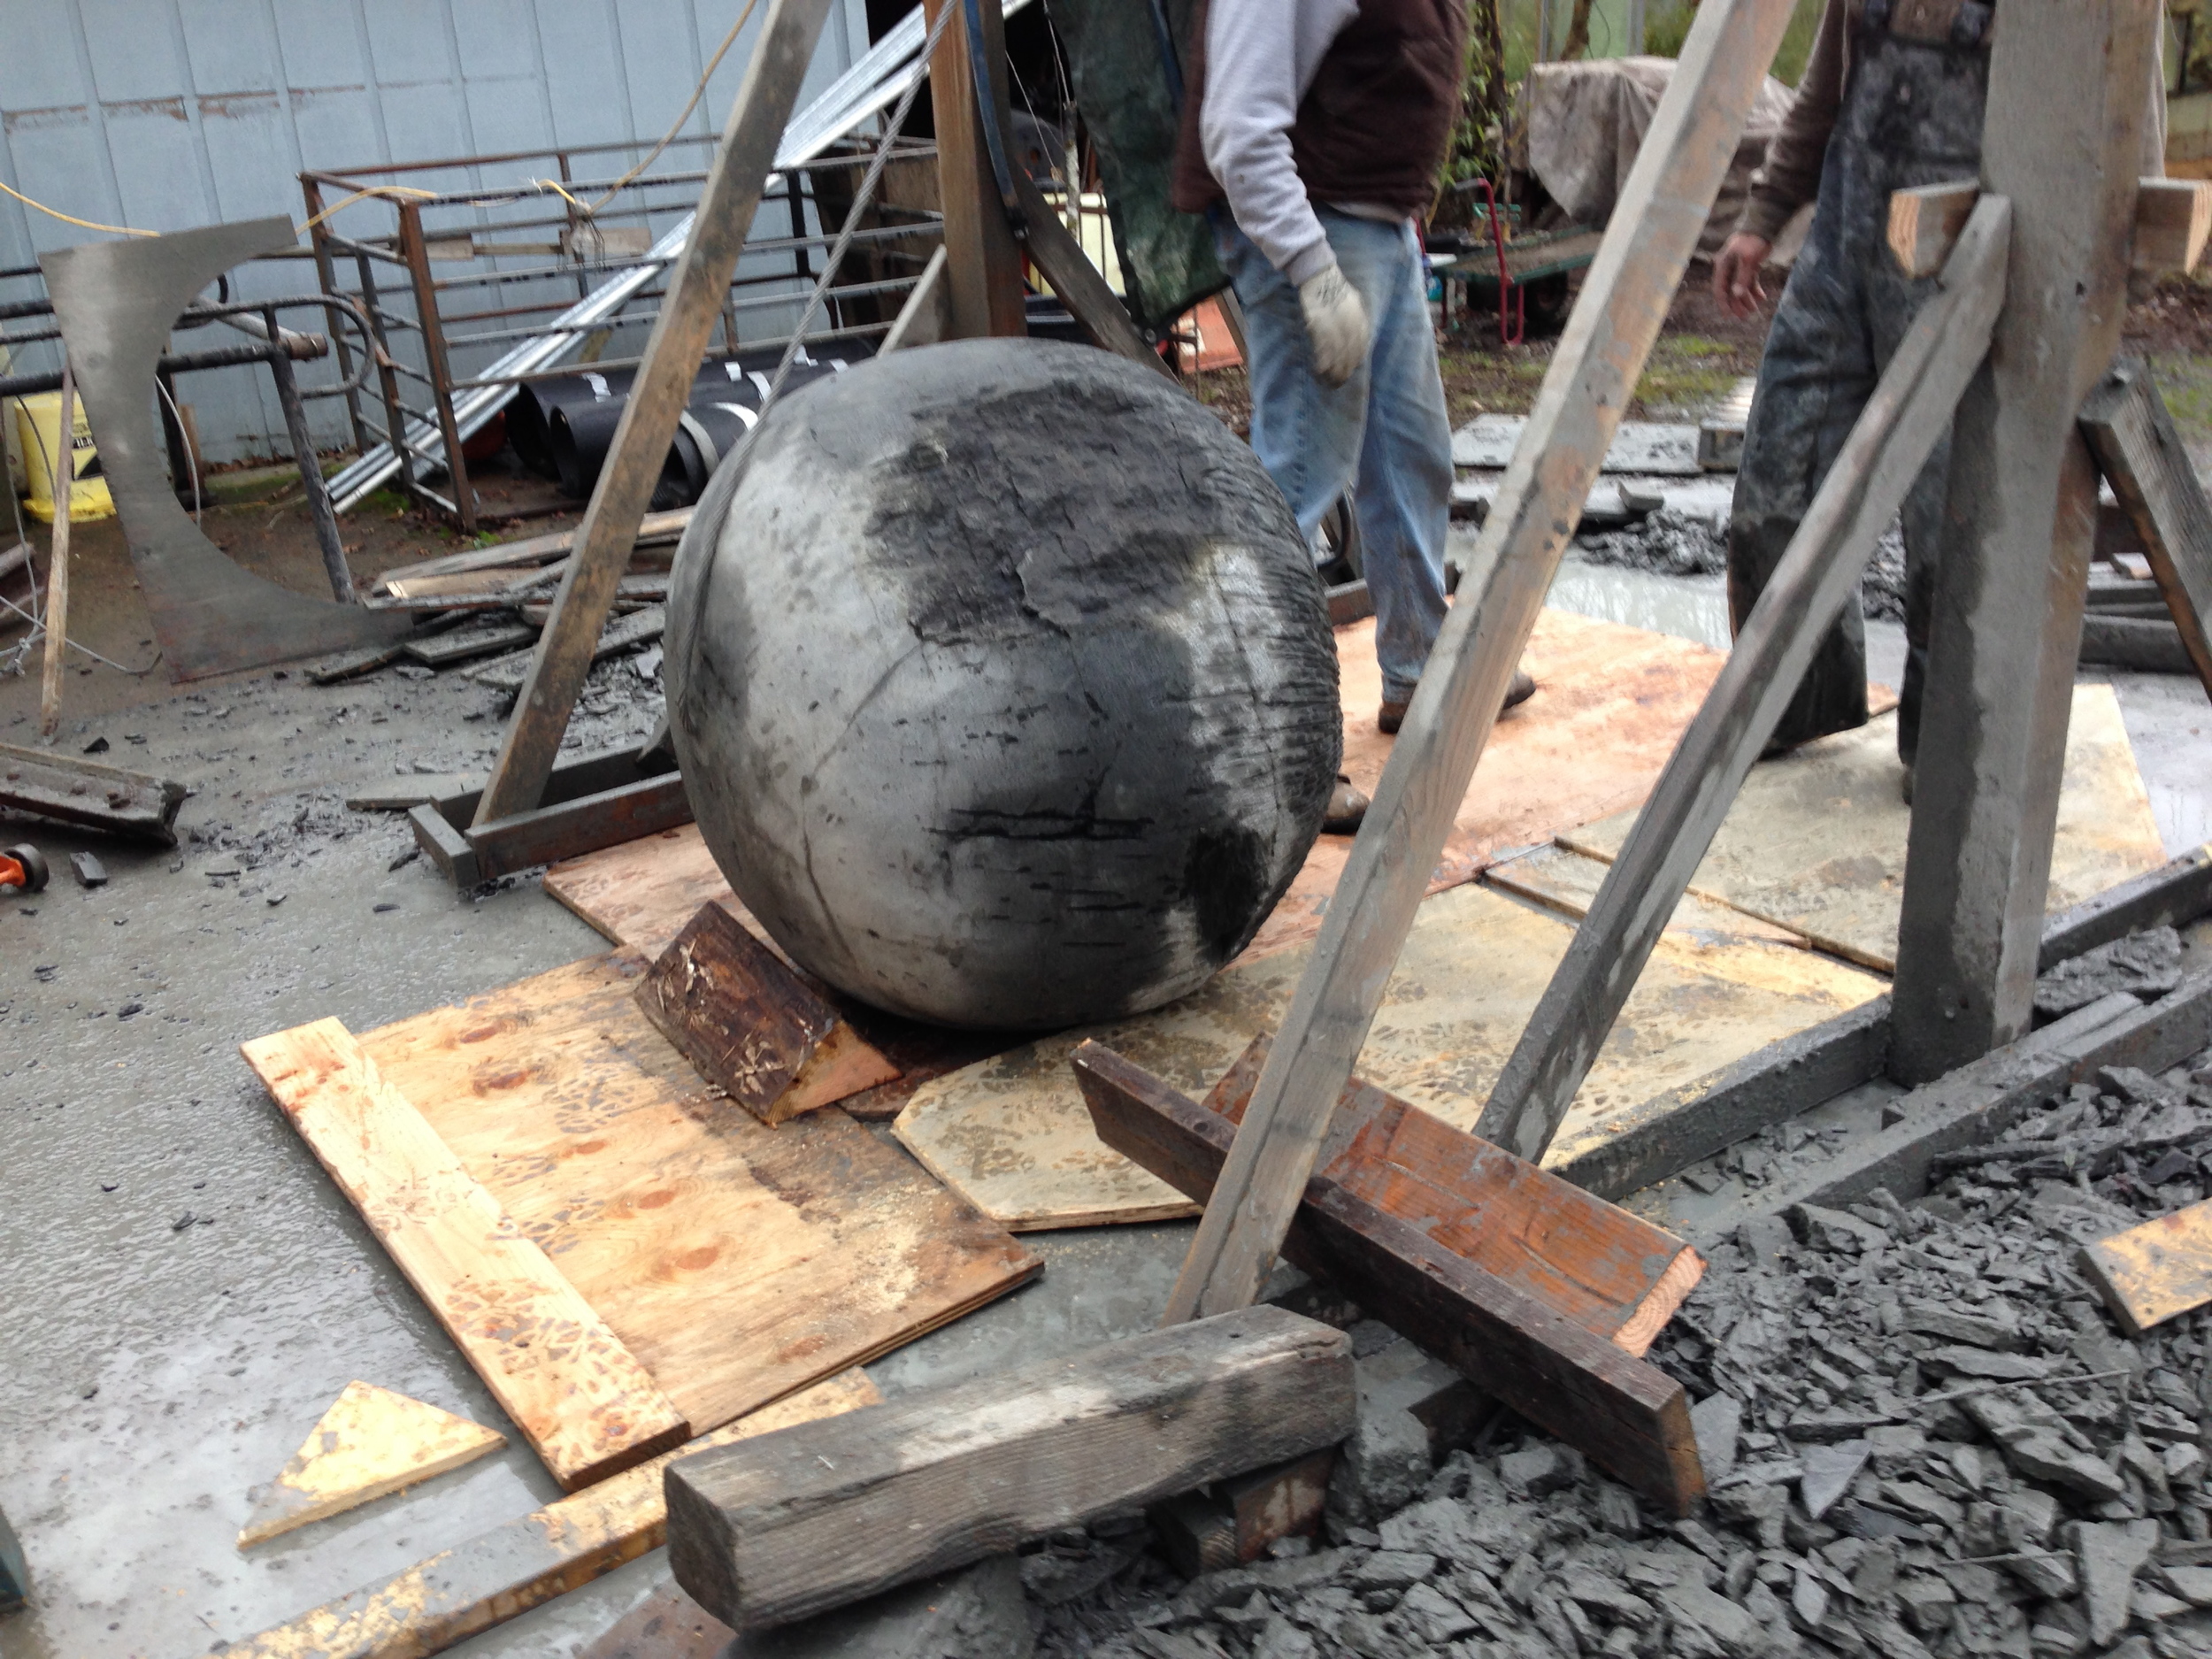
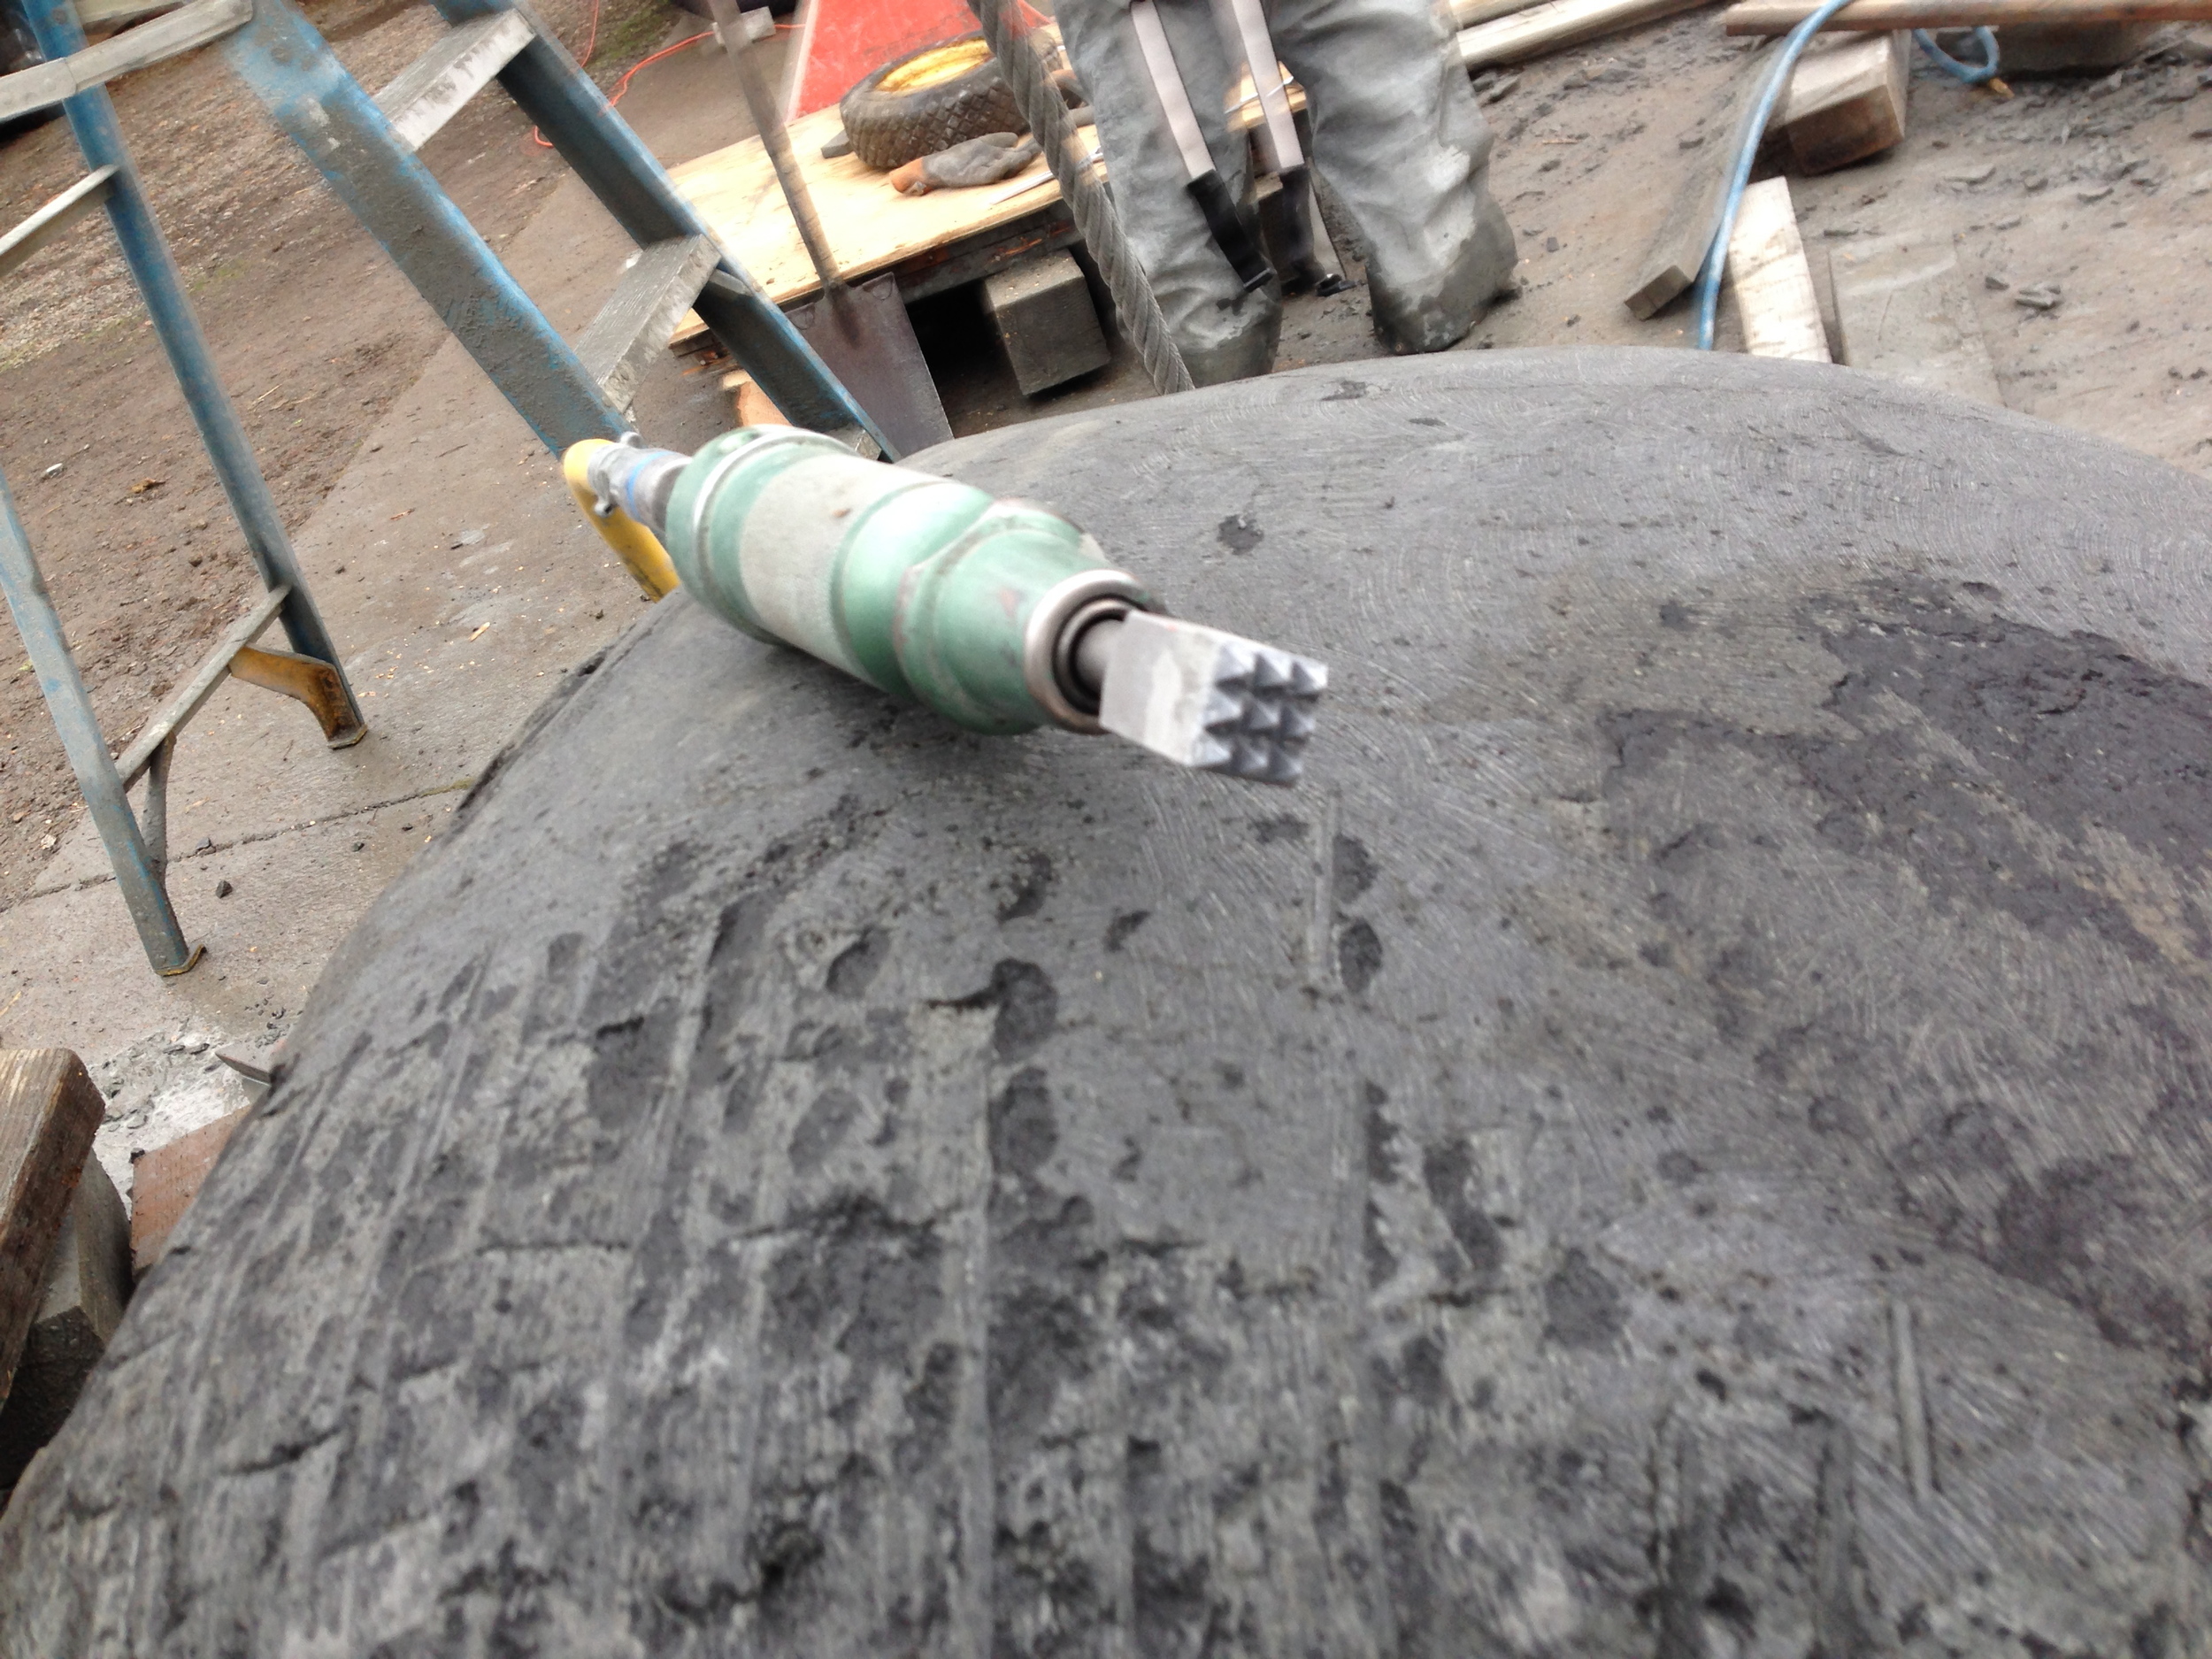
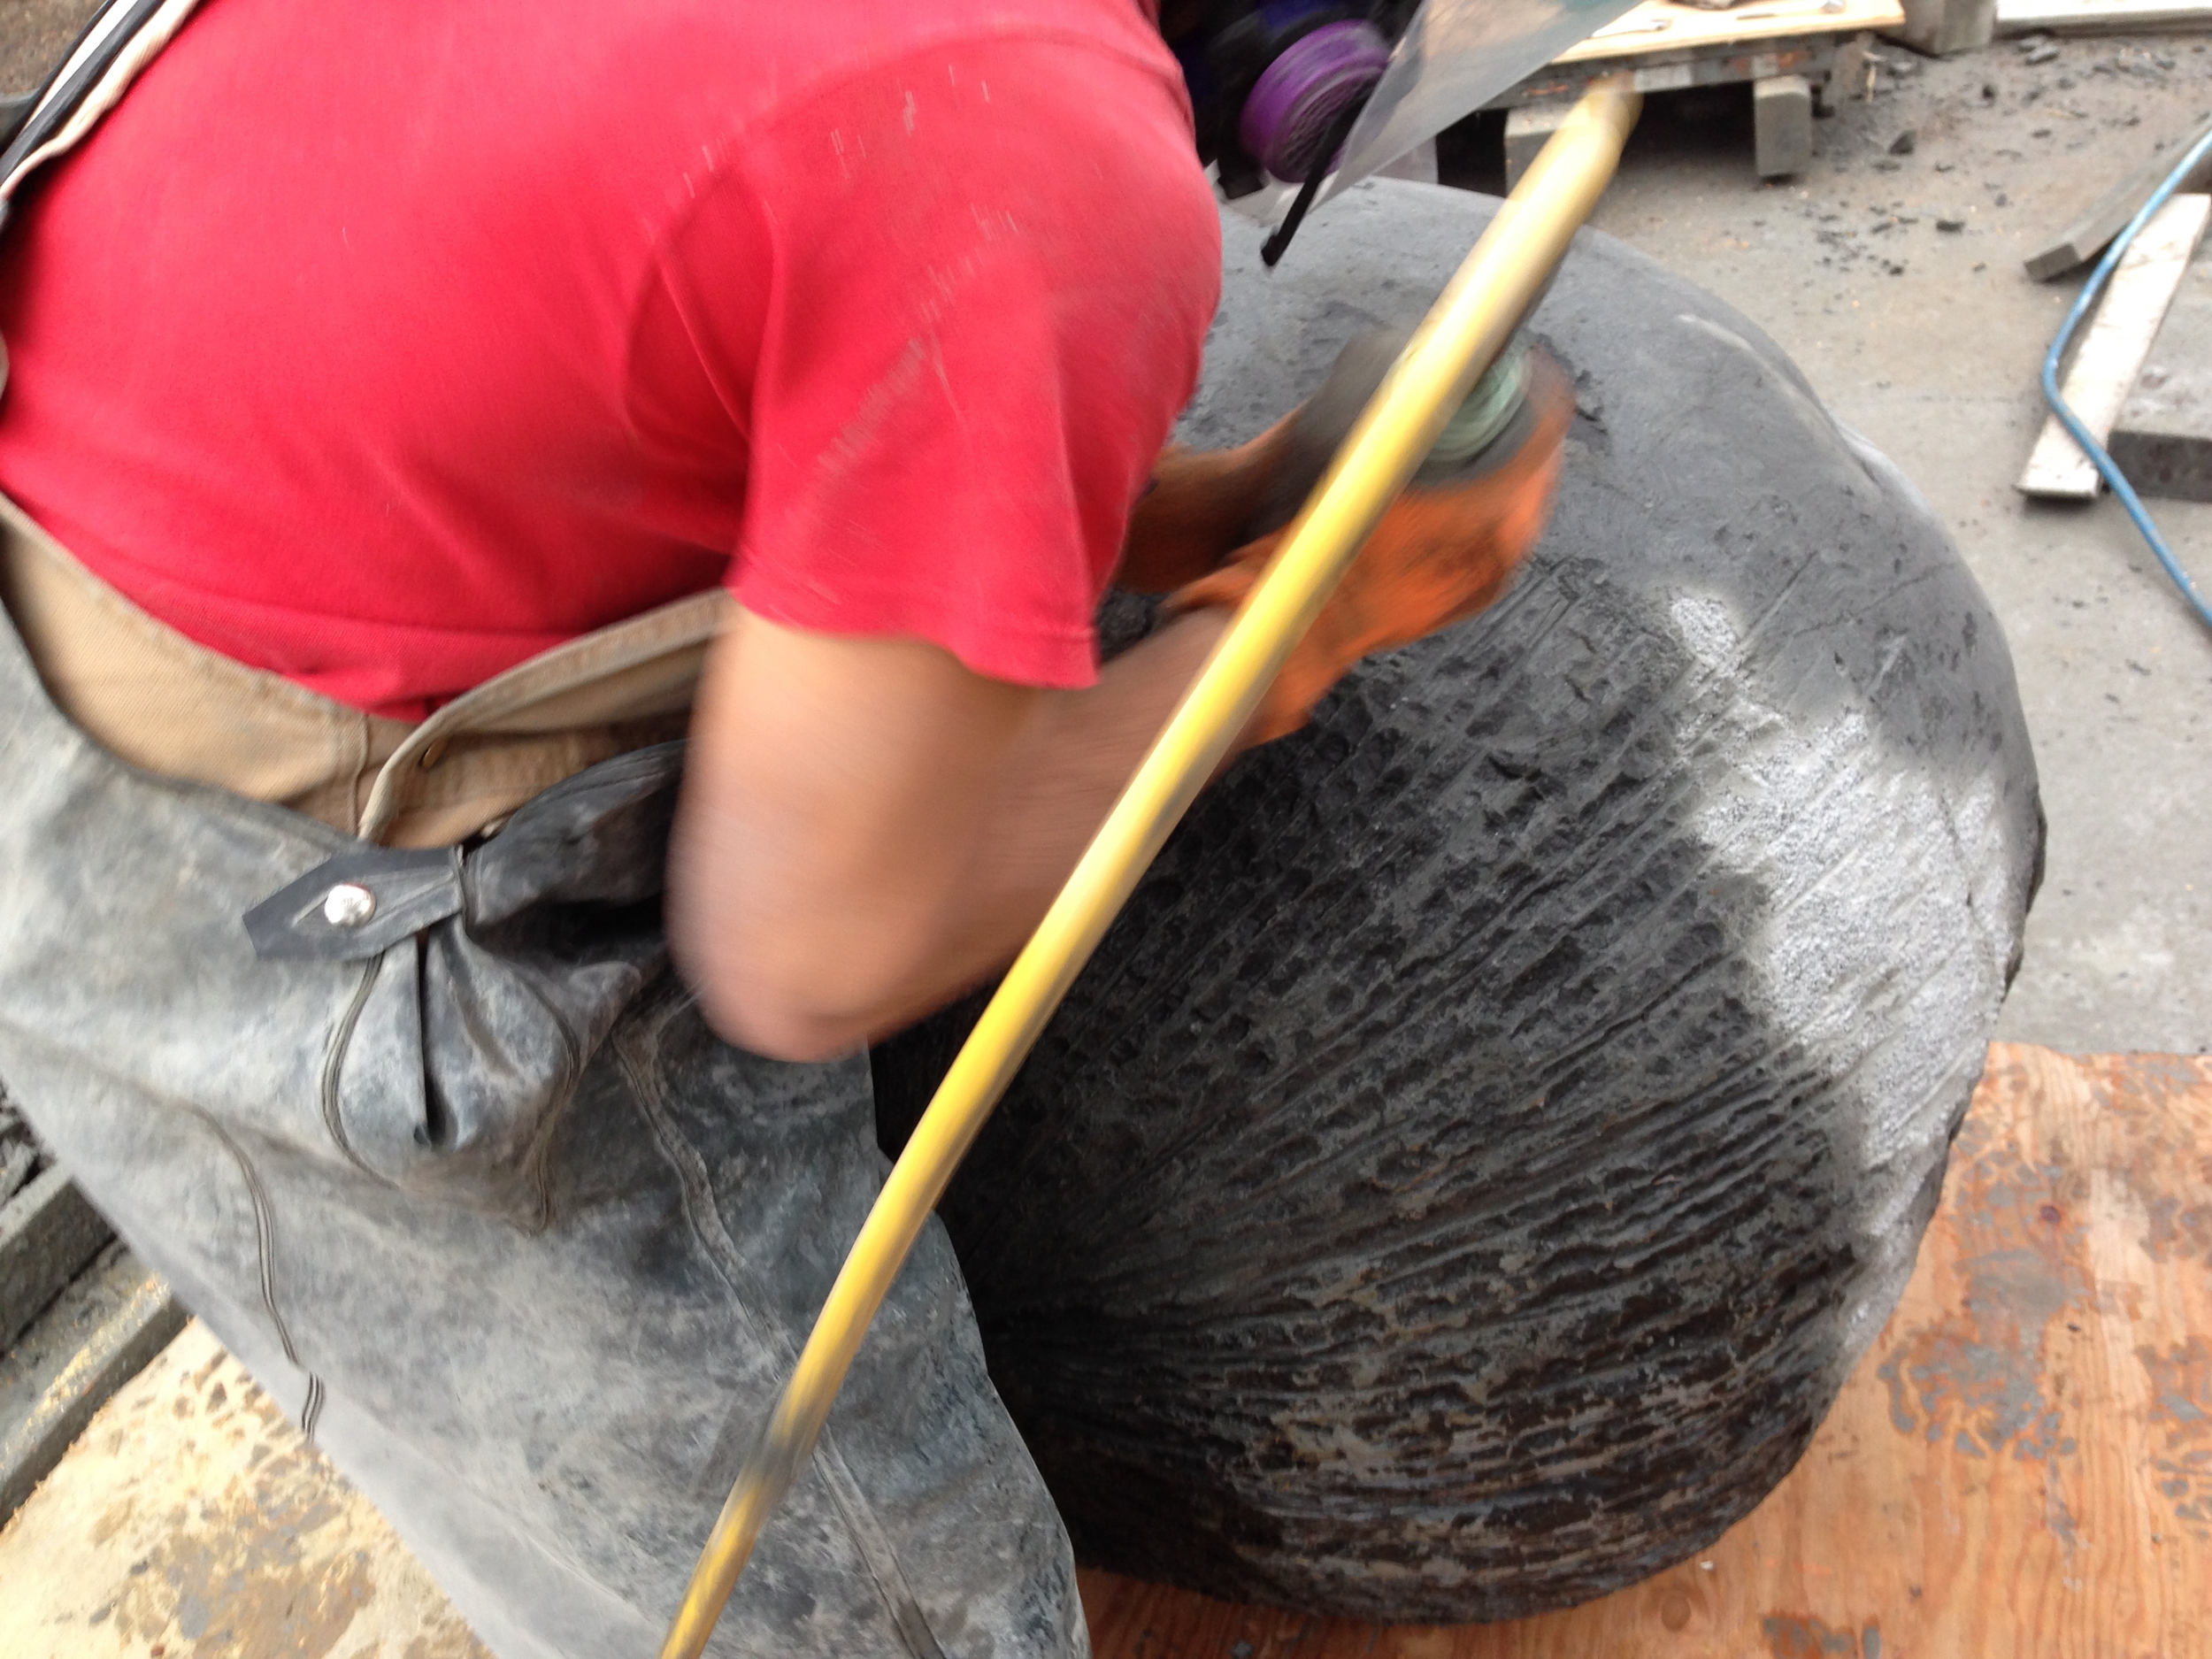
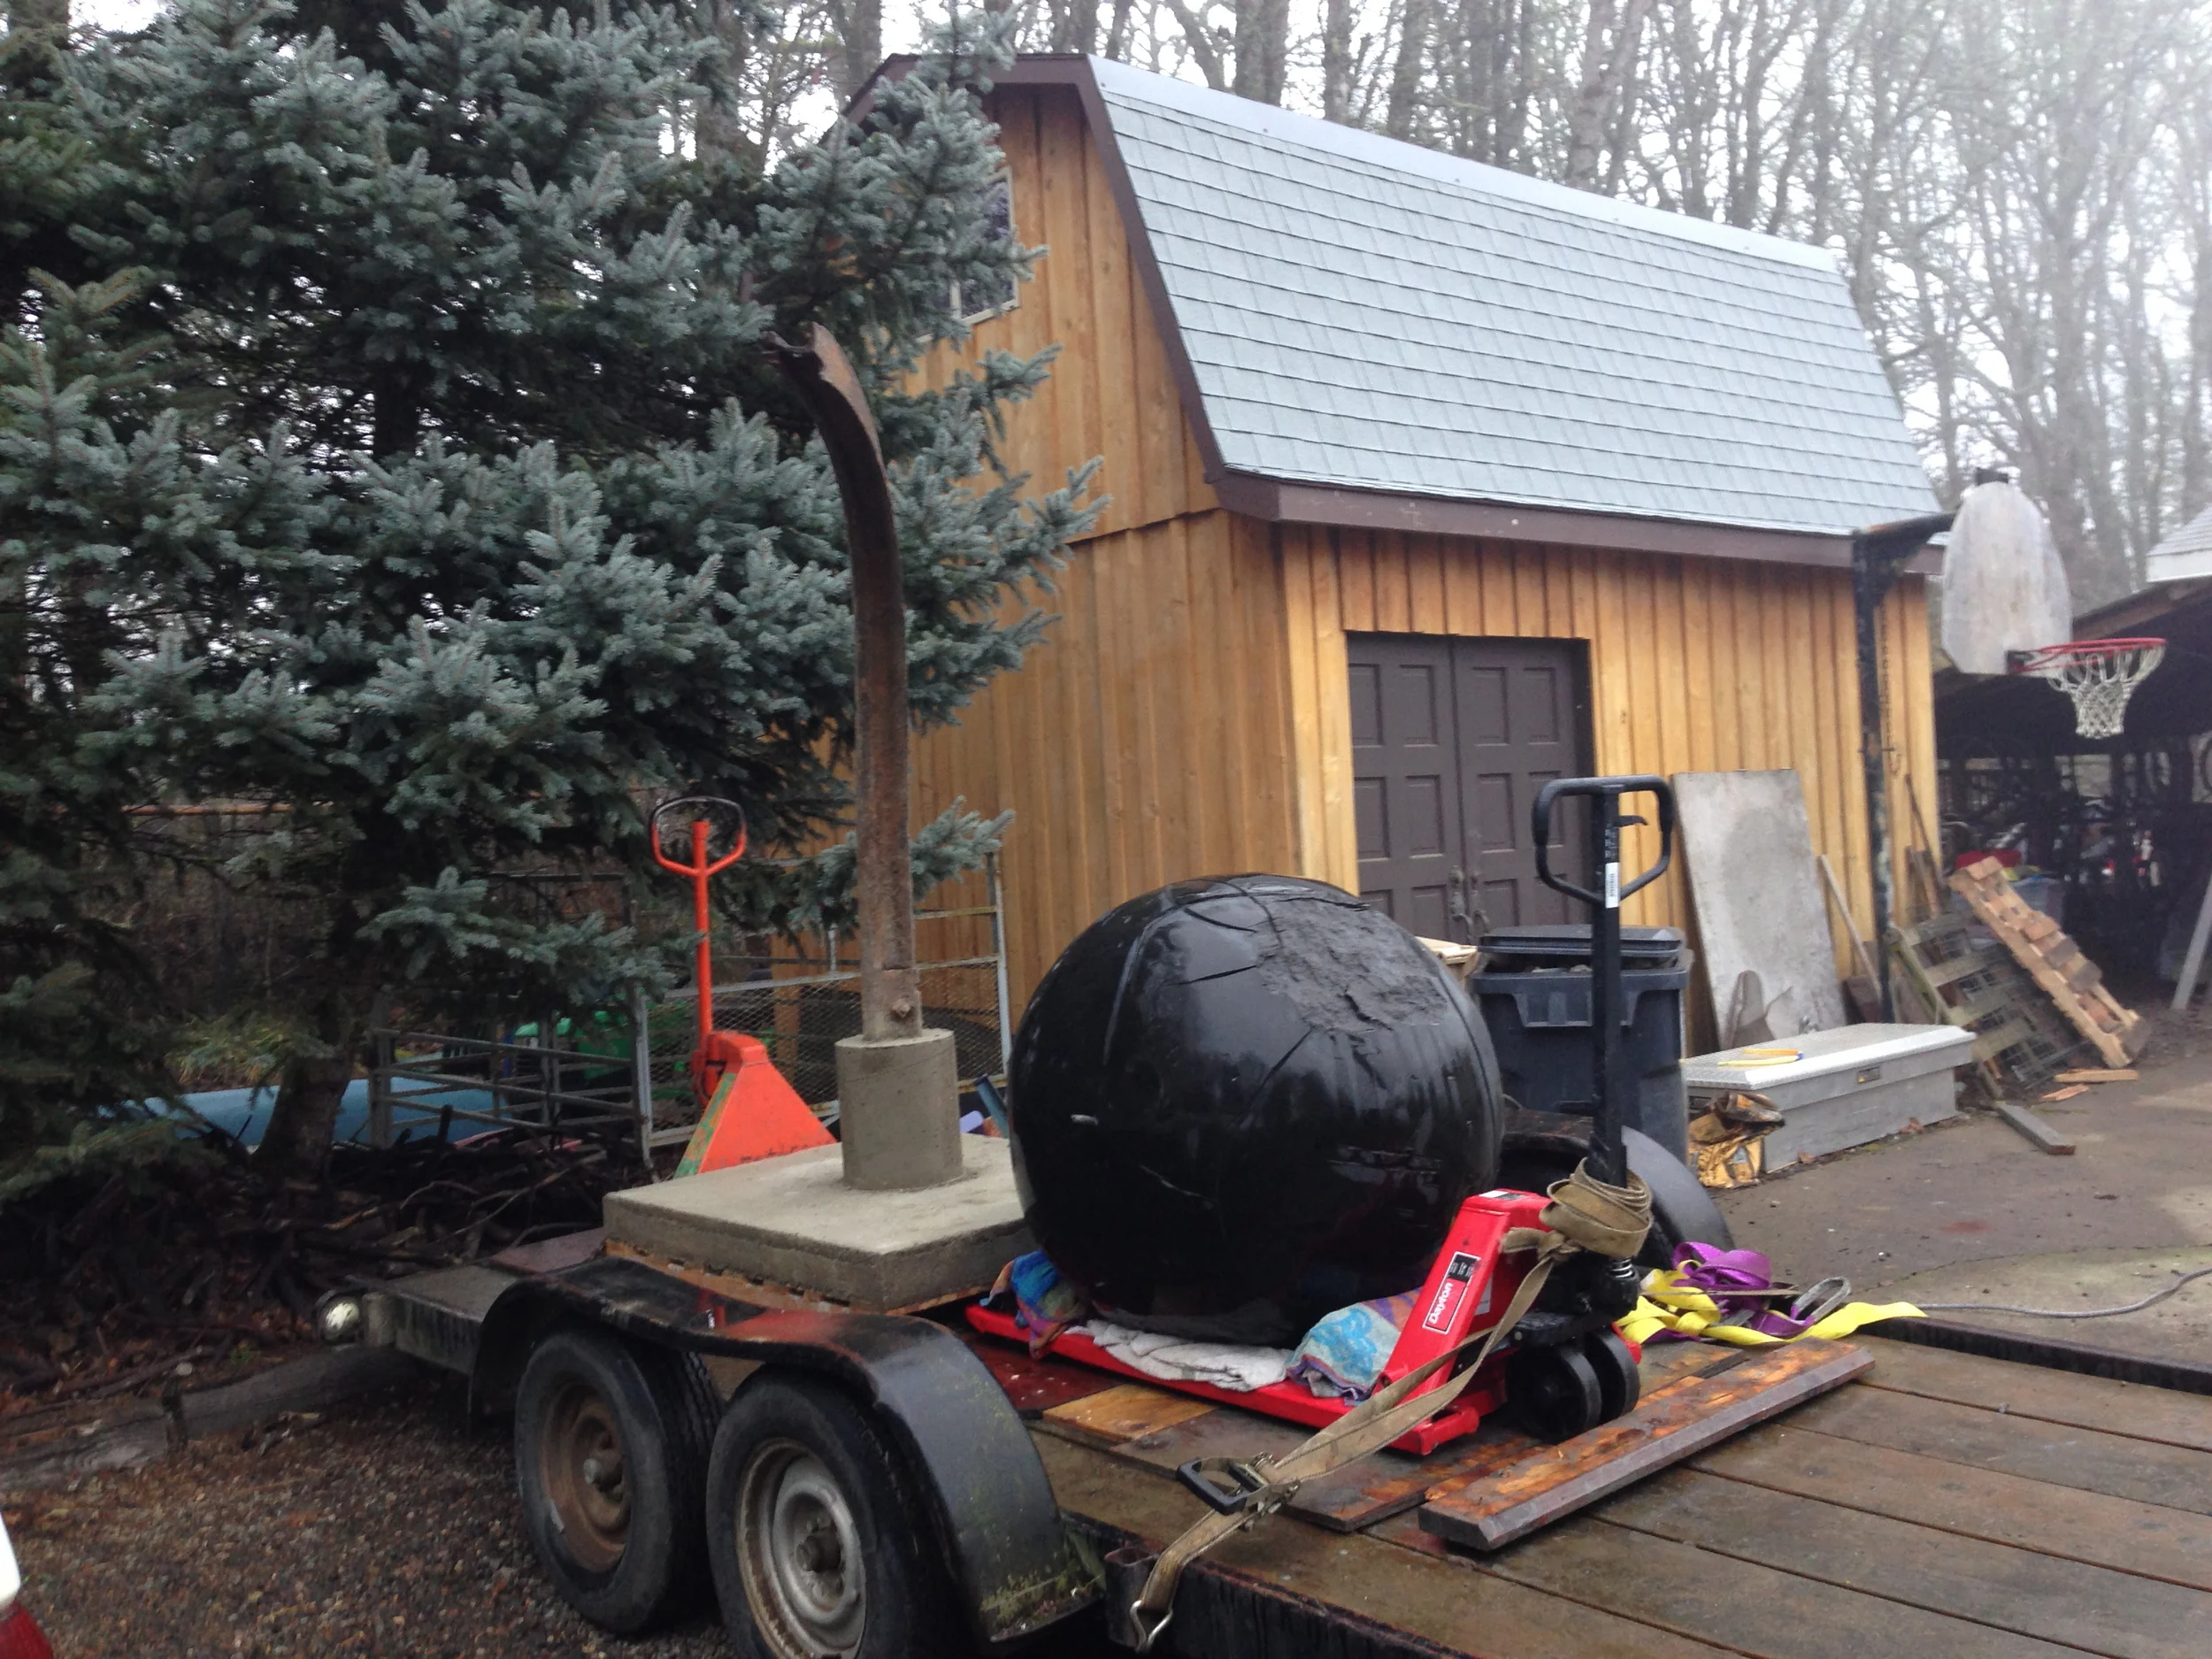
Never carving stone before this was a huge learning curve in a short span of time.  From start to finish i honed this block into a sphere and polished it in 10 days time.  Learning tricks and short cuts on the way to make the process go faster, i did what i could to make this project come together on the due date.  From hand chiseling to pneumatics to hot saw i quickly learned i was naive to think this process was done by hand.... and it may well be, but not in ten days, by me.  It was a slow laborious process and most of the challenges came when i had to figure out how to rotate this behemoth stone.  On my first attempt the rock blasted through one of my frame supports with out hesitation.  I (we; help from friends at times) got smarter and better at controlling it as it rotated. It was a constant effort to work with the stone, not against it and all and all i am stoked at the outcome.  For a project with zero budget i gave it my best and the response has been full of curiosity which i find encouraging.   

Comment
Floor joist and Set Post

3/4 inch plywood was then fastened on the top.

Roof Rafters
Roof Rafters

Over reaching the wall lines to give "nest" effects.

Ceiling In Place
Ceiling In Place

Note the sky light in the center.

Making Roof Measurements
Top View
Top View

Glass and steel roof.  Looking out over Klamath Wildlife Refuge...DRY!

Back Wall
Back Wall

Constructed of Cedar.  Also showing a view of the Skylight beam with weather proof glass installed.

Rip-Rap Trail
Rip-Rap Trail

A slow trail to the top was eventually put in for the visitor to enjoy their walk up to the Aerie.  Completed with stone benches and cobble stone sections...this trail was created for even Sisyphus to leave his burdens behind.

Trail Map
Trail Map

*not to scale

Winter Sunset
Winter Sunset

Windows completed

Front Windows
Front Windows
Bendo Board Trim
Bendo Board Trim

Madone post framed by window frames with scribed bendo board for sealing

Bendo Board Trim
Bendo Board Trim

Madone post framed by window frames with scribed bendo board for sealing

Windows On the Inside
Door and Nest Atop
Door and Nest Atop

The Door is three layers of Shiplap.  Vertical on the outside and Diagonal on the Inside.

Chinkapin Flooring
Chinkapin Flooring
Oiled Cedar and Chinkapin FLooring
Left Over Madrone Poles Weaved into Entrance
Railing and Front Deck
i
i
Finished
Finished
Looking up From the Trail Below
View Stone Bench on Trail
Floor joist and Set Post Roof Rafters Ceiling In Place Making Roof Measurements Top View Back Wall Rip-Rap Trail Trail Map Winter Sunset Front Windows Bendo Board Trim Bendo Board Trim Windows On the Inside Door and Nest Atop Chinkapin Flooring Oiled Cedar and Chinkapin FLooring Left Over Madrone Poles Weaved into Entrance Railing and Front Deck i Finished Looking up From the Trail Below View Stone Bench on Trail

Lower Klamath Aerie

April 16, 2015

I was sought and hired to create a nest upon a rock out cropping for the birds and people.  The idea came to the clients as a way to enjoy the birds from their level and perspective.  This is nothing short of that.  While constructing this symbiotic haven I have had many experiences that have moved me.  Being within arms length of a Kestrel perched on the nest, looking down on a Golden Eagle soaring right below me...rock wrens, meadow larks, pelicans, geese, sand hill cranes and ravens...clucking? With Shasta prominent in mornings and evenings she began to glow as the snow geese shed their feathers during the migration season. So much to learn and it is all comes, if one lets it.  

But this was not my first impression when I surveyed the sight...it saw dry, desolate land with a nice view of Mt. Shasta....  There was no road to this perch, not even a trail.  No power. Nothing but jagged bed rock protruding from the hillside.  In the rain shadow of Mt. Shasta, high desert, hot as hell in summer and cold as the dickens in winter, and always windy.  Recently, 100 mph gust.

The clients had a grove of Madrone in the Willamette Valley needing thinning and we wanted its curvy, natural quality. Left over Chinkapin Flooring from years before, and some utility cedar.  With no reason to say no I emailed him a quote from Tinkers by Paul Harding titled: How to build a Bird Nest and said "sure".

It began with hiking Madrone , tools, branches, generator, more Madrone and cedar up to the site. By using a concrete drill with a generator i was able to set re-bar to the Rock and slide post over the re-bar.  I then fastened all-thread that passed through the post and into the rock using the same method and anchoring it with concrete epoxy.  This was too tie the building down to keep it grounded in the wind. 

A modest, level platform was then created. Using more Madrone for rafters and one with a divided trunk for the center beam the framing was completed.  This center beam was used to create a natural skylight to be able to view up into the nest!  Utilizing ship-lap fir from an old barn down the road, I sanded and oiled them for the ceiling.   Then Cedar walls were applied on the back side for warmth, and off-kilter windows were puzzled into each open space.

The trick came with trying to figure out how to seal between the window frame and the wiggly Madrone post. It was important that the Madrone stayed present and in this method, the shape of the post were embellished.  This was not easy, but i used bendo board scribed to the post with a flat edge against the window frame for sealing. I then Routed a line down the post for this bendo board to fit into...Very tedious process and i wish such a task on no one.

The door was constructed out of the same ship-lap.  And with little moisture in this climate, a steel roof was applied so it would rust and blend in.  The Chinkapin Floor was installed, simple decking and long branches atop for a nesting platform! 

This Sanctuary was created with a Zen like quality in mind.  Simple, ruff, natural outside; clean, smooth, fine detail inside....stepping into meditation room.


Comment
Proposal
Proposal

Submitted sketch for the Autumn Lights Festival

To Contrast With Sketch
Mounted to Ceramic Wheel

I mounted this 11 ft plywood platform to a ceramic wheel so i could have the wheel spin while i etched the growth rings within.

Platform Rough Cut
Platform Rough Cut

3/4 inch Plywood Platform

Mid Way Through Etching

Outside shaded part is the "bark"

Etching Detail
Etching Detail
Finished Etching...The Heart
Platfrom View
Platfrom View
Disc Fountain
Disc Fountain

Support foundation set up in site disc fountain

Laying Platform Down

Can see the wiring for the LED's that will sit through the holes.

Platform and Undernieth
Plaform View With Holes
Platform and Disc Fountain

Before Black Felt is layed down.

Laying out the Glass Panes

Tedious Process to line them up Correctly.  Notice the holes in the glass for the LEDs to sit atop glass and below the Redwood blocks.

Finished Laying Out Glass

LEDS set, Ready for Redwood Blocks.

Redwood Blocks Glued Down
Proposal To Contrast With Sketch Mounted to Ceramic Wheel Platform Rough Cut Mid Way Through Etching Etching Detail Finished Etching...The Heart Platfrom View Disc Fountain Laying Platform Down Platform and Undernieth Plaform View With Holes Platform and Disc Fountain Laying out the Glass Panes Finished Laying Out Glass Redwood Blocks Glued Down

The Redwoods @ #Oaklandalf

April 15, 2015

Autumn Lights Festival @ Lake Merrit in Oakland, CA. 

I had found 40 or so redwood blocks in a burn pile up in the mountains, hiked them out and and wanted to do something with them. I have always thought of Redwood as sacred...no scraps are too small to utilize.  When the opportunity came up for the Autumn Lights Festival a year later I went and checked out the site with this concept in mind; using glass to cast a reflection and to contrast a round stump with a city-scape.  This contrast was important to me because it was a public show and something all walks of life in the Bay-Area could relate to.  To my complete surprise the platform was sitting right at the Garden entrance...this 10 ft-diameter disc-fountain, empty and dry from the years drought, waiting for a glass stump. 

Finding glass in the classifieds I was able to cut it into 12" x 12" panes to lay out in a grid on this platform.  I scribed the circle and broke each curved line by tapping on the scribe line to create the rounded edges. 

Using a froe, I cut the outer 1/2 inch perimeter of each block off creating a cube core.  Removing the core and gluing the perimeter pieces back together created a hallow "box".  Using a router and different sized Jigs I created windows that would mimicked the tall buildings in Oakland at night. Then cut and fit a steel lid to slip over the top to force the LED lighting out the windows.

After finding the appropriate spots for the buildings I went on to figure out how to drill holes in glass.  I was told the glass was too thin and would heat up and fracture on me. So i bought my own diamond core bit, got a tub of water and made it happen.  Some did pop on me but i was far more successful then the glass company lead me to believe i would be.  The key was to do it fast and underwater so the glass wouldn't have time to heat up!

Finally, I placed a painters plank between two ladders.  While laying down for hours on end, I turned the ceramic wheel on and worked my way to the center with diamond bits on a dremel tool, etching each year, to create a mock stump.  

This was all done in a barn in the Sacramento Valley, in a little farm town called Colusa. I then packed everything in my pick-up and re-assembled this piece at the Gardens in Lake Merritt for the weekend fundraiser in October of 2014.  I put felt between the glass and plywood because, in my observations of reflections, it is the dark waters in contrast with the light sky that creates them.  The LED's plugged into my wiring and snapped in with spring-loaded wings giving me a tight, clean weather proof look. Using hot glue, each building was set in its appropriate place.    

1 Comment
Side Profile Sketch
Side Profile Sketch
Roof Sketch
Roof Sketch

Using butyl tape for sealant and manufactured aluminum bar cap for clamping worked great.  *Must  crimp the bottom of bar cap to keep glass panes from shifting as the butyl tape softens in the heat.*

Foundation
Foundation

Poared concrete footers for each post then leveled gravel for clean work space.

Wall Contsturction
Wall Contsturction

The glass is set into a dado cut in post.  Gives it a clean finished look and is sealed.

Glass Inset Close-up
Wall Construction
Wall Construction

This was the puzzle building aspect.  Every quarter inch was accounted for to make sure glass was set correctly and space for opening windows was also sufficient.  

Tall Window Detail
Tall Window Detail

Once this base was set i was able to slide a longer pane into the dado then frame around the upper part of the glass separately.

Framing Complete
Framing Complete

Top-plate on!  With a little corner bracing the walls are sheered.

Ridge Beam Up
Ridge Beam Up
Rafters Up
Rafters Up

It was crucial to be critical with distance between each one.  There HAD to be a gap between the glass on each rafter for screws through the bar cap, but also HAD to catch the glass with @ least 1/2 in for resting.  (rough cut lumber was not advantageous but once completed it looked great!)

Glass Roof Installed

With help from a brother and Bob we got the roof up in a day. A little rain on the butyl tap caused a couple panes to slide out from under us...but we never broke one pane!

Glass Close Up
Glass Close Up

Bar Caps and clear, clean glass...

Framing For The Gable Ends
Gable Ends
Gable Ends

Glass framed and slid within each opening.  Clean, sealed.

Complete
Complete
Clean Glass Overhang
Night Time
Night Time

Outdoor Room

Side Profile Sketch Roof Sketch Foundation Wall Contsturction Glass Inset Close-up Wall Construction Tall Window Detail Framing Complete Ridge Beam Up Rafters Up Glass Roof Installed Glass Close Up Framing For The Gable Ends Gable Ends Complete Clean Glass Overhang Night Time

Glass House

April 14, 2015

January, 2012:

As a rookie college graduate I was eager to begin teaching myself the trade of building. I dug to my roots and remembered a man I trapped gophers for.  Bob.  He had mentioned that he dreamed of having an all glass green house.  At the time (1998) he had purchased 80 (60 – 28x68 and 20 – 20x83) panes of tempered glass from the classifieds.  In August of 2011, I looked him up. He had just received a bid to do a polycarbonate roof with pressure treated framing.   I flinched at the demise of a dream and the ruins of such potential. I asked if he was interested in all glass?  He said yes but wanted to see plans and know how I was planning on doing a glass roof.  I asked him for a week to do research.

I came to him with drawings and a list of materials needed.  He asked if knew what I was doing.  I honestly replied, “no.” But assured him I would find a way and he wouldn’t regret it.  After a pause of wonder, he said sure.

The space had already been excavated. He wanted cedar, opening windows, power and water.  The rest was an open pallet for me to play with.   I used the glass as tangrams to create the whole space.  Using All but one piece of glass I designed and engineered the structure.

For me, it was not about production building.  It was a rare opportunity to do something unique.  I have always admired glass for its clarity, strength, and versatility.  In school, a teacher told me that you there was nothing you could not do with glass.  That stuck with me through out the project. When obstacles arose, I had done enough research and developed resources to overcome them. When finished, I asked if he was happy.  His response was simple, yes. And it was great.

Since then I have stopped by to check up on the building and Bob.   He gets excited to show me what he has done up there.  He claims that when the sun comes out, with in 30 minutes it is 90 degrees in there (this is February in Oregon).  I have come to learn that this makes an avid gardener very happy.  He has his entire garden started from seeds including grafting his own tomato plants.

It is great to see it functioning in the way that he wanted.  However what I enjoy more are the text I get from him hearing that he and his wife are sitting in the glass house, over looking the valley watching the lightning and listening to thunder and the ambiance of rain falling on glass.  It is perched up on a hill that over looks the Willamette Valley, and on a clear day the Three Sisters of the Cascades are gleaming.

1 Comment